Manual channel set, Delete a channel, Change station channel position – JVC DR-MH50S User Manual
Page 75: Subsidiary settings, Press set up to access the main menu screen, Repeat steps 2 – 3 as necessary, Repeat steps 3 – 4 as necessary
EN
75
SUBSIDIARY SETTINGS
Manual Channel Set
Store channels that were not stored during Auto Set Up
(
A pg. 17), Preset Download (A pg. 18) or Auto Channel Set
(
A pg. 74).
1
Press SET UP to access the Main Menu screen.
2
Press selection keys to select
AINITIAL SET UPB, then press
G.
3
Press selection keys to select
ATUNER SETB, then press G.
4
Press selection keys to select
AMANUAL CH SETB, then press
ENTER. The Manual Channel Set screen appears.
5
Press selection keys to select
AEDITB, then press ENTER.
6
Press selection keys
to select a blank
position in which you
want to store a
channel, then press
ENTER. The
Confirmation screen
appears.
7
Press selection keys
to select
ABANDB, then
press ENTER.
8
Press selection keys
to change the band
between CH (regular)
and CC (cable), then
press ENTER.
9
Press selection keys
to select
ACHB, then
press ENTER.
10
Press selection keys
to input the channel
number you want to
store.
●
To enter the registered station name (
A pg. 88), press
selection keys to select
AIDB, then press ENTER. Press
selection keys.
●
For fine tuning adjustment, press selection keys to select
AFINEB, then press ENTER. Press F G to perform fine-tuning.
●
When storing a channel that sends scrambled broadcasts,
press selection keys to select
ADECODERB, then press
ENTER. Press selection keys to set
ADECODERB to AONB
(
AOFFB is the default setting).
●
When
AL-2 SELECTB is set to AVIDEOB, AS-VIDEOB, ASAT
VIDEO
B or ASAT S-VIDEOB, the ADECODERB setting cannot
be changed. (
A pg. 65)
11
Press ENTER to enter new channel information. The
Confirmation screen appears.
12
Press SET UP or RETURN to close the Confirmation screen.
●
To change positions, see
AChange Station Channel PositionB
(
A pg. 75).
●
If you wish to set station names other than the ones registered
in your unit, see
ASet Stations (B)B (A pg. 76).
Delete A Channel
1
Perform steps 1 – 5 of
AManual Channel SetB (A pg. 75).
2
Press selection keys to select the channel you want to delete.
3
Press CANCEL(
L) to delete a channel. The channel next to
the cancelled one moves up one line.
●
Repeat steps 2 – 3 as necessary.
4
Press SET UP or RETURN to close the Confirmation screen.
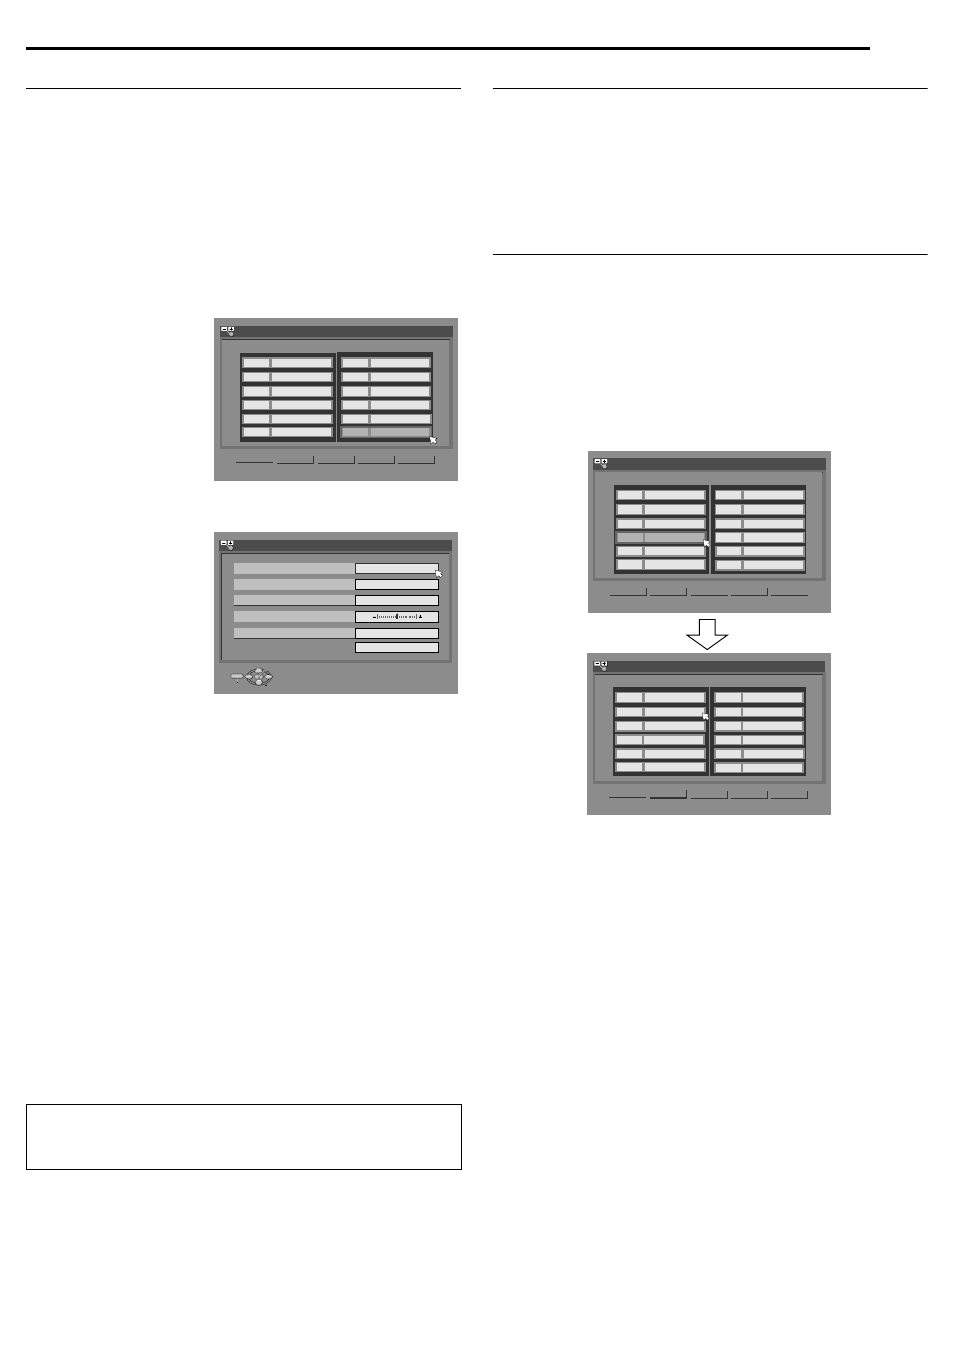
Change Station Channel Position
1
Perform steps 1 – 4 of
AManual Channel SetB (A pg. 75).
2
Press selection keys to select
AMOVEB, then press ENTER.
3
Press selection keys to select the channel you want to move,
then press ENTER.
4
Press selection keys to select the new channel position, then
press ENTER.
Example: If you moved the station in position 4 to position 2, the
stations originally in positions 2 and 3 each move down
one space.
●
Repeat steps 3 – 4 as necessary.
5
Press SET UP or RETURN to close the Confirmation screen.
ATTENTION:
Guide Programme numbers are not set when channels are
stored manually. (
A pg. 73, Ac System SetupB)
(Example) To store in position 12.
The programme currently received on the
selected channel position appears behind
the confirmation screen.
<
>
PR
PR
01
C01
----
02
02
CTEA
03
05
1000
04
C79
3SAT
05
01
9LIV
06
04
AB3
07
----
08
----
09
----
10
----
11
----
12
----
MOVE
INITIAL SET UP > MANUAL CH SET
EDIT
RETURN
CH
ID
CH
ID
2
----
INITIAL SET UP > MANUAL CH SET
BAND
CH
ID
FINE
DECODER
RETURN
CH
OFF
SELECT WITH @ THEN PRESS [ENTER]
ENTER
SELECT
SET UP
EXIT
PRESS [SET UP] TO EXIT
<
>
PR
PR
01
C01
----
02
02
CTEA
03
05
1000
12
----
05
01
9LIV
06
04
AB3
07
----
08
----
09
----
10
----
11
----
04
3SAT
<
>
PR
PR
01
C01
----
02
C79
3SAT
03
02
CTEA
12
----
05
01
9LIV
06
04
AB3
07
----
08
----
09
----
10
----
11
----
05
C79
04
05
1000
INITIAL SET UP > MANUAL CH SET
INITIAL SET UP > MANUAL CH SET
MOVE
EDIT
RETURN
CH
ID
CH
ID
MOVE
EDIT
RETURN
CH
ID
CH
ID