Getting started, Parts identification/getting started – JVC RX-6030VBK User Manual
Page 7
5
AM
LOOP
FM 75
COAXIAL
AM
EXT
ANTENNA
FM 75
COAXIAL
FM 75
CO
AXIAL
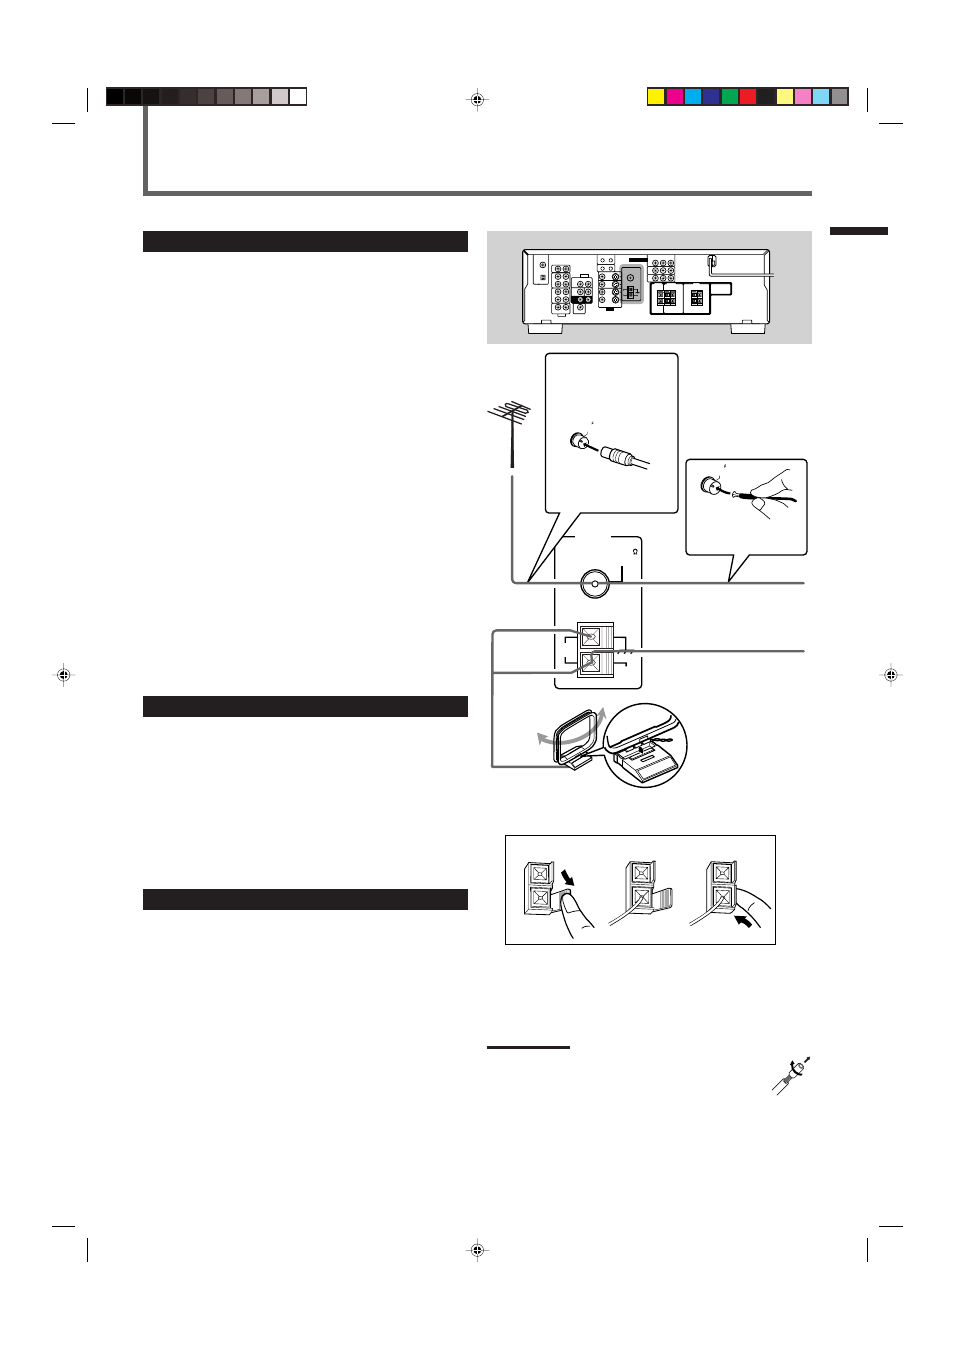
7 How to connect the AM antenna cord
1
Open the terminal.
2
Insert the AM antenna cord.
3
Close the terminal.
Notes:
• If the AM loop antenna wire is covered with vinyl, remove
the vinyl by twisting it as shown to the right.
• Make sure the antenna conductors do not touch any other
terminals, connecting cords, or power cord. This could
cause poor reception.
Getting Started
Before Installation
General Precautions
• DO NOT insert any metal object into the unit.
• DO NOT disassemble the unit or remove screws, covers, or
cabinet.
• DO NOT expose the unit to rain or moisture.
Locations
• Install the unit in a location that is level and protected from
moisture.
• The temperature around the unit must be between –5˚C and
35˚C (23˚F and 95˚F).
• Make sure there is good ventilation around the unit. Poor
ventilation could cause overheating and damage the unit.
Handling the unit
• DO NOT touch the power cord with wet hands.
• DO NOT pull on the power cord to unplug the cord. When
unplugging the cord, always grasp the plug so as not to
damage the cord.
• Keep the power cord away from the connecting cords and
the antenna. The power cord may cause noise or screen
interference. Coaxial cable is recommended for the antenna
connection, since such cable is well-shielded against
interference.
• When a power failure occurs, or when you unplug the power
cord, the preset settings such as preset FM or AM channels
and sound adjustments may be erased within a few days.
Checking the Supplied Accessories
Check to be sure you have all of the following supplied
accessories. The number in parentheses indicates the
quantity of each piece supplied.
• Remote control (1)
• Batteries (2)
• AM loop antenna (1)
• FM antenna (1)
If anything is missing, contact your dealer immediately.
Connecting the AM and FM Antennas
AM antenna connection
Connect the supplied AM loop antenna to the AM LOOP
terminals.
Turn the loop until you have the best reception.
• If the reception is poor, connect an outdoor single vinyl-
covered wire (not supplied) to the AM EXT terminal. (Keep
the AM loop antenna connected.)
FM antenna connection
Connect the supplied FM antenna to the FM 75
Ω COAXIAL
terminal as a temporary measure.
Extend the supplied FM antenna horizontally.
• If the reception is poor, connect an outdoor FM antenna (not
supplied). Before attaching a 75
Ω antenna with a coaxial
type connector, disconnect the supplied FM antenna.
Rear panel
AM loop antenna
(supplied)
If AM reception is poor, connect
outdoor single vinyl-covered wire
(not supplied).
Extend the supplied FM
antenna horizontally.
1
2
3
FM antenna (supplied)
• If FM reception is poor,
connect an outdoor FM
antenna.
Snap the tabs on the
loop into the slots of
the base to assemble
the AM loop antenna.
Standard type outdoor FM
antenna (not supplied)
Parts Identification/Getting Started
01-10_RX-60_5030[J]f
02.11.28, 13:46
5