Operation and settings, Projecting image, Settings – JVC DLA-SH7NL User Manual
Page 30: Preparation, Adjust the position of the projection screen
30
Operation and Settings
If setting for this projector is not completed, refer to
B(A Page 33) upon turning on the power
and configure the settings accordingly.
Once the basic settings are configured, this projector can
be used by simply performing the following operation
procedures.
PREPARATION:
● Remove the lens cap.
● Connect this projector to the computer. (A Page 21, 23)
● Connect the LAN cable. (A Page 24)
1
Set this projector to the standby mode, and
display the main menu
● Refer to ATurning On the Main PowerB
A Page 25), and steps 4 to 6 of
● The [STANDBY/ON] indicator lights up in red.
2
Click the
AONB button under the APowerB
item of the main menu to project the image
● The power of this projector turns on, and formatting
is done taking a few minutes. A gray image will be
displayed during formatting. The projected image
appears once formatting ends.
● The [STANDBY/ON] indicator lights up in green.
NOTE:
● You can also turn on the power by pressing the
[OPERATE I/
B] button on the projector unit for more
than one second.
● The image may flicker for a few seconds immediately
after projection starts. This is not a malfunction.
● After the lamp lights up, it takes about 1 minute or
longer for the brightness of the video image on the
screen to stabilize.
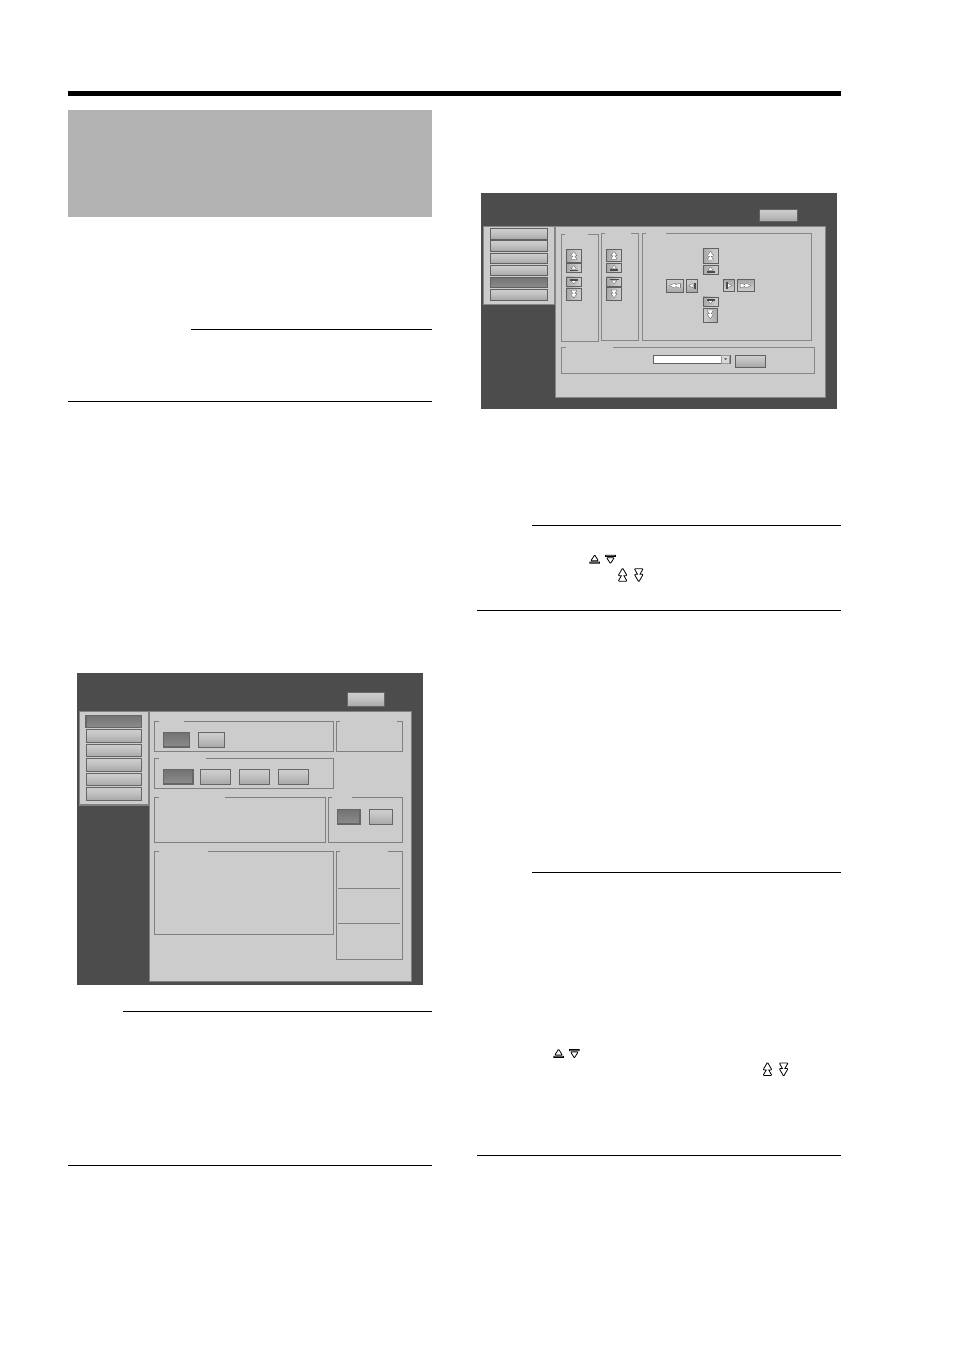
3
Adjust the zoom ratio (screen size) (when
zoom lens is in use)
You can adjust the focus using the
AZoomB item of the
Lens menu.
ⅷ To enlarge the screen size:
Press the
AWB (Wide) end of AZoomB
ⅷ To reduce the screen size:
Press the
ATB (Tele) end of AZoomB
NOTE:
● The screen size changes each time you click on the
inner buttons ( / ). (Fine control)
The outer buttons ( / ) change the screen size when
they are depressed. (Coarse control)
4
Adjust the position of the projection screen
You can adjust the focus using the
AShiftB item of the
Lens menu.
ⅷ To shift the image upward:
Press the
AUB end of AShiftB
ⅷ To shift the image downward:
Press the
ADB end of AShiftB
ⅷ To shift the image rightward:
Press the
ARB end of AShiftB
ⅷ To shift the image leftward:
Press the
ALB end of AShiftB
NOTE:
● When a zoom lens is used, the adjustment range for
lens shift is between 0 % to ±50 % in the vertical
direction, and between 0 % to ±25 % in the horizontal
direction (during single-screen display).
When a short focal length lens is used, the adjustment
range for lens shift is between 0 % to ±15 % in the
vertical direction, and between 0 % to ±5 % in the
horizontal direction (during single-screen display).
(
● The position changes each time you click on the inner
buttons ( / ). (Fine control)
The image shifts when the outer buttons ( / ) are
depressed. (Coarse control)
● The lens shift feature does not function if the lens
mechanism is secured.(
B)
Projecting Image
Main
DVI
Rate(Hz)
Pixel H
Pixel V
Link
1
60.00
2048
2400
Dual
2
3
60.00
2048
2400
Dual
4
Image
Setting
Convergence
Lens
Option
Logout
host PJ-1
user: root
Power
Signal Status
Warning Status
Temperature
Lamp Status Time
1
ok
10h54m
2
ok
11h58m
Lamp Information
Hide
Lamp
26.8 deg.C
Outside
26.3 deg.C
Inside
34.0 deg.C
ON
OFF
ON
OFF
Lamp Mode
Lamp1
Lamp2
Auto
Both
PROJECTION
None
Zoom
Setting
Convergence
Lens
Option
Logout
host PJ-1
user: root
Main
Image
w
T
Focus
+
_
Shift
L
R
U
D
Test Pattern
SET
OFF
OFF