JVC DT-V100CG User Manual
Page 5
5
5
SCAN SIZE button
Reduces the screen size (under-scan) so that
the whole screen is displayed.
6
SCREENS CHECK button
Each time you press this button, the screen
changes in the following order:
Normal screen[Monochrome screen[
Red screen[Green screen[Blue screen[
(back to the beginning)
7
MARKER button
Turns the MARKER function ON/OFF.
• MARKER function includes MARKER SELECT, ZOOM,
ASPECT SELECT, and SAFETY MARKER functions.
☞ “MARKER” on page 12
NOTES:
• Functions do not operate when they are set to OFF in the
“MARKER” menu.
• Initial setting of each function in the “MARKER” menu is OFF.
Before you use the MARKER function, you must change the
“MARKER” menu settings first.
• The ZOOM function does not operate in the under-scan mode.
• When the ZOOM function is operated, the MARKER SELECT
and the SAFETY MARKER function in the “MARKER” menu do
not work.
8
INPUT SELECT buttons/lamps
Select an input to display.
A:
Select the video signal input to the VIDEO A
terminal.
B:
Select the video signal input to the VIDEO B
terminal.
C/D: Select the signal input to the input unit (option) which
is attached to the rear panel.
• For details about how to select the input signal through
the input unit, refer to the input unit’s manual.
• The corresponding lamp of the input currently selected
lights up.
9
Power lamp
Unlit:
The main power is off.
Orange: The main power is on and the monitor is in
stand-by mode.
Green:
The monitor is on.
p
Stand-by button
Turns on and off the monitor when the main
power is on.
NOTES:
• You cannot turn on the monitor if the main power switch on the
rear panel is not turned on.
• You can set the delay time between when the stand-by button is
pressed and when the monitor actually turns on.
☞“RUSH DELAY TIME” on page 15
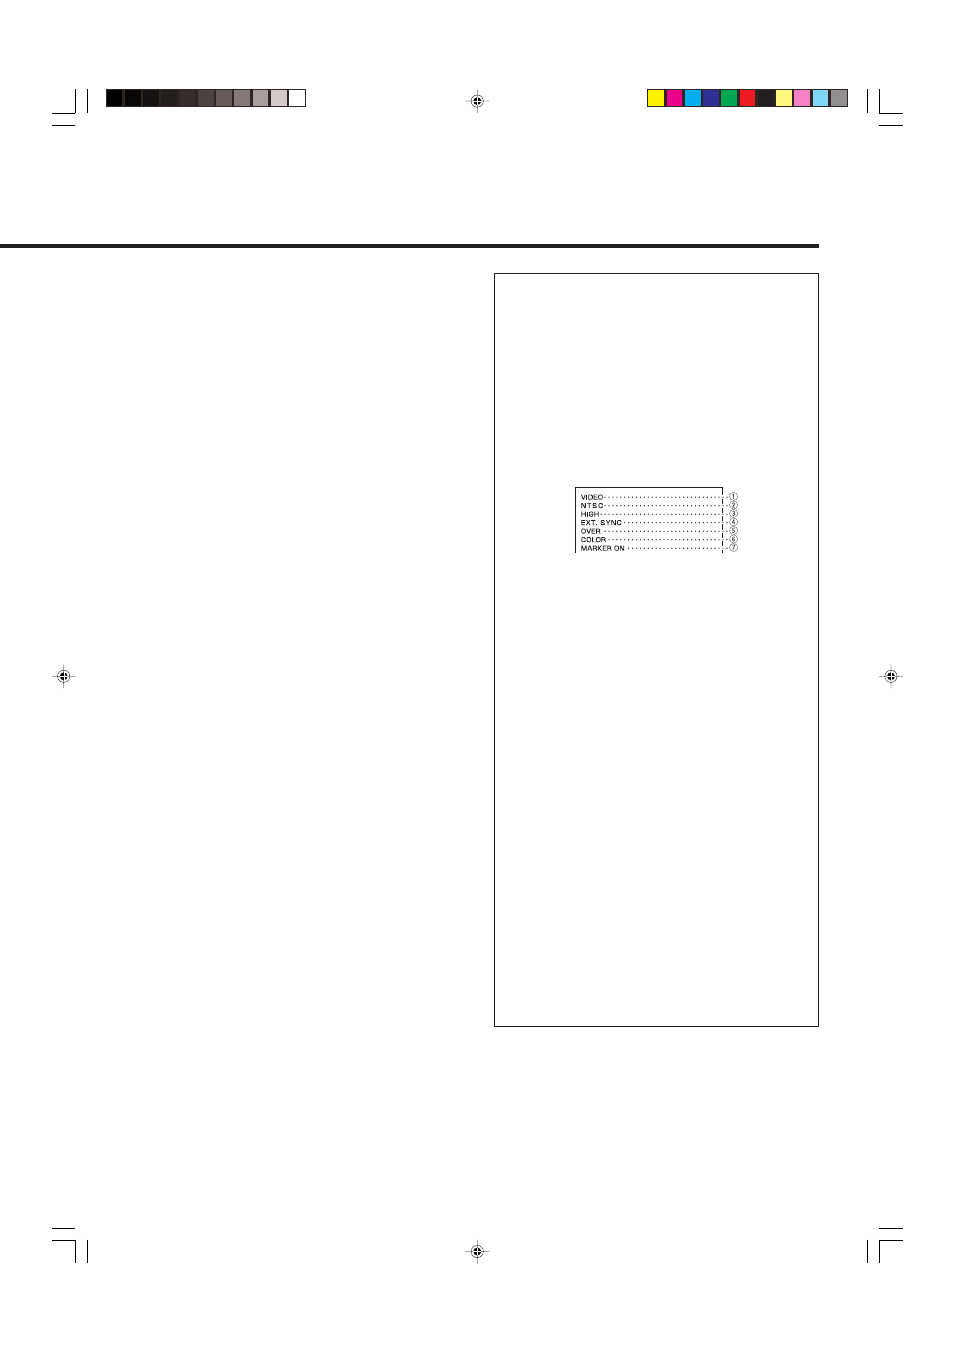
Ⅵ About the status display
Displays information of the current input selection and the
monitor settings for about 3 seconds.
To show the status display, set “STATUS DISPLAY” to
“AUTO” or “MANUAL” beforehand.
☞ “STATUS DISPLAY” on page 18
Pressing the INPUT SELECT button currently selected
shows the status display.
NOTE:
When “STATUS DISPLAY” is set to “AUTO,” the status display also
appears on the screen if you change the inputs or the signal
condition changes.
1 Input status
2 Signal format
• “NO SYNC” is displayed when no video signal is input
or no synchronized signal is detected.
• If “NO SYNC” is displayed even though a video signal is
input, check the setting of “SYNC SELECT.”
☞ “SYNC SELECT” on page 15
• “Out of range” is displayed when a noncompliant signal
is input.
3 Setting of “COLOR TEMP.”
☞ “COLOR TEMP.” on page 16
“
*
” is displayed if white balance is adjusted in the
“COLOR TEMP./BAL.” menu.
4 Appears when “SYNC SELECT” is set to “EXT.”
(External synchronization)
☞ “SYNC SELECT” on page 15
5 Setting of SCAN SIZE
☞ “5 SCAN SIZE button” on the left column
OVER:
Over-scan
UNDER: Under-scan
6 Setting of SCREENS CHECK
☞ “6 SCREENS CHECK button” on the left column
COLOR: Normal screen
MONO: Monochrome screen
R ONLY: Red screen
G ONLY: Green screen
B ONLY: Blue screen
7 Setting of MARKER
☞ “7 MARKER button” on the left column
EN04-06_LCT1811-001A-H.p65
05.4.26, 6:39 PM
5