Power, Charging the battery pack, Using the battery pack – JVC GR-D231 EN User Manual
Page 11: Using ac power, Pg. 11), Pg. 11, 1
GETTING STARTED
EN
11
MasterPage: Start_Right
S/AV/Editing cable
3
Close the core filter until it clicks shut.
NOTES:
● Take care not to damage the cable.
● When connecting a cable, attach the end with the core filter
to the camcorder.
This camcorder’s 2-way power supply system lets you
choose the most appropriate source of power. Do not use
provided power supply units with other equipment.
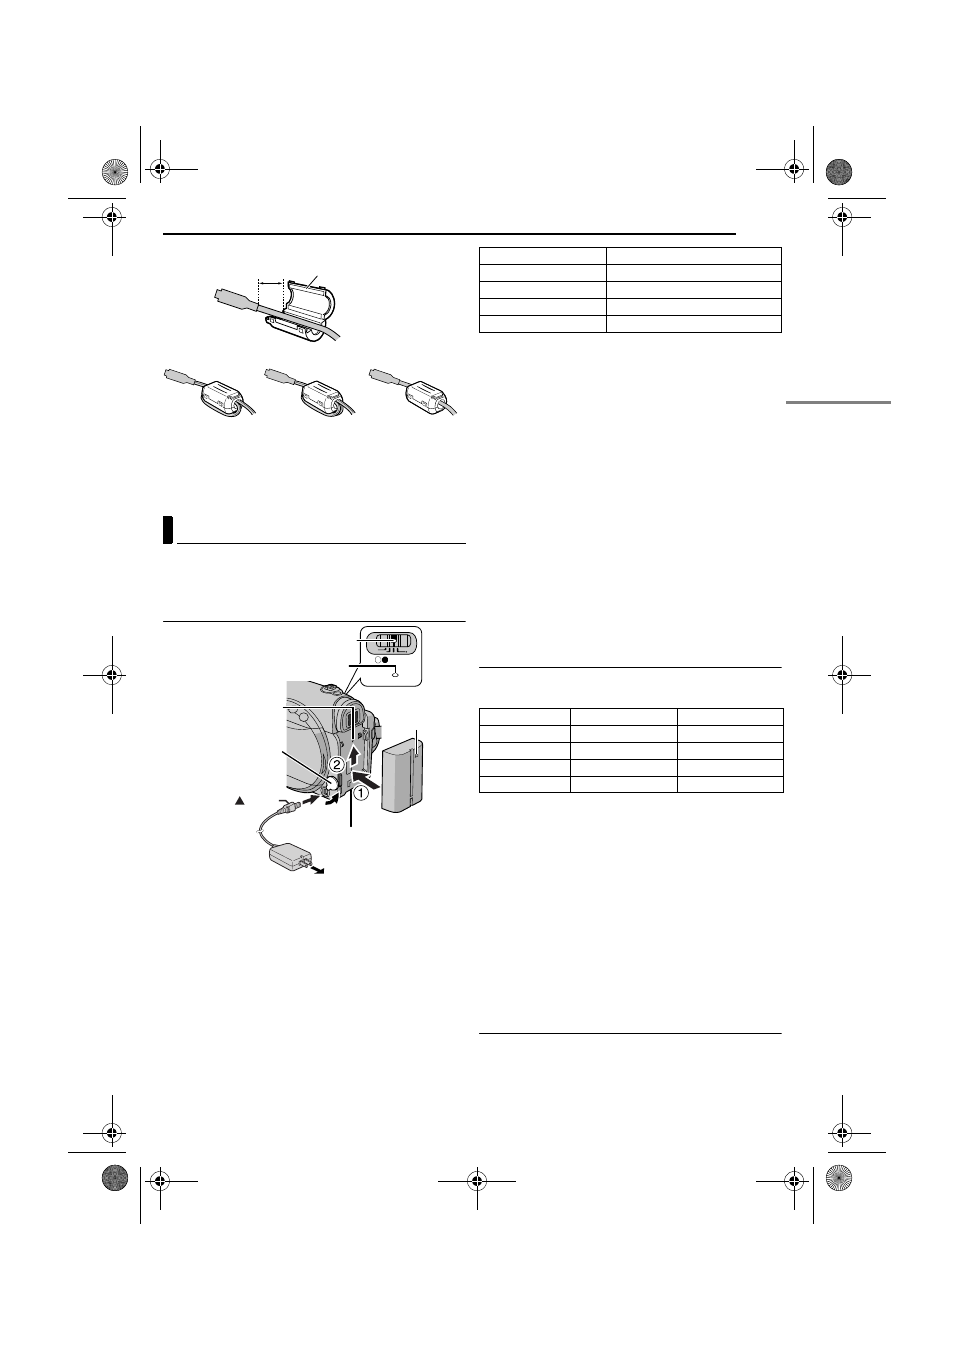
Charging The Battery Pack
1
Set the Power Switch to “OFF”.
2
With the arrow on the battery pack pointing upward,
push the battery pack slightly against the battery pack
mount
a.
3
Slide up the battery pack until it locks in place
b.
4
Connect the AC Adapter to the camcorder.
5
Plug the AC Adapter into an AC outlet. The POWER/
CHARGE lamp on the camcorder blinks to indicate
charging has started.
6
When the POWER/CHARGE lamp goes out, charging
is finished. Unplug the AC Adapter from the AC outlet.
Disconnect the AC Adapter from the camcorder.
To detach the battery pack
Slide the battery pack down slightly while sliding BATT.
to detach it.
* Provided
NOTES:
● If the protective cap is attached to the battery pack, remove
it first.
● During charging, the camcorder cannot be operated.
● Charging is not possible if the wrong type of battery is used.
● When charging the battery pack for the first time or after a
long storage period, the POWER/CHARGE lamp may not
light. In this case, remove the battery pack from the
camcorder, then try charging again.
● If the battery operation time remains extremely short even
after having been fully charged, the battery is worn out and
needs to be replaced. Please purchase a new one.
● Since the AC Adapter processes electricity internally, it
becomes warm during use. Be sure to use it only in well-
ventilated areas.
● Using the optional AA-V40 AC Power Adapter/Charger, you
can charge the BN-V408U/V416U/V428U/V438U battery
pack without the camcorder. However, it cannot be used as
an AC Adapter.
● After 5 minutes has elapsed in Record-Standby mode with
the cassette inserted, the camcorder will automatically turn
off its power supplied from the AC adapter. In this case, the
battery charge starts if the battery is attached to the
camcorder.
Using The Battery Pack
2 – 3 in “Charging The Battery Pack”.
Maximum continuous recording time
* Provided
NOTES:
● Recording time is reduced significantly under the following
conditions:
• Zoom or Record-Standby mode is engaged repeatedly.
• The LCD monitor is used repeatedly.
• The playback mode is engaged repeatedly.
• The LED Light is used.
● Before extended use, it is recommended that you prepare
enough battery packs to cover 3 times the planned
shooting time.
ATTENTION:
Before detaching the power source, make sure that the
camcorder’s power is turned off. Failure to do so can result in
a camcorder malfunction.
Using AC Power
Connect the AC Adapter to the camcorder, as shown in
the illustration.
NOTE:
The provided AC Adapter features automatic voltage
selection in the AC range from 110 V to 240 V.
Power
3 cm (1–3/16
"
)
Core filter (small)
USB cable and AC
Adapter’s cord
Audio Extension
cable
S/AV/Editing
cable
POWER/
CHARGE
PLAY
OFF
M
A
To AC outlet
POWER/CHARGE lamp
Battery pack
BATT.
AC Adapter
Open the cover.
Power switch
To DC connector
mark
Arrow
Battery pack mount
Battery pack
Charging time
BN-V408U*
Approx. 1 hr. 30 min.
BN-V416U
Approx. 3 hr.
BN-V428U
Approx. 5 hr.
BN-V438U
Approx. 6 hr. 30 min.
Battery pack
LCD monitor on
Viewfinder on
BN-V408U*
1 hr. 20 min.
1 hr. 40 min.
BN-V416U
2 hr. 40 min.
3 hr. 15 min.
BN-V428U
4 hr. 40 min.
5 hr. 50 min.
BN-V438U
6 hr. 20 min.
7 hr. 50 min.
CONTINUED ON NEXT PAGE
GR-D231US.book Page 11 Wednesday, February 4, 2004 4:00 PM