Replacing/adjusting the drive belt – Jet Tools 708315BTA User Manual
Page 20
20
Replacing/Adjusting the Drive Belt
For Replacement and Adjustment
1. Remove the saw blade (see Replacing the
Blade on page 19).
2. Using the front handwheel, lower the blade
arbor to its lowest position (rotate handwheel
counterclockwise).
3. Remove the blade guard and splitter (see
Installing the Blade Guard and Splitter section
on page12), then turn the saw upside down.
4. Remove
the
dust shroud if applicable.
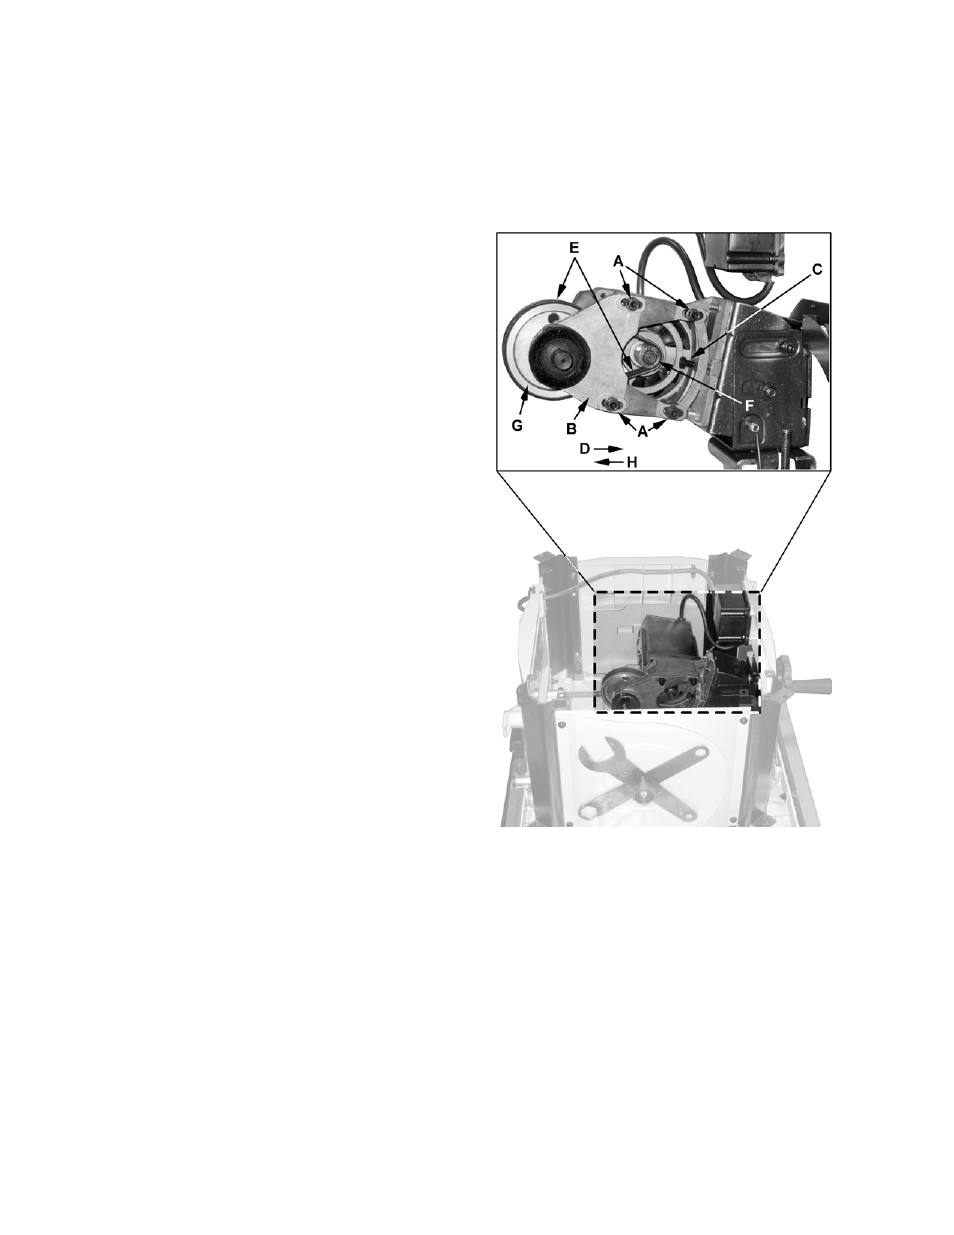
Referring to Figure 24:
5. With a 5mm hex wrench, loosen four socket
head cap screws (A) that secure the arbor
support (B) to the motor casing.
If adjusting belt tension only (no belt replacement),
skip steps 6 – 10 and proceed to step 11.
6. With a 10mm wrench, loosen the tension adjust
screw (C) by turning counterclockwise.
7. Push the arbor support (B) forward (D) to
relieve tension on the belt (E).
8. Remove belt (E) from the motor and arbor
pulleys (F, G).
9. Replace the old belt with a new belt making
sure that it sits properly on both pulleys.
10. Pull the arbor support (B) back (H), placing
tension on the belt, and hand-tighten the four
mounting screws (A).
Adjustment
11. With a 10mm wrench, turn the tension adjust
screw (C) to place proper tension on the belt.
Adjustment is sufficient when moderate finger
pressure on the belt between the pulleys
results in approximately 1/4" deflection.
12. Tighten the four mounting screws (A) with a
5mm hex wrench.
After the Adjustment
13. Replace the dust shroud (page 11) if
applicable.
14. Turn the table saw right-side up.
15. Replace and adjust the blade guard and splitter
(refer to the Installing the Blade Guard and
Splitter and Adjusting the Blade Guard and
Splitter sections on page 12).
16. Replace the saw blade (Replacing the Blade
on page 19).
Figure 24