Invacare Excelerator XLT 2000 User Manual
Page 15
15
F
O
R
K
/
S
P
R
I
N
G
/
C
R
A
N
K
EXCELERATOR XLT/XLT 2000
FORK/CRANK ASSEMBLY
REPLACEMENT (FIGURE 3)
NOTE: Invacare recommends that the following proce-
dure be performed by a qualified technician.
1. Note the position of the crank handles.
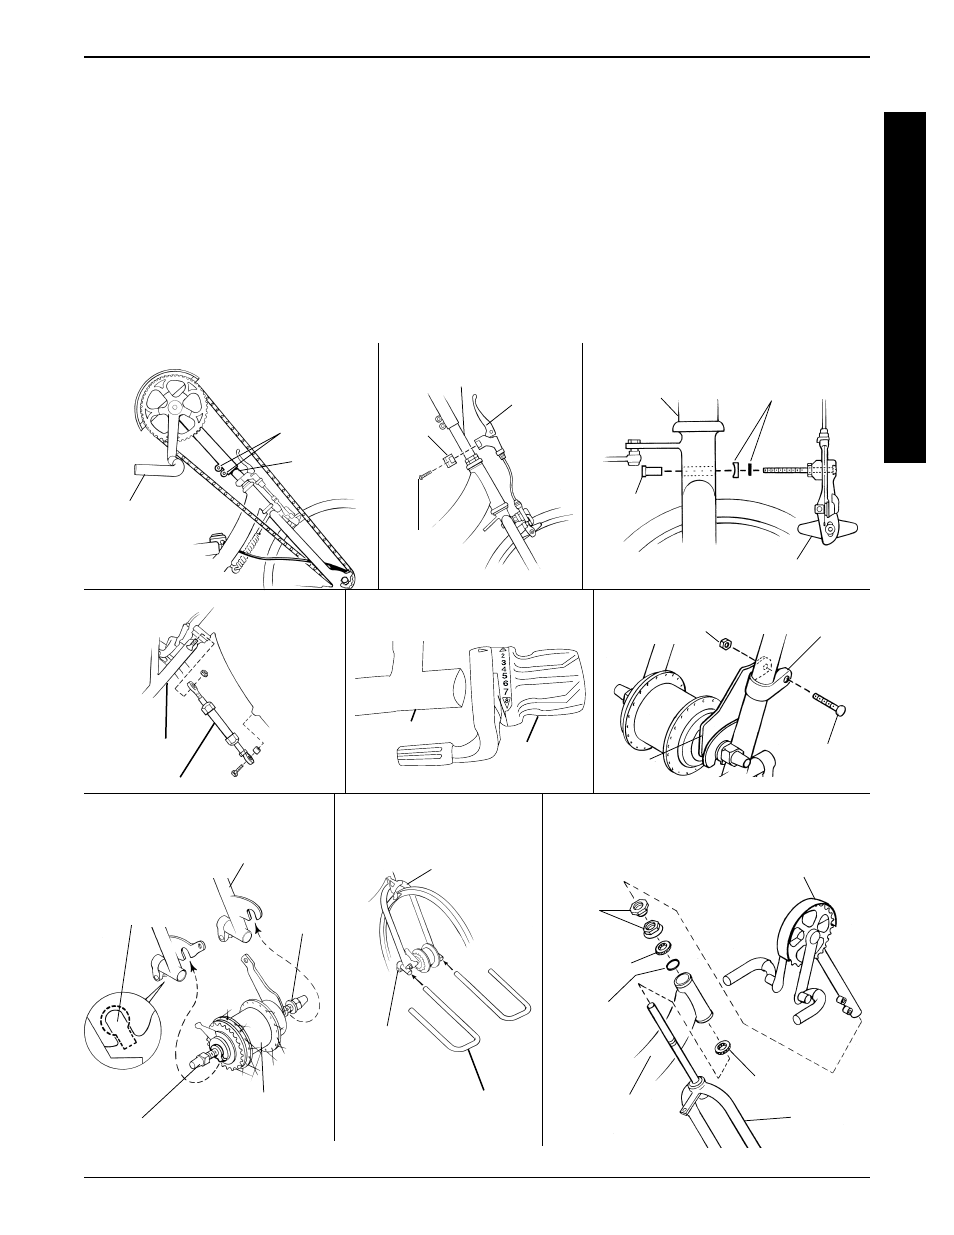
FIGURE 3 - EXCELERATOR XLT/XLT 2000 FORK/CRANK ASSEMBLY REPLACEMENT
FORK/SPRING/CRANK
PROCEDURE 5
2. Loosen, but do not remove the two (2) socket screws
that secure the crank handles to the existing fork.
3. Slide the crank handles down towards the front wheel.
4. Remove the chain from the crank handles.
5. Remove the crank handles from the existing fork.
6. Remove the two (2) socket screws and half clamp
that secure the brake handle to the existing fork.
7. Remove the socket nut on the BACK of the existing
fork that secures the brake assembly.
STEPS 1, 2, 3, 38, 39
STEPS 6, 36
STEPS 7, 8, 35
STEPS 9, 34
STEPS 10, 33
STEPS 11, 12, 31, 32
STEPS 13, 14, 27, 28, 29, 30
STEPS 16, 17, 24, 25
STEPS 5, 18, 19, 20, 21, 22, 23, 37
Crank
Handles
Socket
Screws
Crank Handles
Fork
Brake
Handle
Socket
Screws
Half
Clamp
Socket
Nut
Fork
Brake Assembly
Road Crown Compensator
Fork
Seat Frame
Hex Bolt
Locknut
Brake
Arm
Clamp
Brake
Arm
Fork
Cap Nuts
Front
Wheel
Hex
Bolts,
Locknuts
and
Footrest
Clamps
Footrest
Fork
Top
Nuts
Bearing
O-Ring
Frame
Bottom Bearing
Non-Turn
Washer - Must
Be Installed
as Shown
Washer
Hardware
Shifter
Fork
Fork