Installation ep-8kta, Dimm module installation – IBM EP-8KTA User Manual
Page 20
Installation
EP-8KTA
Page 3-8
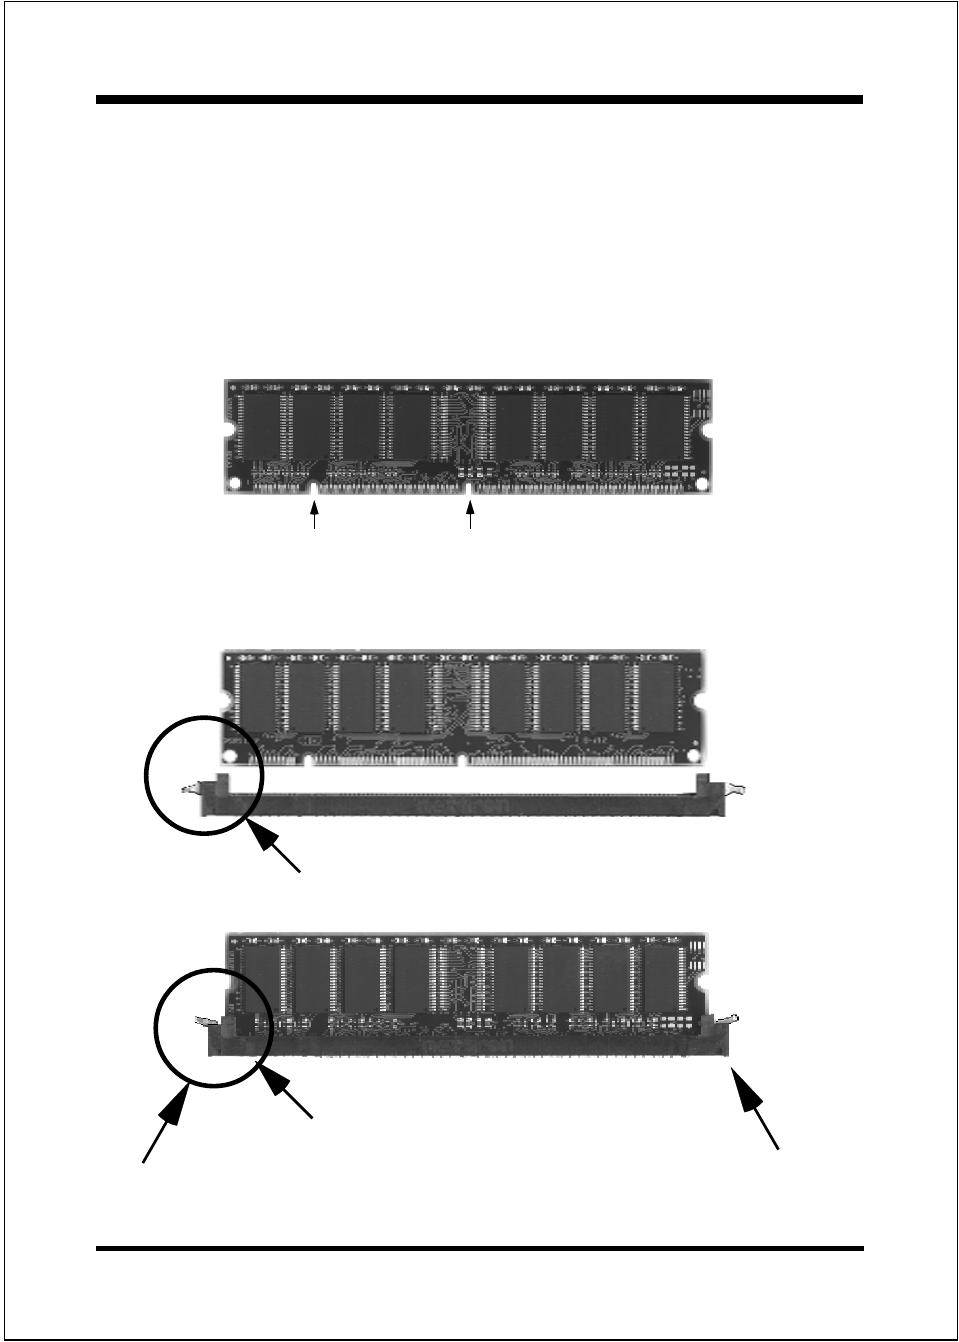
DIMM Module Installation
Figure 3 displays the notch marks and what they should look like on your DIMM
memory module.
DIMMs have 168-pins and two notches that will match with the onboard DIMM
socket. DIMM modules are installed by placing the chip firmly into the socket at a
90 degree angle and pressing straight down (figure 4) until it fits tightly into the
DIMM socket (figure 5).
Figure 3
Figure 5
DIMM Module clip after installation
To remove the DIMM module simply press down both of the white clips on
either side and the module will be released from the socket.
Figure 4
DIMM Module clip before installation
CENTER KEY ZONE
(3.3 V DRAM)
LEFT KEY ZONE
(UNBUFFERED)
See also other documents in the category IBM Hardware:
- ADSL Bridge/ Router Heritage (167 pages)
- 27L2579 (20 pages)
- DR550 (128 pages)
- LCD/LVDS/LAN (154 pages)
- 22P6959 (50 pages)
- ThinkPad 73P3315 (62 pages)
- ULTRABAY 2000 (62 pages)
- SYSTEM STORAGE DS4000 (38 pages)
- uPD78P083 (274 pages)
- 2257 (252 pages)
- 51 (248 pages)
- 2 (72 pages)
- System Storage N6040 (6 pages)
- 22P6960 (56 pages)
- 07N4108 (11 pages)
- 22P9176 (76 pages)
- 22P6972 (46 pages)
- 48X (60 pages)
- 22P6979 (52 pages)
- 8313 (314 pages)
- 19K4543 (56 pages)
- SC30-3865-04 (513 pages)
- DTLA-305020 (2 pages)
- WebSphere Adapters (226 pages)
- x Series 200 (152 pages)
- Storage Device Enclosure 7214 (4 pages)
- Tivoli and Cisco (516 pages)
- ZSERIES 890 (12 pages)
- 10K0001 (20 pages)
- 31P8128 (112 pages)
- 09N4076 (78 pages)
- Computer Drive (44 pages)
- N7000 (8 pages)
- All-in-One Super7 Single Board Computer PCM-5896 (128 pages)
- 20X (17 pages)
- 73P3309 (64 pages)
- W2H (68 pages)
- 22P6415 (62 pages)
- THINKCENTER 8187 (290 pages)
- NETVISTA 6830/6831 (152 pages)
- 802.11g Wireless Broadband Router WRT-410 (69 pages)
- THINKPAD 72 W DC (70 pages)
- ThinkPad 73P3279 (54 pages)
- HS64 (13 pages)
- THINKVISION MONITOR L150P (35 pages)