Grindmaster 3341A User Manual
Page 12
Page 10
Crathco
®
Remote Beverage Freezers
Sanitizing and Refilling
1. Re-assemble carburetor assembly by installing the two “O” Rings at the bottom of
the carb tube.
2. Place the carburetor assembly in the bottom of the hopper.
3. Install the “O” Rings on valve plunger and lay plunger assembly on a clean piece
of paper towel.
4. Prepare a minimum of 2.5 gallons (9.5 liters) of sanitizing solution (Kay-5
Sanitizer/Cleaner or equivalent) following the manufacturer’s instructions.
NOTE: Add 1 ounce of Kay-5 to 2.5 gallons (9.5 liters) of 120ºF (50ºC) water to achieve
a concentration of 100 parts per million.
5. Dip a medium sized brush into the sanitizing solution and sanitize the inside bore
of the dispensing valve (figure V).
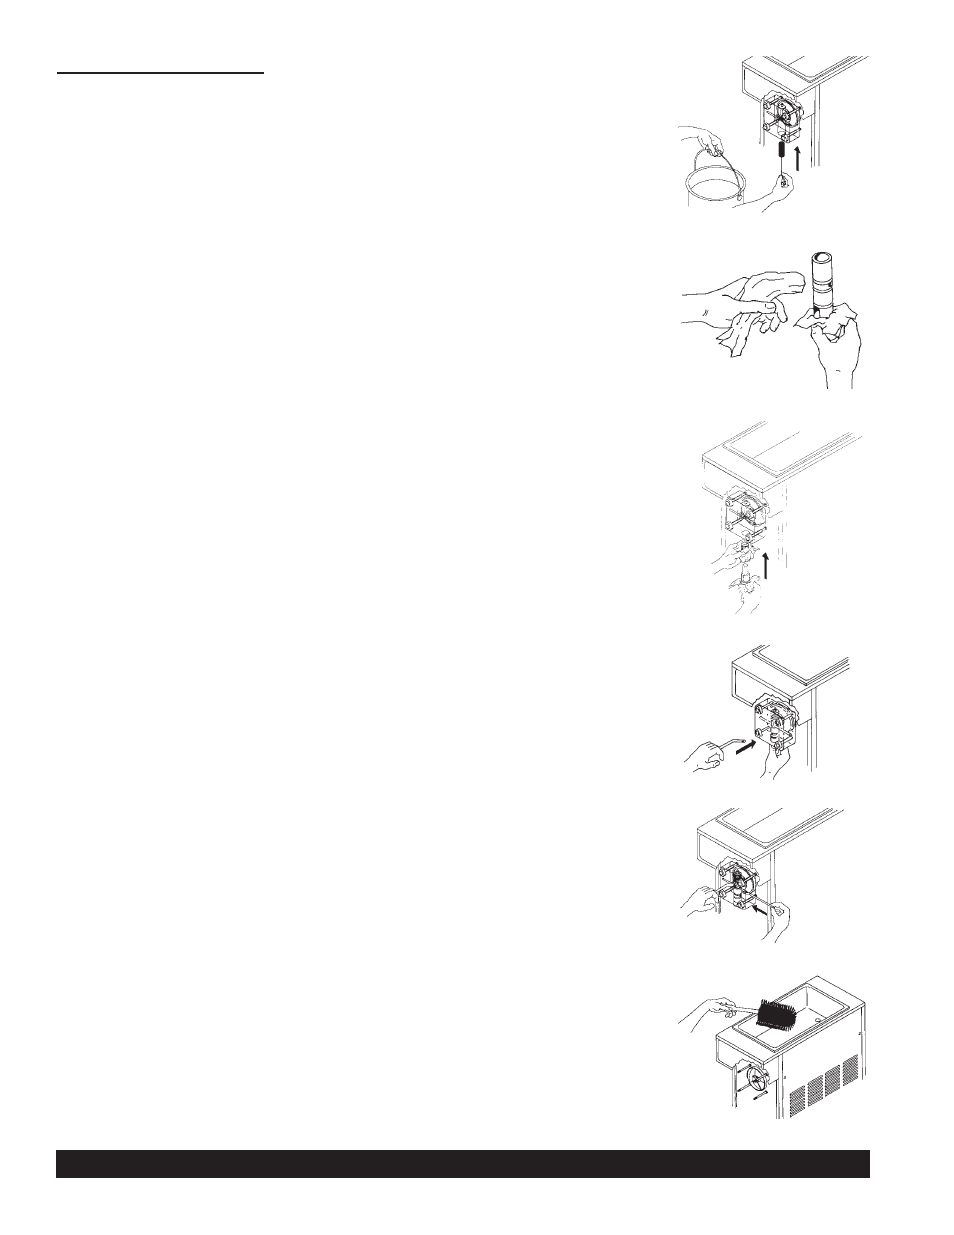
6. Place a small amount of lubricant onto a piece of clean paper toweling (figure W).
Use a clean piece of paper toweling to pick up the small end of the valve plunger
assembly. Apply a thin film of lubricant from the other piece of paper toweling to
the “O” Rings on the valve plunger assembly (figure W).
7. Slide the valve plunger spring over the small end of the valve plunger and, using
another clean piece of paper toweling, pick up the valve plunger at the outlet end
and insert plunger and spring into the valve body (figure X).
8. Push up on the valve plunger and insert the stainless steel handle (figure Y).
9. Holding the handle down slightly so that the hole in the handle and valve block
are aligned, insert the dispensing valve handle retaining pin (figure Z).
10. Pour sanitizing solution into the mix storage hopper and allow the solution to fill
freezing cylinder. Use a large brush to sanitize all hopper surfaces (figure AA).
11. Turn panel switch to “CLEAN” and allow freezer to run for 10 minutes.
12. Open dispensing valve and drain solution. Allow the dasher to push remaining
sanitizer out of the freezing cylinder. Once the sanitizing solution is drained,
turn panel switch to “OFF”.
13. Place a small amount of sanitary lubricant onto another piece of clean paper
toweling. Use a clean piece of paper toweling to pick up the large end of the
carburetor from the bottom of the hopper taking care not to touch the sanitized
carburetor with your bare hand. Apply the lubricant on the other piece of paper
toweling to the two “O” rings on the bottom of the carburetor assembly.
14. Place the lubricated carburetor assembly on a clean piece of paper toweling.
15. Prepare fresh product according to manufacturer’s instructions.
16. Hold open the dispensing valve, and pour product (approx. 10 oz.) into the
hopper to allow this product to chase out any remaining sanitizer. Watch the
product flowing out of the dispensing valve and close the valve when the new
mix has purged the sanitizer remaining in the cylinder.
17. Fill mix storage hopper with fresh product.
18. Use a clean piece of paper toweling to insert the sanitized carburetor assembly
into the inlet hole in the hopper. Cover hopper with hopper lid.
19. Turn front panel switch to “ON”. Allow freezer to reach proper consistency.
Figure V Sanitize Valve Body
Figure W Lubricate Plunger
Figure X Installing Plunger and Spring
Figure Z Insert Retaining Pin
Figure Y Insert Valve Handle
Figure AA Sanitize Hopper