Caution, Warning – Goodman Mfg IO-367B User Manual
Page 5
5
•
Do not skid or slide on any surface as this may
damage unit base. The unit must be stored on a
flat, level surface. Protect the condenser coil
because it is easily damaged.
R
OOF
C
URB
I
NSTALLATIONS
O
NLY
:
Before installing this unit...
IMPORTANT NOTE: This unit has been equipped with a ship-
ping brace under the compressor section that MUST BE RE-
MOVED before installing the unit on a roof curb.
Please follow the instructions below to remove brace.
W
HEN
UNIT
IS
SUSPENDED
,
BOARDS
AND
SHIPPING
BRACE
WILL
DROP
WHEN
SCREWS
ARE
REMOVED
. T
O
PREVENT
PERSONAL
INJURY
, STAND CLEAR.
R
EMOVE
FORK
HOLE
BRACKETS
,
BOARDS
AND
SHIPPING
BRACE
FROM
BOTTOM
OF
UNIT
BEFORE
PLACING
UNIT
ONTO
CURB
.
CAUTION
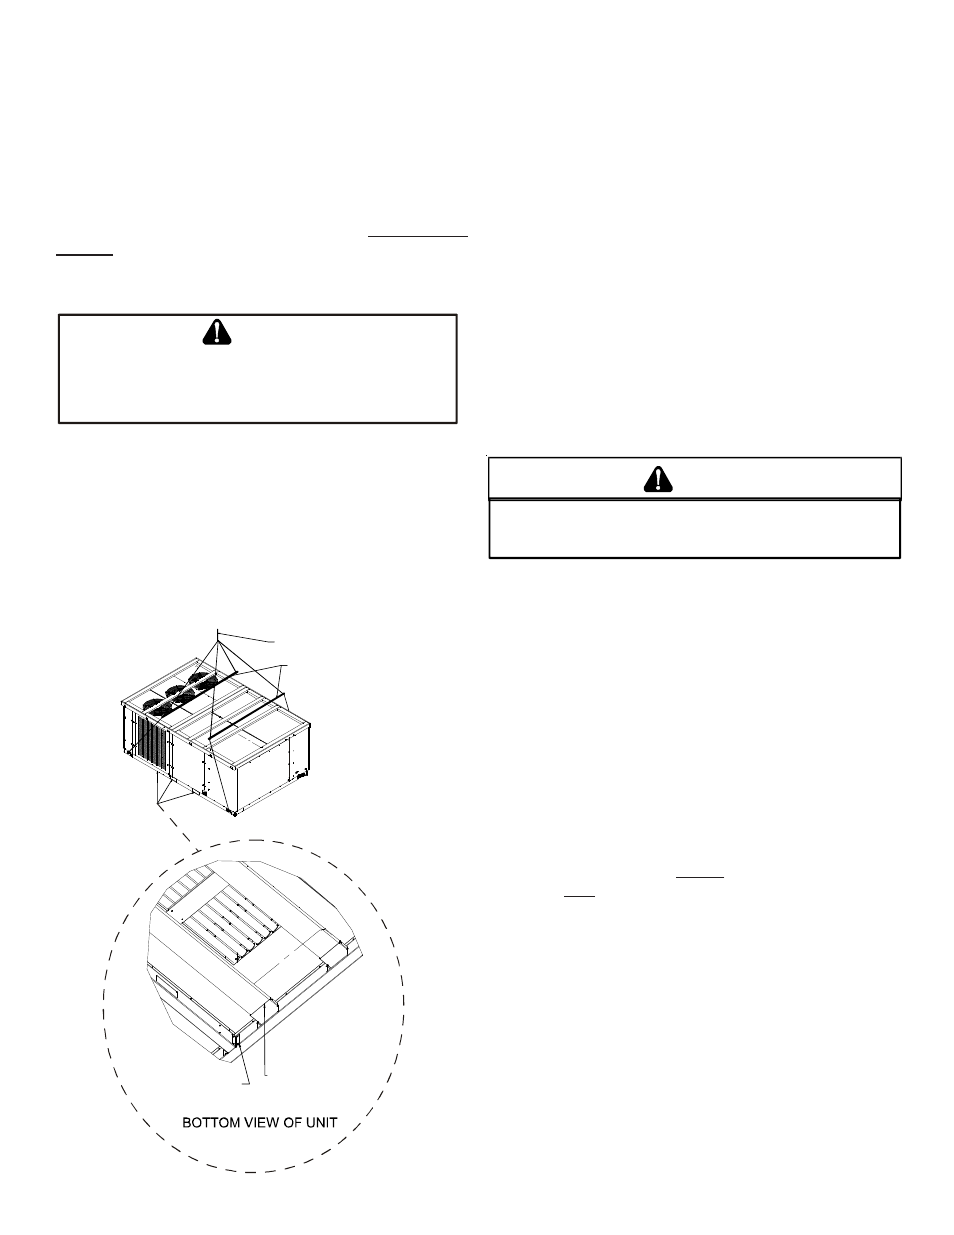
1. Remove wooden struts and shipping brace per
installation instructions. The struts are located in the
fork holes and are used to protect the unit from
damage while lifting with forks. The shippping brace
is located underneath the unit (under compressors).
Also remove the fork hole brackets as shown in the
following figure.
2. Locate and remove the end brackets as shown below.
LIFT OVER APPROXIMATE
CENTER OF UNIT
SPREADER BARS
MUST BE USED WITH
LIFTING STRAPS THAT
ARE LESS THAN 16
FEET LONG
REMOVE 2 BRACKETS
ON EACH END TO
REMOVE
WOODEN STRUTS
REMOVE 2 BRACKETS
ON EACH END TO
REMOVE
SHIPPING BRACE
3. Lift unit per the “Rigging Details” section of this manual,
observing all warnings and cautions. When unit is
lifted, boards and shipping brace will drop if screws
have been removed. To avoid injury, STAND CLEAR.
4. Dispose of the boards and brace appropriately.
Curb installations must comply with local codes and should
be done in accordance with the established guidelines of the
National Roofing Contractors Association.
Proper unit installation requires that the roof curb be firmly
and permanently attached to the roof structure. Check for
adequate fastening method prior to setting the unit on the
curb.
Full perimeter roof curbs are available from the factory and
are shipped unassembled. Field assembly, squaring, level-
ing and mounting on the roof structure are the responsibility
of the installing contractor. All required hardware necessary
for the assembly of the sheet metal curb is included in the
curb accessory.
T
O
PREVENT
POSSIBLE
EQUIPMENT
DAMAGE
,
PROPERTY
DAMAGE
,
PERSONAL
INJURY
OR
DEATH
,
THE
FOLLOWING
BULLET
POINTS
MUST
BE
OBSERVED
WHEN
INSTALLING
THE
UNIT
.
WARNING
•
Sufficient structural support must be determined prior
to locating and mounting the curb and package unit.
•
Ductwork must be constructed using industry
guidelines. The duct work must be placed into the
roof curb before mounting the package unit. Our full
perimeter curbs include duct connection frames to be
assembled with the curb. Cantilevered type curbs
are not available from the factory.
•
Curb insulation, cant strips, flashing and general
roofing material are furnished by the contractor.
The curbs must be supported on parallel sides by roof mem-
bers. The roof members must not penetrate supply and re-
turn duct opening areas as damage to the unit might occur.
NOTE: The unit and curb accessories are designed to allow
vertical duct installation before unit placement. Duct
installation after unit placement is not recommended.