Functions, Safet y op era tion m aintenan c e setu p – Harbor Freight Tools 95838 User Manual
Page 10
Page 10
For technical questions, please call 1-800-444-3353.
Item 95838
SAFET
y
Op
ERA
TION
M
AINTENAN
c
E
SETU
p
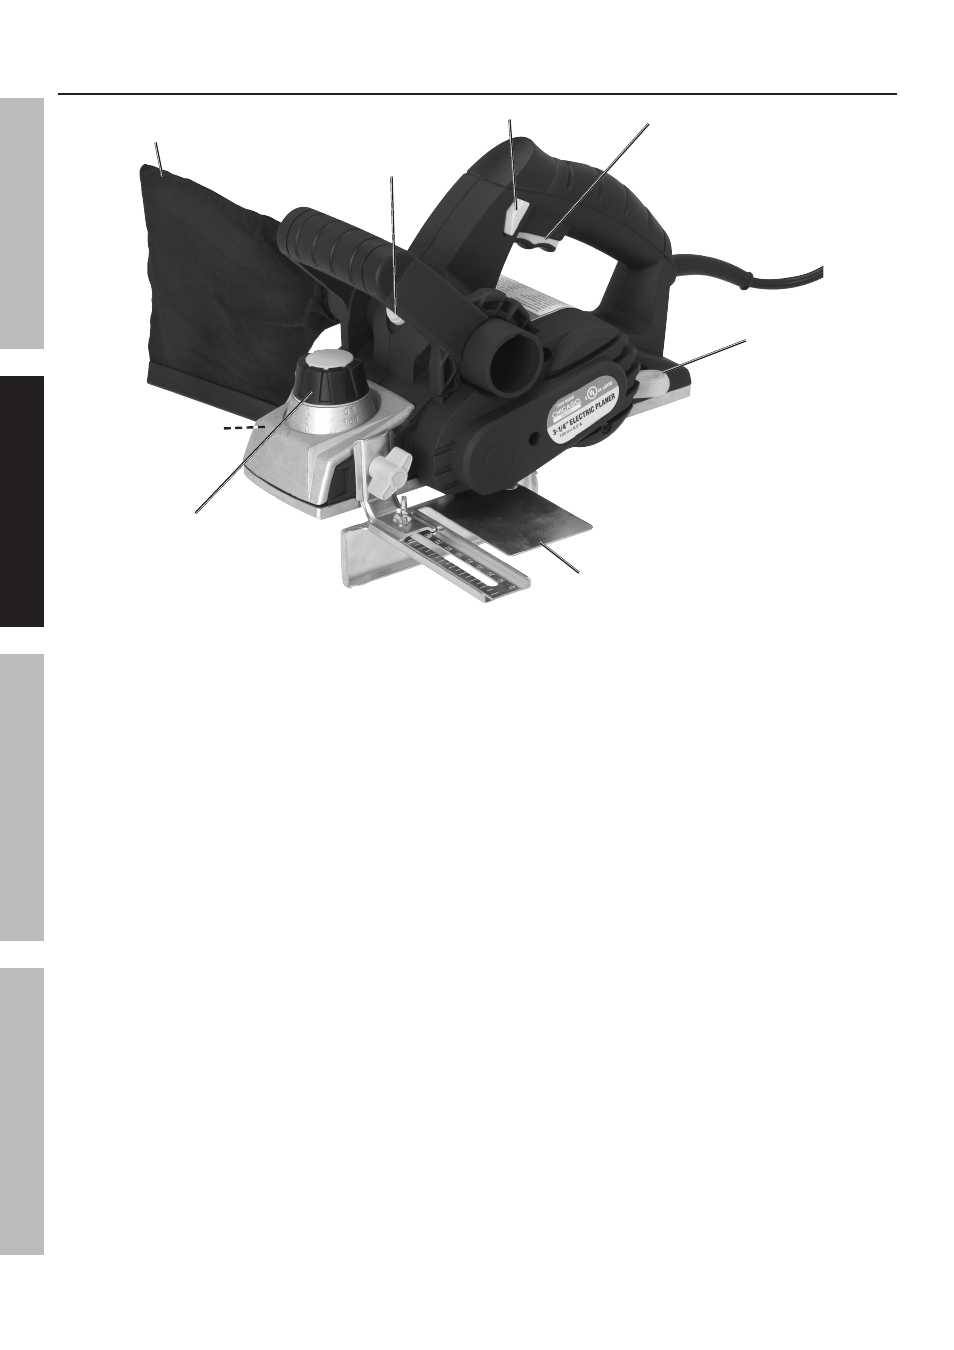
Functions
Dust
Bag (46)
Safety Switch (51)
Wrench
Handle (47)
Fence (37)
Trigger (48)
Depth
Adjustment
Knob (24)
Exhaust Direction
Lever (55)
Rabbet Depth
Guide (17)
(Hidden from view)
1.
Trigger and Safety Switch:
As a safety feature, the Safety Switch (51)
must be pushed to one side to allow
the Trigger (48) to operate.
2.
Wrench Handle storage:
The Left Housing (3) has a slot to allow storage
of the Wrench Handle (47) and Wrench (49).
3.
Fence:
The Fence (37) can be adjusted to control the width
of the cut from the edge of the workpiece. The Fence
can only be installed on the Left Housing. It is held in
place by the Locking Knob (18).
To adjust: Loosen the Wing Nut (38), slide the Fence
(37) to the desired setting. Retighten the Wing Nut
after adjustment.
Note: The Bolt (40) needs to be inserted through
the Fence from the top down with the Washer (39)
underneath the fence, otherwise the flats on the Bolt
will not properly engage the Fence Bracket (41).
The markings on the Fence are intended
as general guidelines only. For accurate
measurements, verify the position of the Fence
using a measuring tool after tightening.
4.
Dust Bag and Exhaust Direction Lever:
The Exhaust Direction Lever (55) controls the
dust port that the dust blows out of. Turn it to
the right to direct the exhaust right, and left to
direct the exhaust left. Do not position the Lever
between settings, the dust will come out of both
ports. Connect either the Dust Bag (46) or a
different dust collection system (not included) to
the dust port that the exhaust is being directed to.
5.
Rabbet Depth Guide:
This is used to set the final cut depth when cutting
a rabbet. Set the depth gauge to the desired depth,
and then use the Fence to determine the desired
width. You may wish to double-check the gauge’s
accuracy with a ruler (sold separately). The Rabbet
Depth Guide (17) should only be attached to the
Right Housing (16). The Rabbet Depth Guide
rests on the unplaned surface of the wood and
helps to maintain an even, consistent depth.
6.
Depth Adjustment Knob and Depth Knob Scale:
The Depth Adjustment Knob (24) is used to control
the amount of material that is removed in one
pass. Turn the Knob so that the triangle on the
Front Cover (29) lines up with the desired setting on
the Depth Knob Scale (25). The scale has metric
measurements on top (from 0 - 2 mm) and SAE
measurements on the bottom (from 0 - 5/64″). The
knob should be turned back past the 0 marking to
the P (park) after the planer is used. This will push
the knife slightly away from the surface the planer
is resting on and will help prevent the planer from
lurching forward if it is accidentally turned on.