Isle o ale oo to e – Hearth and Home Technologies QUADRA-FIRE 823-0170 - MBK User Manual
Page 15
Isle o ale oo to e
R
March
21,
2013
250-5763F
Page
15
i
le
Site constructed for masonry chimney installation:
o ponents
$ PLQLPXP OHQJWK RI LQFKHV >PP@ ORQJHU IRU
thicker walls) of solid insulated factory-built chimney
OHQJWKFRQVWUXFWHGWR8/7\SH+7LQFKPP
inside diameter. Chimney needs to extend a minimum
of 2 inches (51mm) from the interior wall and a mini-
mum of 1 inch (25mm) from the exterior wall.
:DOOVSDFHUWULPFROODUDQGZDOOEDQGWR¿WVROLGSDFN
chimney selected.
0LQLPXPLQFKPPGLDPHWHUFOD\OLQHUVHFWLRQLI
not already present in chimney) and refractory mortar.
ir learan es
0DVRQU\FKLPQH\FOHDUDQFHPXVWPHHW1)3$PLQL-
mum requirement of 2 inches (51mm) to sheet metal
supports and combustibles.
0LQLPXPRILQFKPPFOHDUDQFHDURXQGWKHFKLP-
ney connector.
7RS RI ZDOO RSHQLQJ LV D PLQLPXP RI LQFKHV
(343mm) from ceiling or 4-1/2 inches (114mm) below
PLQLPXP FOHDUDQFH VSHFL¿HG E\ FKLPQH\ FRQQHFWRU
PDQXIDFWXUHU1)3$PLQLPXPYHUWLFDOFOHDUDQFHRI
18 inches (457mm) from chimney connector and ceil-
ing or minimum recommended by chimney connector
manufacturer.
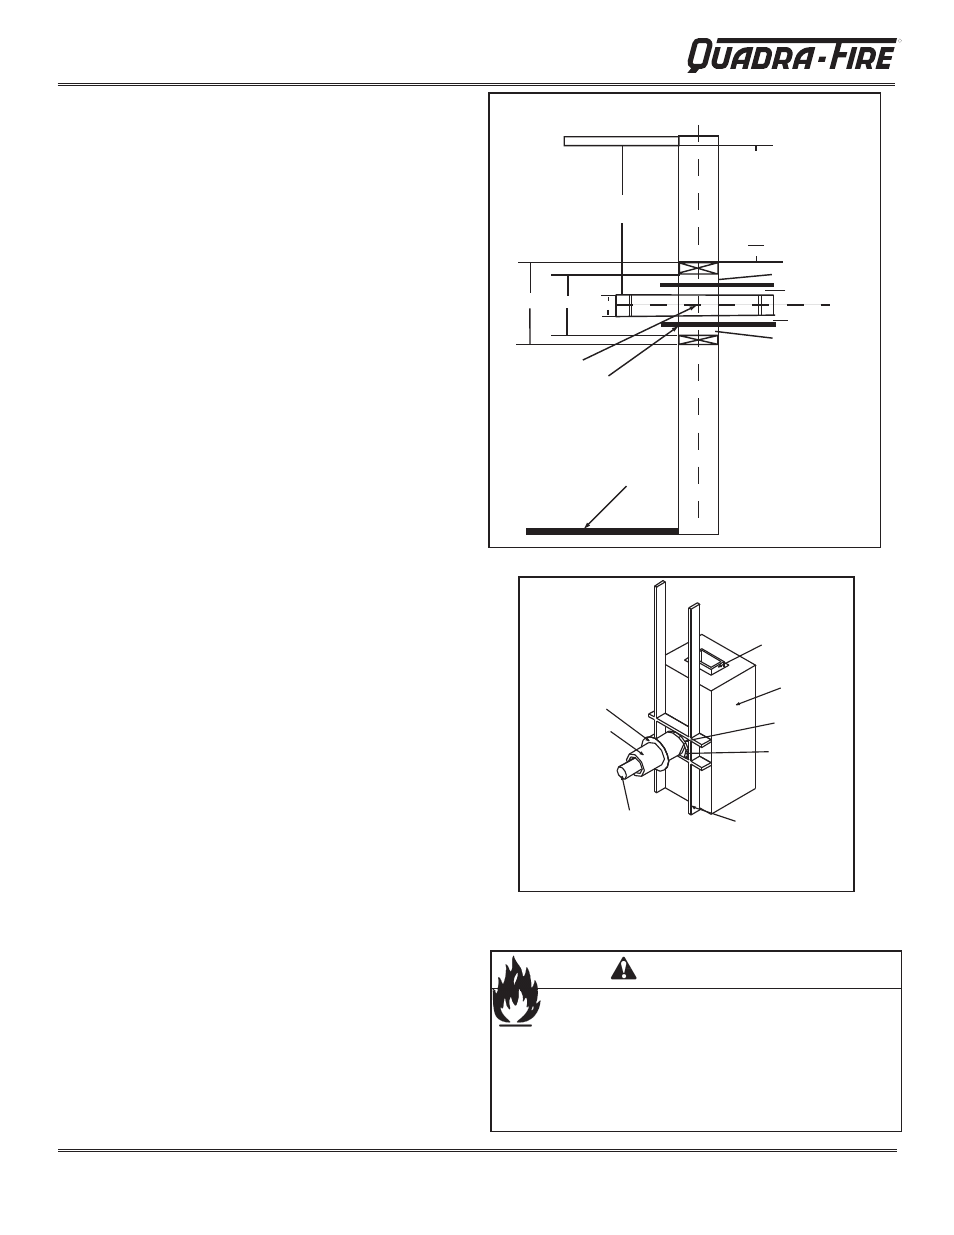
Figure 1 .1.
Instru tions
1. Open inside wall at proper height for the chimney con-
nector to entry the masonry chimney.
Figure 1 .1
2. Entry hole to masonry chimney must be lined with an 8
inch (203mm) minimum diameter clay liner, or equiva-
lent, secured with refractory mortar.
3. Construct a 17 inch x 17 inch (432mm x 432mm) out-
side dimension frame from 2 x 2 framing lumber to
¿WLQWRZDOORSHQLQJ,QVLGHRSHQLQJRIIUDPHVKRXOG
be no less than 14 inch x 14 inch (356mm x 356mm).
Figure 1 .1.
$WWDFKWKHZDOOVSDFHUWRWKHFKLPQH\VLGHRIWKHIUDPH
5. Nail the frame into the wall opening. The spacer should
be on the chimney side.
6. Insert the section of the solid insulated chimney into
the outer wall of the masonry chimney.
7. Tightly secure the length of the solid insulated chimney
with the wall band to the masonry chimney.
8. Insert a section of chimney connector into the chimney.
Make sure it does not protrude past the edge of the
clay chimney liner inside the chimney.
9. Seal the end of the chimney connector to the clay liner
with refractory mortar.
10. Install trim collar around the sold pack chimney section.
Figure 1 .1
Trim Collar
Chimney Section
with 2 inch
(51mm)
Clearance to
Combustibles
Chimney
Connector
Fire Clay Flue
Liner
with Airspace
Masonry
Chimney
Wall Band to
Secure Chimney
Section
Wood Studs Used
for Framing - Spaced
2 inch (51mm)
clearance from
Masonry Chimney
Wall Spacer
Figure 1 .2 oli a
i ne wit etal upports
as a i
le
Fire Risk.
Do NOT pack insulation or other combustibles between
spacers.
$/:$<6PDLQWDLQVSHFL¿HGFOHDUDQFHVDURXQG
venting and spacers.
,QVWDOOVSDFHUVDVVSHFL¿HG
Failure to keep insulation or other material away from
YHQWSLSHPD\FDXVH¿UH
I
1.5”
1.0”
2.0”
2.0”
1.5”
14.0” ID
17.0” OD
ceiling
Minimum18.0”
NFPA 211
13.5” below ceiling to top
of opening
1.0”
8.0”
1.5 2x2 framing stud
2.0 min air clearance
1.0 min air clearance
4.5
or top of opening is a min.of
4.5” below min.clearance
specified by connector mfg.
Center of Hole
Thimble
C
L
C
L
Wall
Include depth
of hearth pad