Displacement pump – Hitachi EM 490 User Manual
Page 15
307-735
15
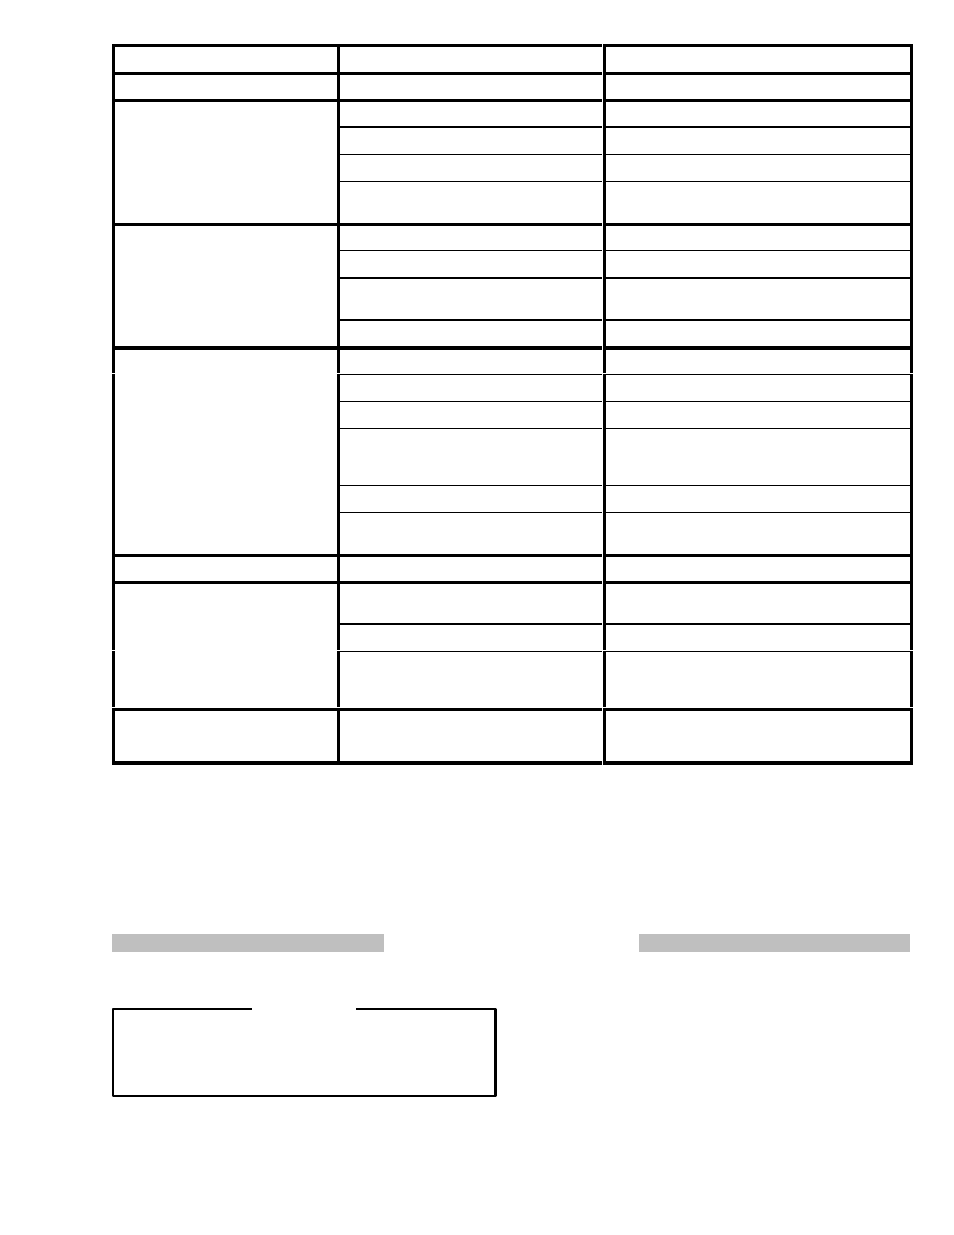
PROBLEM
CAUSE
SOLUTION
Paint leaks into wet–cup
Throat packings are worn or damaged
Replace the packings. See page 16.
Excessive surging from spray gun
Spray tip or fluid filter is plugged
Disassemble and clean.
Spray tip too big or worn
Change the spray tip.
Paint too viscous
Thin the paint.
Wrong type hose
Use minimum 50 ft (15.2 m), static–free nylon
hose (wire braid hose is unacceptable).
Not enough paint pressure
Pressure setting too low
Increase pressure.
Spray tip too big or worn
Change the spray tip.
Pressure control frozen
2
or damaged by
over–pressurization
3
Try to thaw, or replace pressure control.
Displacement pump worn or damaged
Replace the displacement pump. See page 16.
Tails or fingers in spray pattern
Pressure setting too low
Increase pressure.
Fluid outlet filter is dirty or clogged
Clean the filter. See page 12 or manual 307–273.
Spray tip too big or worn
Change the spray tip.
Fluid supply is low or empty
Refill and prime the pump. See page 10. Check
fluid supply often to prevent running the pump
dry.
Paint too viscous
Thin the paint.
Wrong type hose
Use minimum 50 ft (15.2 m), static–free nylon
hose (wire braid hose is unacceptable).
Paint runs or sags
Spray tip too big or worn
Change the spray tip.
Spitting from gun
Air in fluid pump or hose
Check for loose connections at pump intake and
tighten. Then prime the pump. See page 10.
Tip partially clogged
Clear the tip. See page 11.
Fluid supply is low or empty
Refill and prime the pump. See page 10. Check
fluid supply often to prevent running the pump
dry.
Static sparking from the gun
Spray or work being sprayed is not prop-
erly grounded
Correct problem before continuing. Follow the
warning section, FIRE OR EXPLOSION HAZ-
ARD on page 3.
1
The electric motor has an over–temperature switch
which automatically resets upon cooling. If it opens and
the electric motor shuts itself off, unplug the power supply
cord and let the sprayer cool for 30 to 60 minutes. Always
use the lowest pressure setting needed when spraying.
2
Freezing results from failure to replace the water–base
paint or flushing water with mineral spirits, and usually
causes permanent damage to the pressure control.
3
Over–pressurization results from (1) using less than 50
ft (15.2 m) of nylon spray hose, (2) from using a wire braid
spray hose, (3) from adding a shutoff device between the
pump outlet and the spray gun, (4) from attaching a spray
hose to the pressure drain valve, or (5) from using a
clogged or incorrectly assembled filter.
DISPLACEMENT PUMP
To reduce the risk of serious bodily injury, follow the
Pressure Relief Procedure Warning on page 14
before checking or repairing any part of the spray
system.
Unplug the sprayer!
WARNING
Removing the Pump.
See Fig 12.
1.
Flush the sprayer. Relieve pressure.
2.
Hold the intake valve (222) steady with a wrench and
unscrew the adapter (38).
3.
Unscrew the hose (52).
4.
Use a screwdriver to push the retaining spring (33)
aside, and then push out the pin (34).
5.
Loosen the locknut (112) and unscrew the pump (58).