Fig.3, Fig.4 fig.6 fig.5, Maintenance – Sealey SA1565 User Manual
Page 3
5. MAINTENANCE
fig.3
In order to keep the compressor in good working condition, periodic
maintenance is essential.
IMPORTANT! Failure to carry out maintenance tasks may
invalidate the warranty on your compressor.
WARNING! Service and maintenance must be performed by an
authorised agent. DO NOT tamper with, or attempt to adjust, the
pressure switch or safety valve. Before moving, or carrying out
any maintenance on the compressor, ensure that the ignition
switch is ‘off’, that the air tank pressure has been vented and
the compressor has been allowed to cool down for a period of
time.
5.1.
ENGINE.
For all engine maintenance, please refer to the engine
manufacturer’s handbook (supplied) for the full schedule.
5.2.
COMPRESSOR.
5.2.1.
Operations to be carried out after the first 50 working
hours:
a) check that all bolts/nuts are tight, particularly those
retaining the crank case and cylinder head.
b) Replace the lubricating oil - see para 5.2.5.
5.2.2.
Operations to be carried out daily:
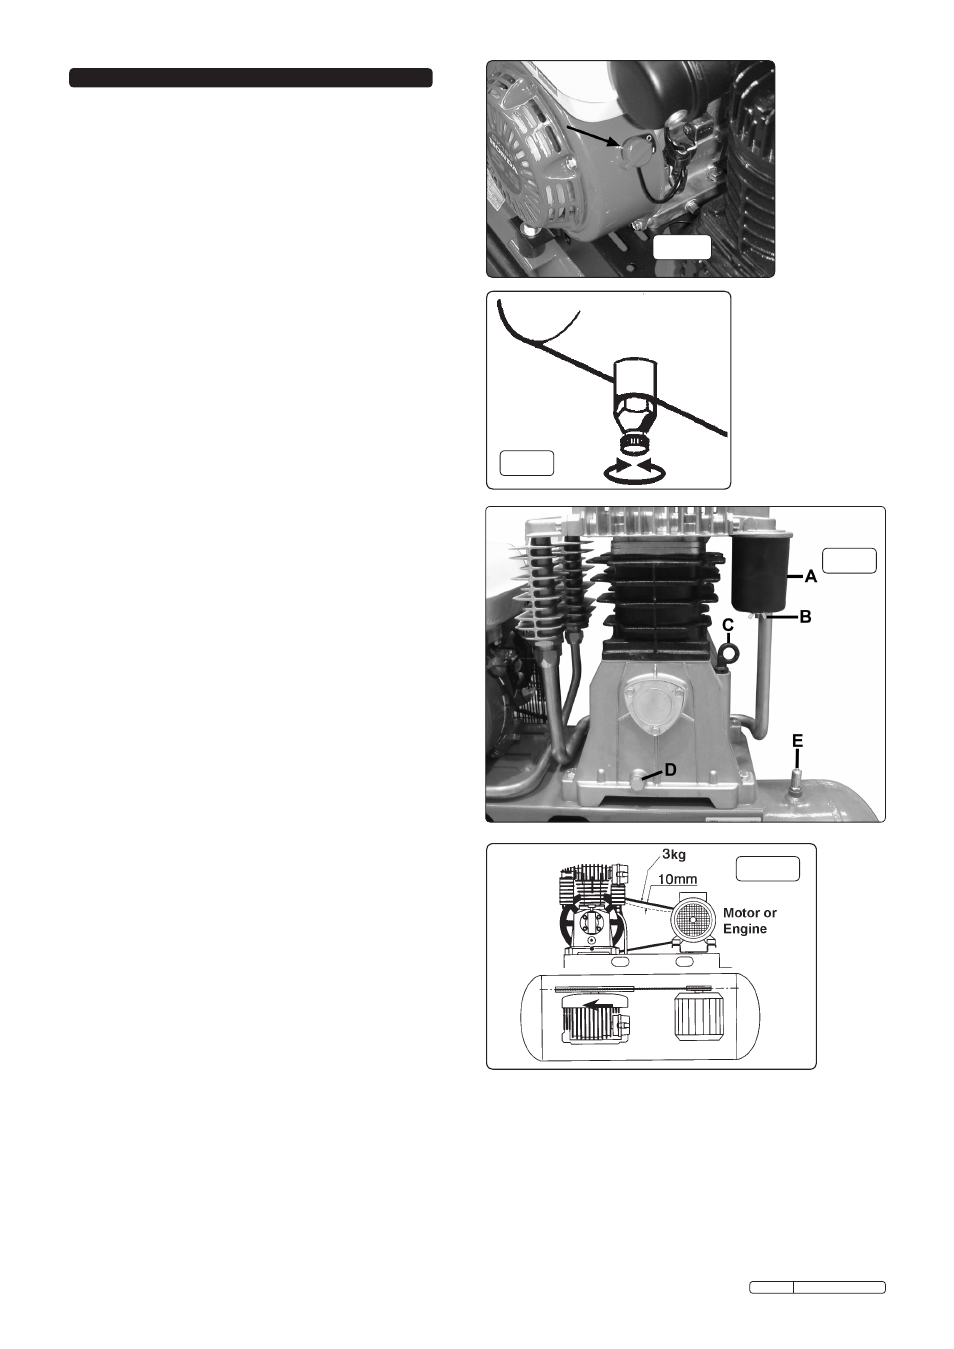
a) drain condensation by opening the valve (fig.4) located
under the tank.
b) check oil level (fig.5c) and, if necessary, top-up.
c) check guards/covers are secure.
d) check for oil leaks.
e) check for unusual noises or vibrations.
f) check for air leaks.
5.2.3.
Operations to be carried out weekly:
(or more frequently, if the compressor operates in a
very dusty atmosphere):
a) Remove the air filter element by undoing the screw
(fig.5B) and removing the filter cover. clean the filter by
blowing through from the clean side, with an air line at
low pressure. Replace filter, cover and screw.
DO NOT
operate compressor without filter as foreign bodies or
dust could damage the pump and will invalidate
warranty.
WARNING! Wear safety goggles when performing this
task.
b) clean compressor.
c) check that the relief valve, vents pump output and
reduces engine speed when maximum pressure is
reached.
Also that the compressor restarts pressure build up
automatically at 2bar below max pressure.
5.2.4.
Operations to be carried out monthly:
a) check belt tension. A weight of 3kg applied at the belt
mid-point should give a deflection of approximately
10mm (fig.6). If adjustment is required, maintain the
alignment of the two pulleys (fig.6). Adjust by
repositioning the engine, using the screw adjuster
provided in the base plate.
5.2.5.
Operations to be carried out every 200 working hours:
a) change air filter element. (See 5.2.3).
b) Replace the lubricating oil. For oil specifications see 5.4.
Remove the dipstick (fig.5c) and (after placing a
suitable container under it) undo the oil drainer (fig.5d).
drain when the compressor has recently run, so the oil
is hot, the oil will drain rapidly and completely. Replace
the oil drainer and refill through the filler aperture.
do not overfill. Replace the dipstick.
WARNING! Never mix different oils and do not use
non-detergent/low quality oils as the compressor
may be damaged and will invalidate the warranty.
WARNING! Dispose of waste oil only in accordance
with local authority requirements.
c) check all tube fittings and electrical connections.
d) Inspect pressure tank inside and out for damage or
corrosion.
NOTE: It is recommended that every two years
(or approximately every 1600 working hours), the
compressor is returned to an authorised dealer for a
complete inspection.
ALIGNMENT
fig.4
fig.6
fig.5
Original Language Version
SA1565 Issue: 2 - 20/02/12