Installing the fob, Installing an “optional” light fixture – Kichler 300113 User Manual
Page 10
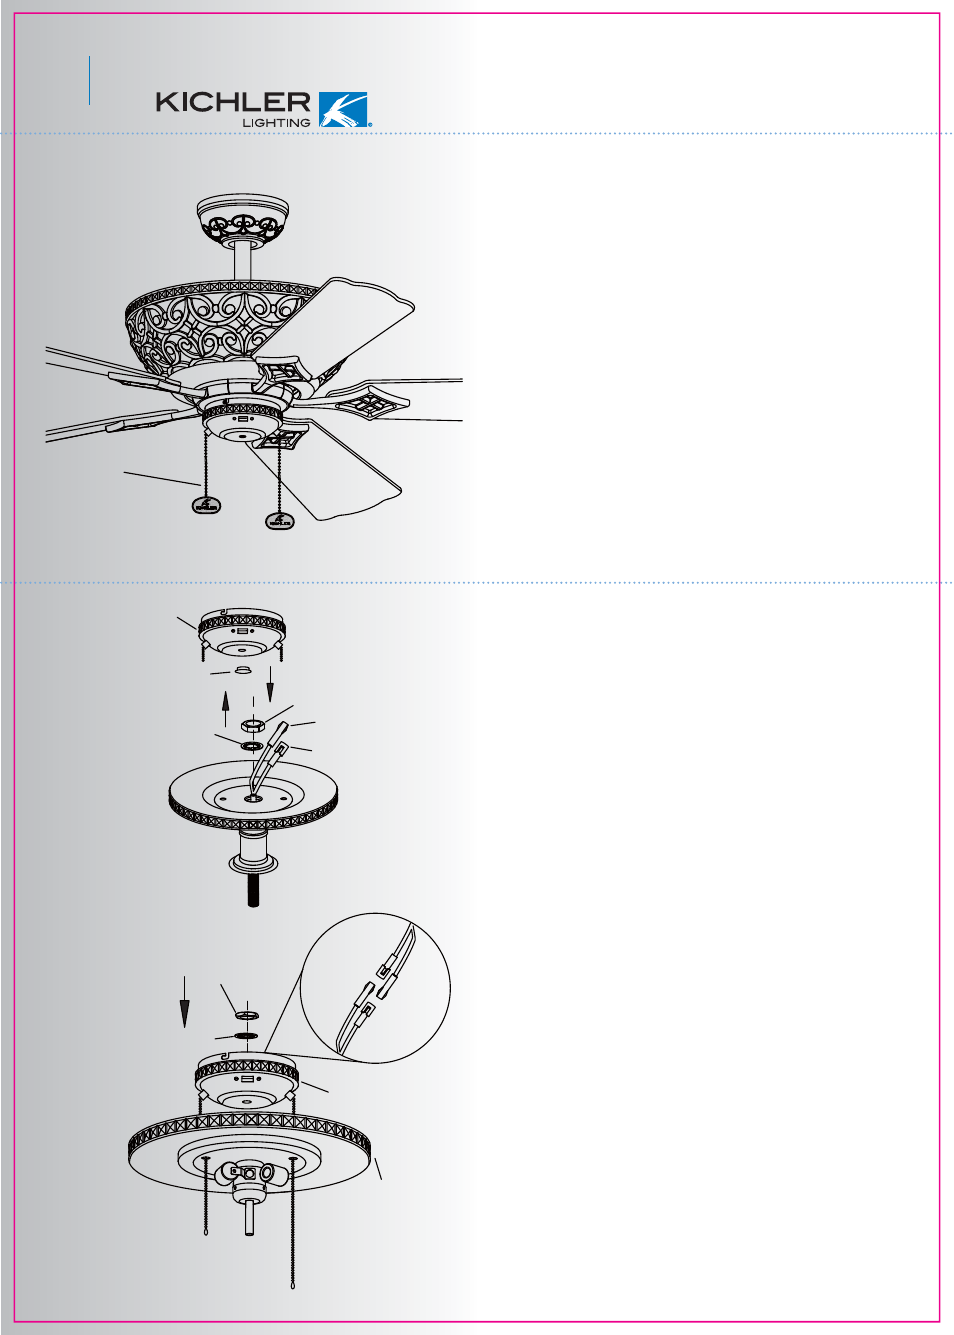
9
Fig. 20
Fig. 22
Fig. 21
12. INSTALLING THE FOB
Step 1. Attach the decorative pull chain Fob to
the pull chain coming out of the Switch Housing.
Refer to Fig. 20
Step 2. The longer pull chain is for motor speed
control and it has four positions. High, Medium,
Low and Off. Pulling the Fob once for each
position.
Step 3. The shorter pull chain controls the up
Light Fixture either ON or OFF with each pull of
the chain.
NOTE: Reversing the direction of the ceiling fan
blades is controlled by a horizontal “Slide Switch”
located on the side of the switch housing.
NOTE: REVERSING the blade rotation and
pushing the air UP during Winter months will help
to keep a balanced room temperature.
Step 1. Remove the finial NUT located in the
center of the switch housing. See Fig. 21.
Step 2. Remove the lock washer and hex nut
from the light fixture mounting stem. (Fig. 21)
Step 3. Feed the electrical wires from the light
fixture through the hole in the switch housing
(starting with the black wire first, it has a
larger connector). Feed the two pull chains
from switch housing through the holes on
each side of the light kit. Threaded the light kit
onto the switch housing, add the lock washer
and hex nut on the inside of the switch hous-
ing and tighten securely. (Fig. 22)
Step 4. Connect the black wire connectors
from the light fixture and switch housing by
pushing them together. Follow the same
procedure with the white wire connectors.
(Fig. 22)
Step 5. The square plastic wiring connector
from the ceiling fan and the light fixture will
only fit together one way. Match up the color
on the side of each connector, then push
them together until the snap engages. (Fig. 23
on the next page)
13. INSTALLING AN “OPTIONAL”
LIGHT FIXTURE
Fob
(big)
(small)
Plastic Nut
Molex Connection
Lock Washer
Switch Housing
Hexnut
Molex Connection
Light Kit
Switch Housing
Lock Washer
Hexnut