Diagram e – ShoreLand'r SL70TAL V.1 User Manual
Page 5
Midwest Industries, Inc.
Ida Grove, IA 51445
800.859.3028
www.shorelandr.com
0003355
REV C 2/14/06
Page 5
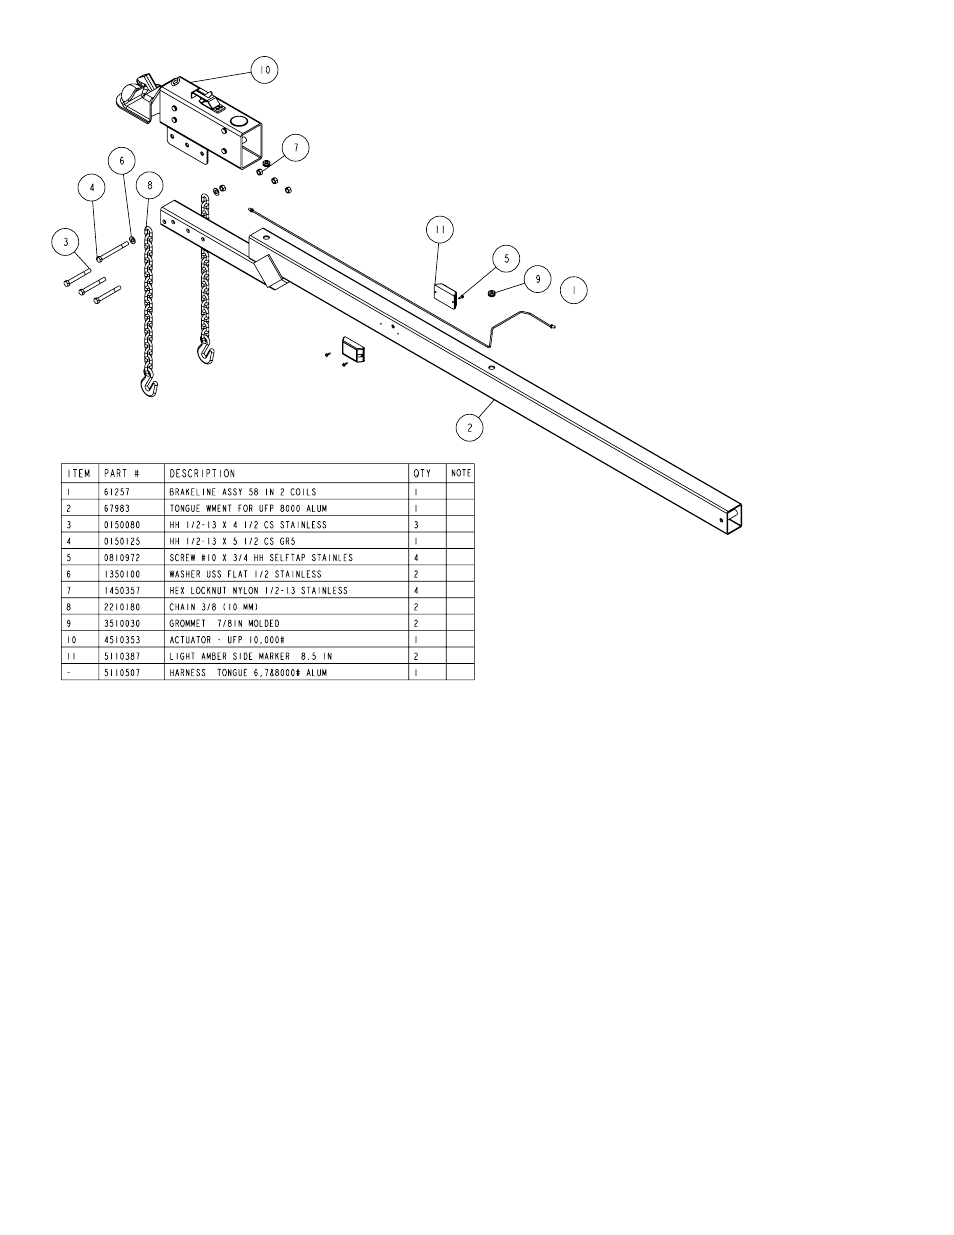
IMPORTANT: All hardware for your trailer is stainless steel.
It is important that you use an anti-seize material on the
bolt threads when assembling to prevent gaulding.
Tongue:
Fasten the tongue in the rear to the front cross member with a
1/2” X 4-1/2” stainless steel hex bolt and 1/2” stainless steel flat
washers under the bolt head and under the 1/2” stainless steel
lock nut. Slip the tongue under the lower frame plate of the frame.
Line up the holes, fasten the tongue in the frame with two (2)
1/2” X 3-9/16” X 5” stainless steel square U-bolts, 1/2” stainless
steel washers and 1/2” stainless steel hex lock nut with nylon in-
serts to the front tongue plate. Refer to Detail E and F.
Safety Chain:
Mount the safety chains to the front of the tongue using a 1/2” X 5-
1/2” stainless steel hex bolt (Item #4). Place a 1/2” stainless steel
flat washer on the head of the bolt, followed by a safety chain. Insert
the bolt through the drop tongue tube. Place the other safety chain on
the bolt on the opposite side of tongue and secure with a 1/2” stain-
less steel flat washer and 1/2” stainless steel hex lock nut with nylon
insert. Refer to Diagram E.
Wiring:
Pull the wire harness out the rear of the tongue which is located
on the first cross member. Match the color of the tongue wire
harness with those of the side frame harnesses. Plug in the
tongue wire harness to the side frame wire harnesses.
White Ground Wire Installation
Pull the white wire out the hole in the top of the tongue located just
behind the front joint of the two side frames. Place the self-tapping
screw provided through the round metal ring on the white ground
wire of the tongue harness just pulled out. Attach the ground wire
to the main frame by driving the screw into the bottom flange of the
side frame. This will assure a positive ground for the lighting.
Brake line:
Place one end of the tongue brake line into the hole in the top of
the tongue located just behind the front joint of the two side frames.
Insert until the end of the line comes out the front of the tongue.
Place the actuator into it’s approximate location on the tongue.
Remove the plastic plug in the rear of the actuator and thread the brake line
into the port. Tighten. Place the actuator in it’s proper location by aligning
the holes in the mounting channel with the holes in the tongue.
Actuator:
Mount the actuator (Item #10) to the drop tongue section
using three (3) 1/2” X 4-1/2” stainless steel hex bolts (Item #3)
and 1/2” stainless steel hex lock nuts with nylon inserts.
Place a grommet around the brake line where it comes out
of the top of the tongue to keep it from vibrating and chaff-
ing as it is being towed. Form the remaining end of the brake
line so it will mate up with the brake line running down the
side frame. Secure the two lines together with the brass
coupling provided in Hardware box 66801. Tighten securely to
prevent leaks but do not over tighten causing the threads in the fitting
to strip.
FINAL ASSEMBLY INSTRUCTIONS
Remove and sort the small parts from the frame.
Reference Standing at the rear of the trailer looking forward will
determine the right and left sides of the trailer for assembly
instructions.
Diagram E