Setting the projector id, Setting the remote control id, Epson powerlite 7800p projector – Epson 7800P User Manual
Page 13: Using the control panel, Controlling multiple projectors, And press, Projector id, Enter
EPSON PowerLite 7800p Projector
12
-
EPSON PowerLite 7800p Projector
5/03
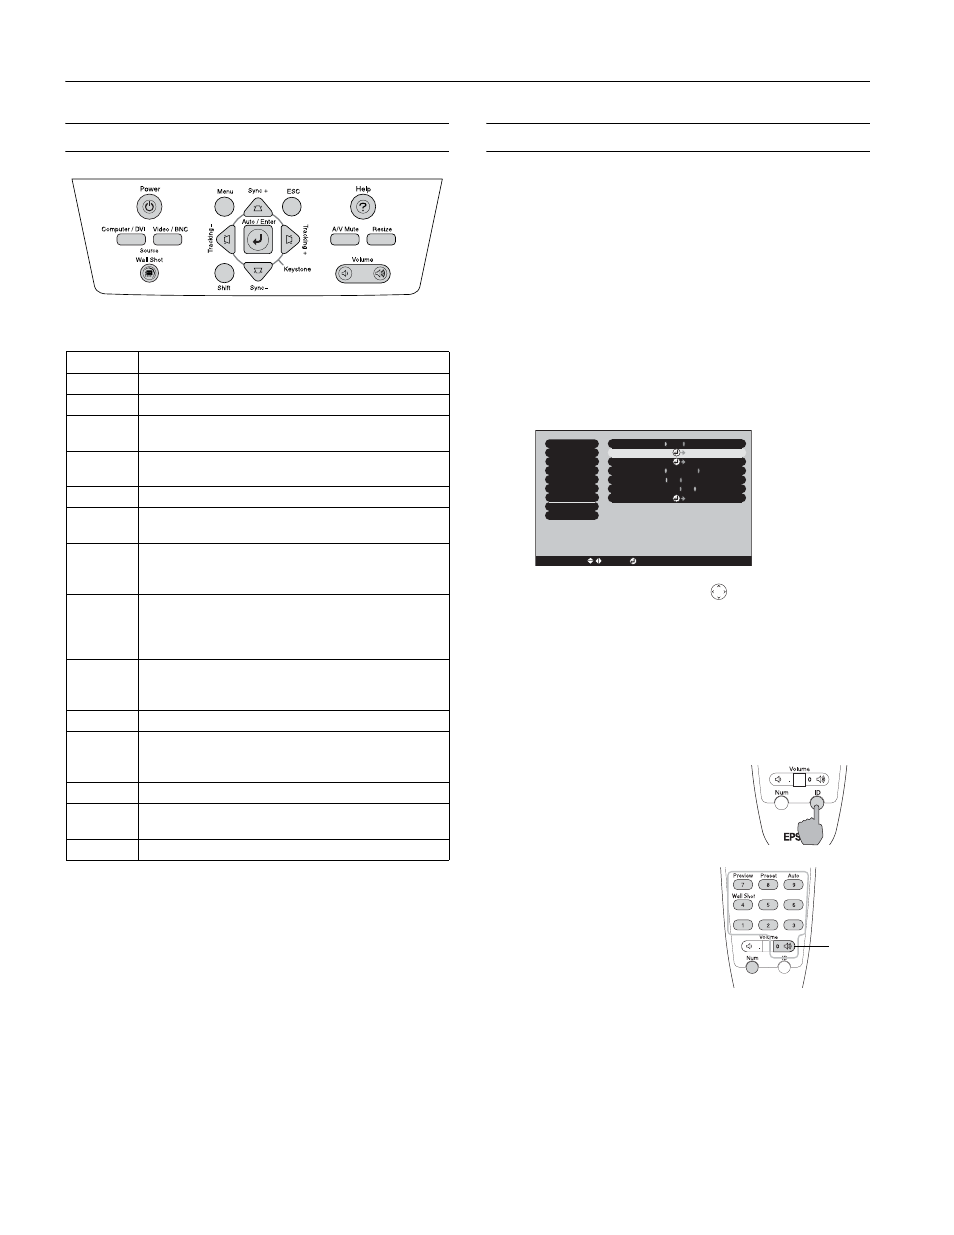
Using the Control Panel
This table describes the functions of the control panel buttons.
Controlling Multiple Projectors
If you’re using more than one projector, you can control all
the projectors—or just selected ones—by using the projector
ID system with just one remote control. To operate a
projector, you have to set the remote control’s ID to match
that of the projector. Or you can control all of the projectors
simultaneously by setting the remote control’s ID to zero.
Setting the Projector ID
The projector’s default ID is 1. If you need to change it,
follow these steps:
1. Access the projector’s Advanced2 menu, highlight
Projector ID
and press
Enter
.
2. Press the right or left side of the
pointer button to
increase or decrease the ID value.
3. Press
Enter
to set the value.
4. When done, press
ESC
to exit the menu system.
Setting the Remote Control ID
The remote control’s default ID is zero. If you need to change
it, follow these steps:
1. Press the
ID
button on the remote
control. You see it light up.
2. Press one of the numbered
buttons on the remote
control to select the desired
ID (0 through 9). Select zero
to control all projectors, or
select a number to match the
ID of the projector(s) you
want to operate.
The
ID
button’s light shuts off and the new ID is registered.
If you would like to check the remote control’s current ID,
press the
ID
button twice. Count the number of flashes; this
number corresponds to the remote control’s ID. If it doesn’t
flash, the ID is set to zero.
Button
Function
Power
Turns the projector on or off.
Help
Displays the online help menu.
Computer/
DVI
Switches between the connected Computer and DVI
sources.
Video/BNC
Switches between the connected video and BNC
sources (Video, S-Video, and BNC).
Menu
Displays the on-screen menu system.
ESC
Displays the previous menu when you’re viewing a
menu.
Auto/Enter
Selects an option when the menu or help system is
active. When computer images are displayed, press to
auto-adjust the image.
Tracking
+
and
–
Eliminates vertical banding that may be present in
some computer images. Use the Tracking buttons as
arrow keys to navigate the on-screen menu and help
systems.
Sync
+
and
–
Corrects blurriness that may be present in some
computer images. Use the buttons as arrow keys to
navigate the on-screen menu and help systems.
Shift
Press and hold to use the Tracking and Sync buttons.
A/V Mute
Turns off audio and video, displaying the black, blue,
or user logo background. Press again to turn audio
and video back on.
Resize
Adjusts how an image fits into the display area.
Keystone
Squares an image that is “keystoned” or tapered on
the sides after tilting up the projector.
Volume
Increases or decreases the sound.
Brightness Control
Brightness Control
High
High
Low
Low
:
Video
Video
Audio
Audio
Setting
Setting
User's Logo
User's Logo
Advanced1
Advanced1
About
About
Reset All
Reset All
Projector ID
Projector ID
Network
Network
Reset
Reset
Execute
Execute
: 1
: 1
[Menu]: Exit
[Menu]: Exit
Effect
Effect
Advanced2
Advanced2
COM Port
COM Port
BNC Sync Termination
BNC Sync Termination
:
ON
ON
OFF
OFF
:
Set
Set
Set
Set
RS-232C
RS-232C
USB
USB
[ / ]: Select
[ / ]: Select
[ ESC ]: Return
[ ESC ]: Return
[ ]: Set
[ ]: Set
Auto setup
Auto setup
:
OFF
OFF
:
ON
ON
Zero