Using the adapter with only one usb connector, Mounting instructions mac os x, Ab c – Amped Wireless UA600EX - High Power Wireless-N 600mW Pro USB Adapter User Manual
Page 2
Amped Wireless
A Division of Newo Corporation
Copyright © 2011 Amped Wireless / Newo Corporation. All rights reserved.
Amped Wireless, Newo Corporation, the Amped Wireless Logo are registered trademarks or trademarks of Newo Corporation.
Using the Adapter with only One USB Connector
The High Power 600mW USB Adapter features two USB connectors for providing the maximum performance
through the power of two USB ports. However, in the case that you wish to only use one USB connection,
simply insert only the USB connector labeled “PRIMARY.” For full range and performance the USB connector
labeled “
AMPED
” must also be inserted.
Mounting Instructions
Mac OS X
O. Connect to a Wireless Network
The Amped Wireless Utility should automatically
load.
If it does not load, click the Amped Wireless
Utility icon to load the utility.
Select the
Available
Network
tab to view nearby wireless networks.
Highlight your desired network and click
Connect
.
Note:
Click
Add to Profile after highlighting your network to save it
and have the Utility connect automatically when in range.
B. Find your Operating System Version
Click on the
Apple Icon
(upper-left corner).
Select
About this Mac
and note the Mac OS X
version
.
K. Activate the USB Adapter
You may be prompted to activate your USB
Adapter in Network Preferences. If not, select
the
Apple Button
(upper left corner), and select
System Preferences
from the drop-down list.
From there, select
Network
.
E. Install the Software
Follow the instructions and click
Continue
to
install the software. If prompted, select a
destination for the driver software. This is
typically the Macintosh HD. Click
Continue
.
M. Activate the Adapter
(OSX 10.4/10.5 Only)
In the Advanced menu, check that the adapter
is
Using DHCP
and then click
OK
.
P. Connect to a Wireless Network
If your network has security enabled, enter the
security key here. Re-enter it again to confirm.
Click
OK
to begin using your new wireless adapter.
L. Activate the USB Adapter
For OS X 10.4 Tiger and 10.5 Leopard:
Select
Ethernet Adapter (en#)
and click
Advanced
.
Continue to Step M
For OS X 10.6 Snow Leopard and 10.7 Lion:
Select
Amped Wireless Adapter
and click
Apply
.
Continue to Step O
N. Activate the Adapter
(OSX 10.4/10.5 Only)
Click
Apply
to activate your USB Adapter.
J. Insert the High Power USB Adapter
Once all AirPort cards are disabled, insert the High
Power USB Adapter into your USB port. Locate two
available USB ports and connect the adapter to
your computer. If only one USB port is available,
only insert the USB connecter labeled
Primary
.
AMPED
PRIMARY
C. Select your Operating System
From the CD Menu, select the software version
that your Mac is using to begin installing the
software (i.e. 10.7, 10.6, 10.5 or 10.4).
A. Access the Menu
From the autoload page, click on
Start Here
to open the CD Menu. If the CD menu does not load
browse the CD to find the Start Here file.
F. Enter your Password
If your computer has a password, please enter
it when prompted and click
OK
.
G. Restart your Computer
When the software has installed, you will be
asked to restart your Mac. Click
Restart
to
reboot your computer.
Desktop Mounting
H. Turn off your AirPort Card
After the computer reboots, disable any AirPort
cards by selecting the wireless icon (upper right-
corner) and select
Turn AirPort Off
. If you do not
have an Airport Card continue to Step H.
Q. Position the Directional Antenna
The UA600EX has a high power directional antenna.
For optimal performance position the adapter
towards the direction of your wireless network.
Amped Wireless Utility
Can be found in your
Applications folder or
the Mac dock
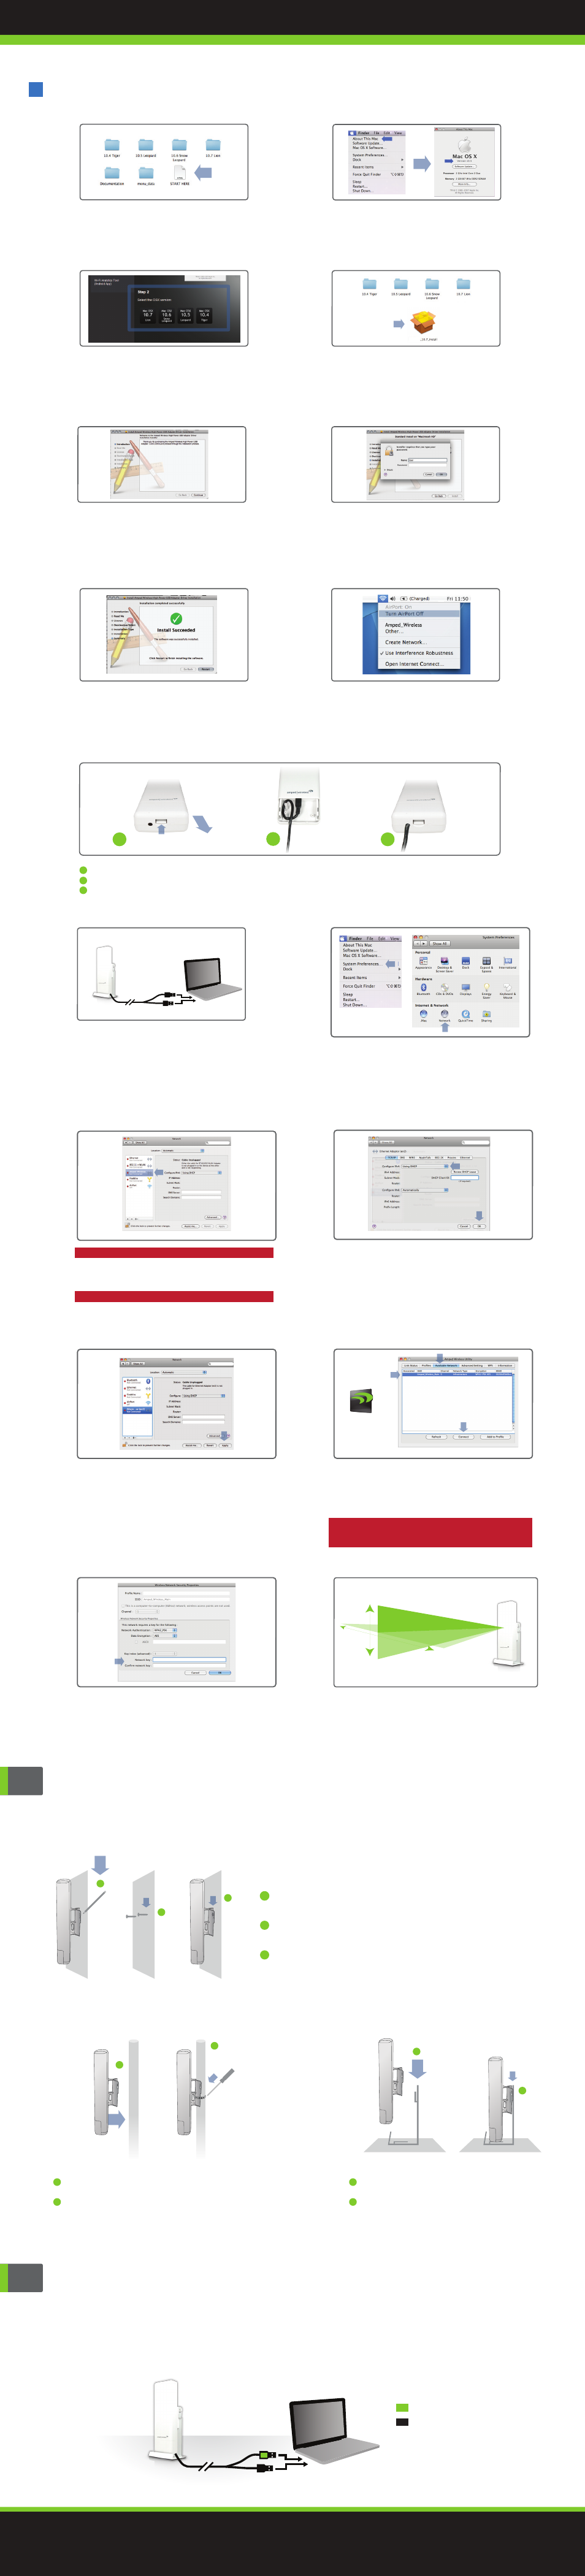
I. Insert USB Cable into the unit
Open the bottom cover: Lift the lock tab and slide the cover out.
Insert the mini USB connector into the USB port. Secure the USB Cable by wrapping the cable around the pegs.
Slide the bottom cover back on firmly so it locks. Make sure the USB cable positioned through the cable hole.
a
b
c
a
b
c
Wall Mounting
b
a
c
a
b
a
b
Pole Mounting
Place the UA600EX against the wall, use a pencil and mark
two pilot locations through the mounting hole on the wall.
Remove the UA600EX and securely drill two screws where
you’ve marked on the pilot locations wall.
Now, mount the unit onto the secured screws.
a
b
c
Place the UA600EX against the pole.
Use the included hose clamp and secure the adapter to the
pole by inserting one side of the clamp through the smaller hole
located on the bottom of the mounting bracket. Use a screw
driver to fasten the clamp until the adapter is securely mounted.
a
b
Place the stand in an optimum location.
Secure the UA600EX onto the desktop mount.
a
b
This is the second page of the Setup Guide. Start on the opposite side first.
D. Find the Folder on the Setup CD
Open your OS X version folder, and then
click Installation file to begin the installation.
UA600EX