Anti-fouling paint, Installation, Assembly – Airmar ST600 User Manual
Page 2: Hole drilling, Bedding, Installing
Anti-fouling Paint
Aquatic growth can accumulate rapidly on the sensor’s surface
reducing performance within weeks. Surfaces exposed to salt
water must be coated with anti-fouling paint. Use water-based
anti-fouling paint only. Never use ketone based anti-fouling paint,
since ketones attack many plastics possibly damaging the sensor.
It is easier to apply anti-fouling paint before installation, but allow
sufficient drying time. Reapply paint every 6 months or at the
beginning of each boating season. Paint the following surfaces
(see Figure 1):
• Outside wall of paddlewheel insert below lowest o-ring
• Paddlewheel cavity
• Paddlewheel
• Bore of housing up 30mm (1-1/4")
• Exterior flange of housing
• Blanking plug below lowest o-ring including the exposed end
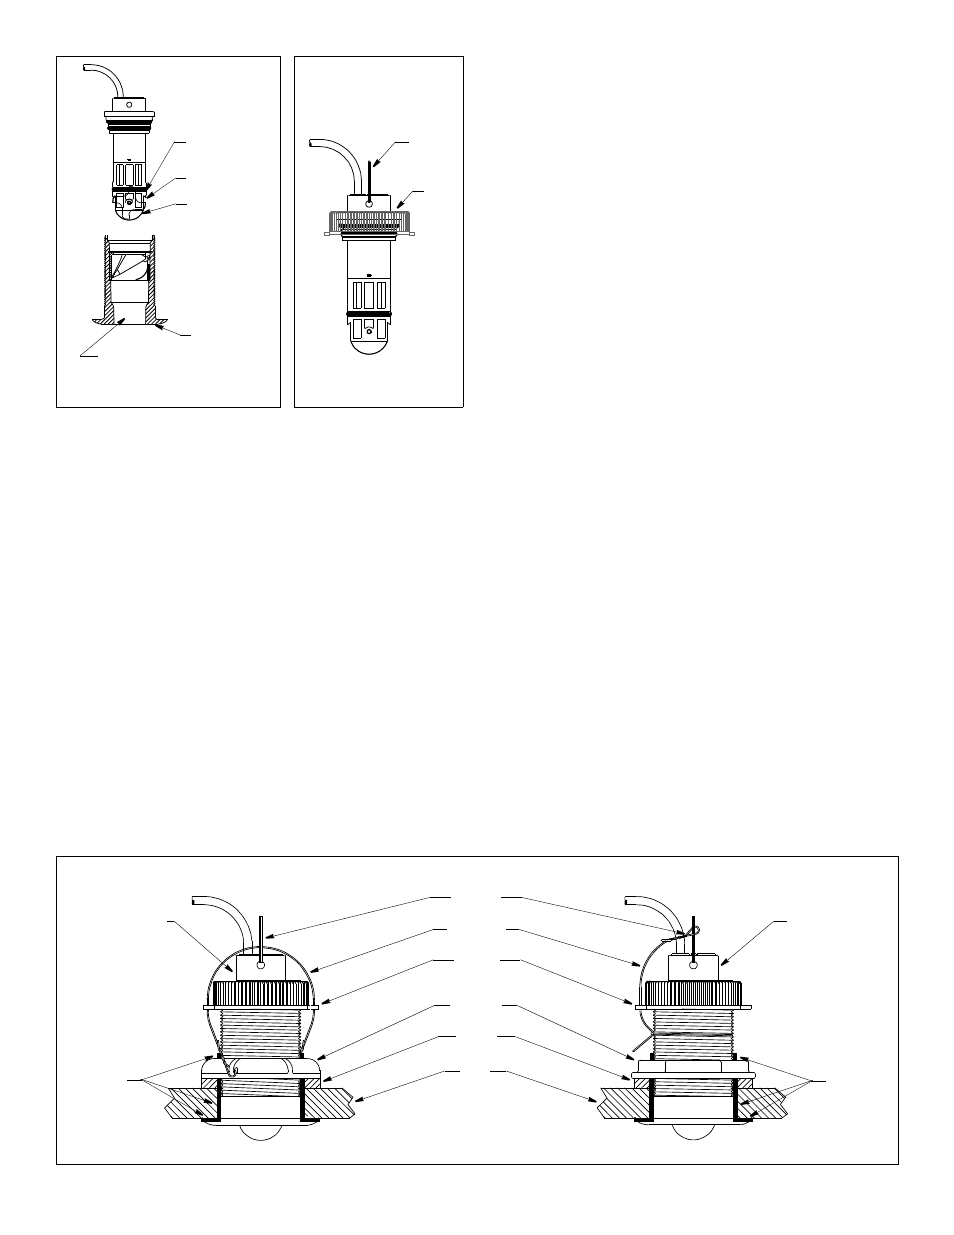
Assembly
Slide the cap nut along the cable until it rests on the top of the
paddlewheel insert. Attach the pull ring to the insert capturing the
cap nut (see Figure 2). Similarly attach the pull ring to the blanking
plug capturing the cap nut.
Installation
Hole Drilling
Cored fiberglass hull—Follow separate instructions on page 3.
1. Drill a 3mm or 1/8" pilot hole from inside the hull. If there is a rib,
strut, or other hull irregularity near the selected mounting
location, drill from the outside.
2. Using the 51mm or 2" hole saw, cut the hole perpendicular to
the hull from outside.
3. Sand and clean the area around the hole, inside and outside, to
ensure that the sealant will adhere properly to the hull. If there is
any petroleum residue inside the hull, remove it with either mild
household detergent or a weak solvent (alcohol) before sanding.
Metal hull—Remove all burrs with a file and sandpaper.
Bedding
CAUTION: Be sure the surfaces to be bedded are clean and dry.
Apply a 2mm (1/16") thick layer of marine sealant around the
flange of the housing that contacts the hull and up the sidewall of
the housing (see Figure 3). The sealant must extend 6mm (1/4")
higher than the combined thickness of the hull, washer, and hull
nut. This will ensure there is sealant in the threads to seal the hull
and to hold the hull nut securely in place.
Installing
1. From outside the hull, push the housing into the mounting hole
using a twisting motion to squeeze out excess sealant (see
Figure 3). Align the arrow on the flange of the housing to point
forward toward the bow. If the sensor is not installed on the
centerline of the boat, angle the housing slightly toward the
centerline to align it with the water flow.
2. From inside the hull, slide the washer onto the housing.
Aluminum hulls less than 6mm (1/4") thick—Use an
additional rubbery, plastic, or fiberglass washer. Never use a
wood backing block, since swelling of the wood can overstress
the plastic housing causing a fracture. Never use bronze since
electrolytic corrosion will occur.
3. Screw the hull nut in place being sure the notch on the upper rim
of the housing and the arrow on the flange are still positioned
forward toward the bow (see Figure 7).
Plastic housing—Do not clamp tightly on the wrenching flats,
causing the housing to fracture.
Plastic hull nut—Hand-tighten only. Do not over tighten.
Metal hull nut—Tighten the hull nut with slip-joint pliers.
Figure 3. Bedding and installing
plastic housing
metal housing
pull ring
safety wire
cap nut
hull nut
washer
hull
paddlewheel
paddlewheel
insert
insert
marine
sealant
marine
sealant
(plastic)
2
Figure 1. Anti-fouling paint
outside wall
paddlewheel
paddlewheel
bore of housing
exterior flange
lowest o-ring
below
cavity
up 30mm (1-1/4")
Figure 2. Assembly
paddlewheel
insert
of housing
paddlewheel
insert
housing
pull
ring
cap
nut
Copyright © 2001 Airmar Technology Corp.
Copyright © 2001 Airmar Technology Corp.
Copyright © 2001 Airmar Technology Corp.