Fairing, Airmar polymer fairing, Fabricating a fairing & backing blocks – Airmar M42 User Manual
Page 2: Cutting the fairing
Fairing
Nearly all vessels have some deadrise angle at the transducer’s
mounting location. If the transducer is mounted directly to the hull,
the sound beam will be tilted off the vertical at the same angle as
the deadrise. If the deadrise angle at the mounting location
exceeds 10
°
a fairing is strongly recommended (see Figure 1).
• Orients the sound beam straight down by mounting the
transducer parallel to the water surface.
• Mounts the transducer deeper in the water for clean flow over
the transducer’s face.
AIRMAR
Polymer Fairing
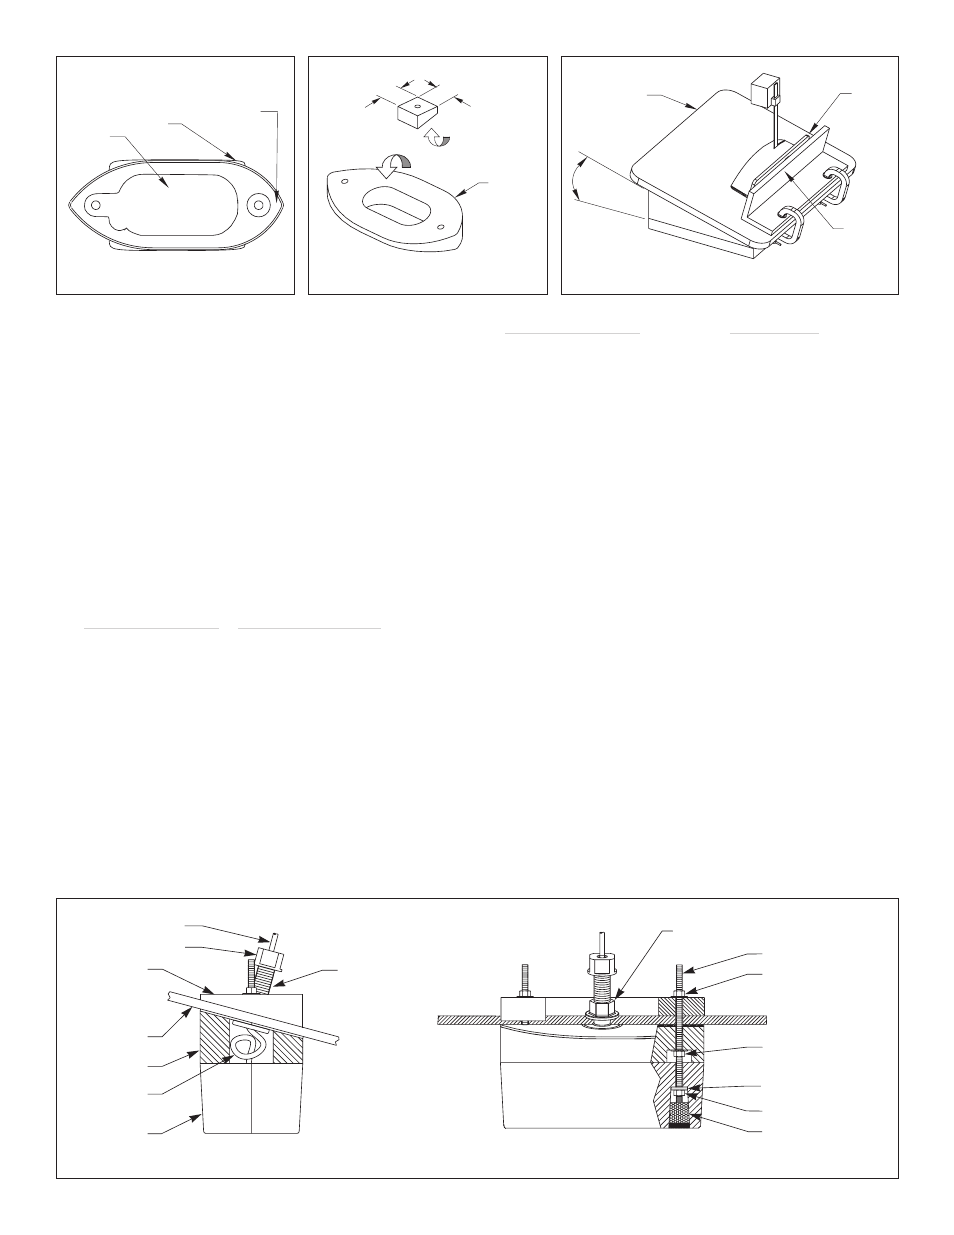
Made of a high impact polymer with an integrated cutting guide,
the Airmar fairing is easy to cut with a band saw and shape with
hand tools (see Figure 3). The fairing also has a center cavity for
the stuffing tube and cable service loop.
Model (see cable tag)
Airmar Fairing Part No.
M155, R155, M172
33-147
M177
33-145
Fabricating a Fairing & Backing Blocks
A fairing is usually constructed of an oily wood such as mahogany
or teak. Shape the fairing to match the outline of the transducer
(see Figure 4). Cut a 75mm x 150mm (3" x 6") hole in the center
of the fairing for the stuffing tube and the cable service loop. Place
the transducer over the fairing and using the transducer as a
guide, drill two holes for the threaded rods.Backing blocks are
mounted inside the hull to provide a level surface for tightening the
nuts that hold the threaded rods. They are fabricated to match the
interior deadrise angle. Drill a hole through the center of each
backing block.
Model (see cable tag)
Hole Diameter
M42
13mm or 1/2"
M163
10mm or 3/8"
Cutting the Fairing
Warning
: The fairing must be installed parallel to the keel to
ensure proper boat handling and water flow over the transducer.
1. The stuffing tube will be centered in the cavity of the fairing (see
Figures 3, 4 & 6). Measure the deadrise angle of the hull at the
stuffing tube using an angle finder or a digital level (see Figure 1).
2. Tilt the band saw table to the measured angle and secure the
cutting fence (see Figure 5).
Caution
: The arrow will be pointing forward toward the bow
after the fairing is installed (see Figure 3).
M177
—This fairing is symmetrical.
3. Place the fairing on the table so the cutting guide rests against
the fence. The arrow will be pointing toward you for installation
on the port side and away from you for installation on the
starboard side of the boat (see Figure 5).
Be sure
to orient the
fairing on the band saw so the angle cut matches the intended
side of the hull and not the mirror image.
Warning
: Always wear safety goggles and a dust mask.
4. Recheck steps 1 through 3; then cut the fairing.
5. Center the stuffing tube in the cavity of the fairing.
Be sure
the
fairing is parallel to the keel (centerline). Shape the fairing to the
hull as precisely as possible with a rasp or power tool.
6. The remaining section of the fairing with the cutting guide will
be used as the backing block inside the hull. It will provide a
level surface for tightening the nuts on the threaded rods.
2
Figure 5. Cutting an Airmar fairing
cutting
guide
band saw
table
deadrise
angle
fence
Bow
➣
arrow points
Figure 3. Airmar fairing
cavity
toward bow
▲
cutting
guide
Figure 6. Threaded stem stuffing tube installation
—stainless steel stuffing tube shown
stuffing
flanged nut
or
nut & washer
threaded rod (2)
nut (2) & washer (2)
nut (2) & washer (2)
rubbery washer (2)
nut (2) & washer (2)
plug (2)
cable
compression nut
backing block
fairing
cable
transducer
hull
tube
transducer
fairing
backing block
service loop
AIRMAR
®
deadrise shape
77mm (3")
77mm (3")
backing block (2)
deadrise shape
Figure 4. Fabricating a fairing
blunt
end
and backing blocks
fairing
AIRMAR
®
AIRMAR
®
Bow
➣
forward view
Bow
➣
AIRMAR
®