Checking for leaks, Installation in a cored fiberglass hull, Cable routing & connecting – Airmar Shorty™ Transducers—P6 User Manual
Page 3
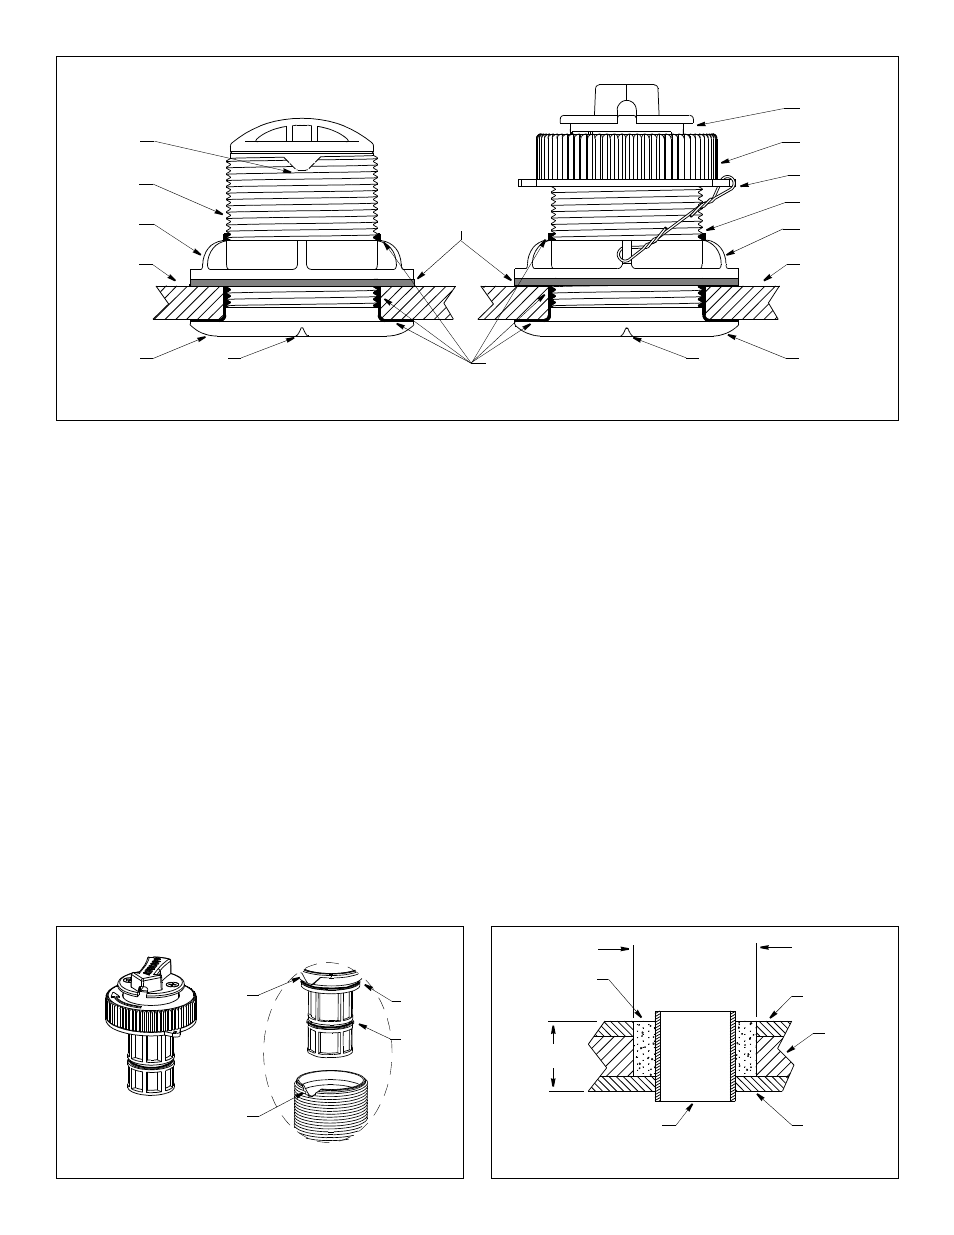
3. Screw the cap nut several turns, then check that the arrow on
the insert is still facing forward toward the bow. Continue to
tighten the cap nut. Hand-tighten only. Do not over tighten.
4. Attach the safety wire to prevent the insert from backing out in
the unlikely event that the cap nut fails or is screwed on
incorrectly Attach the safety wire to one eye in the hull nut.
Keeping the wire taut throughout, lead the wire in a
counterclockwise direction and thread it through one eye in the
cap nut. Twist the end securely to the wire.
Cable Routing & Connecting
CAUTION: If your sensor came with a connector, do not remove it
to ease cable routing. If the cable must be cut and spliced, use
Airmar’s splash-proof Junction Box No. 33-035 and follow the
instructions provided. Removing the waterproof connector or
cutting the cable, except when using a watertight junction box, will
void the sensor’s warranty.
1. Route the cable to the instrument, being careful not to tear the
cable jacket when passing it through the bulkhead(s) and other
parts of the boat. Use grommets to prevent chafing. To reduce
electrical interference, separate the transducer cable from other
electrical wiring and the engine. Coil any excess cable and
secure it in place with cable ties to prevent damage.
2. Refer to the instrument owner’s manual to connect the
transducer to the instrument.
Checking for Leaks
When the boat is placed in the water, immediately check around
the thru-hull transducer for leaks. Note that very small leaks may
not be readily observed. Do not to leave the boat in the water for
more than 3 hours before checking it again. If there is a small
leak, there may be considerable bilge water accumulation after 24
hours. If a leak is observed, repeat “Bedding” and “Installing”
immediately (see page 2).
Installation in a Cored Fiberglass Hull
The core (wood or foam) must be cut and sealed carefully. The
core must be protected from water seepage, and the hull must be
reinforced to prevent it from crushing under the hull nut allowing
the housing to become loose.
CAUTION: Completely seal the hull to prevent water seepage into
the core.
1. Drill a 3mm or 1/8" pilot hole from inside the hull. If there is a rib,
strut, or other hull irregularity near the selected mounting location,
drill from the outside. (If the hole is drilled in the wrong location,
drill a second hole in a better location. Apply masking tape to the
outside of the hull over the incorrect hole and fill it with epoxy.)
2. Using a 51mm or 2" hole saw, cut a hole from outside the hull
through the outer skin only (see Figure 4).
3
Figure 2. Bedding and installing—
low profile models shown
P6 or P7
P8
hul
l
hull nu
t
hull
safety wire
cap nut
hull nut
marine sealant on
insert
housing
housing
arrow
arrow
notch
washer
flange and side wall
large
O-ring
detail
key
small
O-ring
Figure 3. Retractable insert
notch
(some installations)
Figure 4. Preparing a cored fiberglass hull
inner skin
core
outer skin
solid or hollow cylinder
pour in
casting
epoxy
9-12 mm
(3/8-1/2")
larger than the
hole through the
hull’s outer skin
hull thickness
Copyright © 2005 Airmar Technology Corp.
Copyright © 2004 Airmar Technology Corp.
Copyright © 2004 Airmar Technology Corp.
flange
flange