Airmar, St700: valve, Cleaning – Airmar B122—Long-Stem User Manual
Page 8: Winterizing, Replacement sensor & parts
AIRMAR
®
TECHNOLOGY CORPORATION
35 Meadowbrook Drive, Milford, New Hampshire 03055-4613, USA
www.airmar.com
Copyright © 2004 - 2011 Airmar Technology Corp. All rights reserved.
ST700: Valve
How the Valve Works
The valve is not a watertight seal! The sensor incorporates a
self-closing valve which minimizes the flow of water into the boat
when the insert is removed. The curved flap valve is activated by
both a spring and water pressure. Water pushes the flap valve
upward to block the opening, so there is no gush of water into the
boat. Always use the insert or the blanking plug secured with the
safety wire for a watertight seal.
Servicing the Valve Assembly—Should the valve fail, remove it
for servicing.
1. Inspect the O-rings on the blanking plug and lubricate them with
silicone lubricant or petroleum jelly (Vaseline
®
).
2. Remove the insert from the housing.
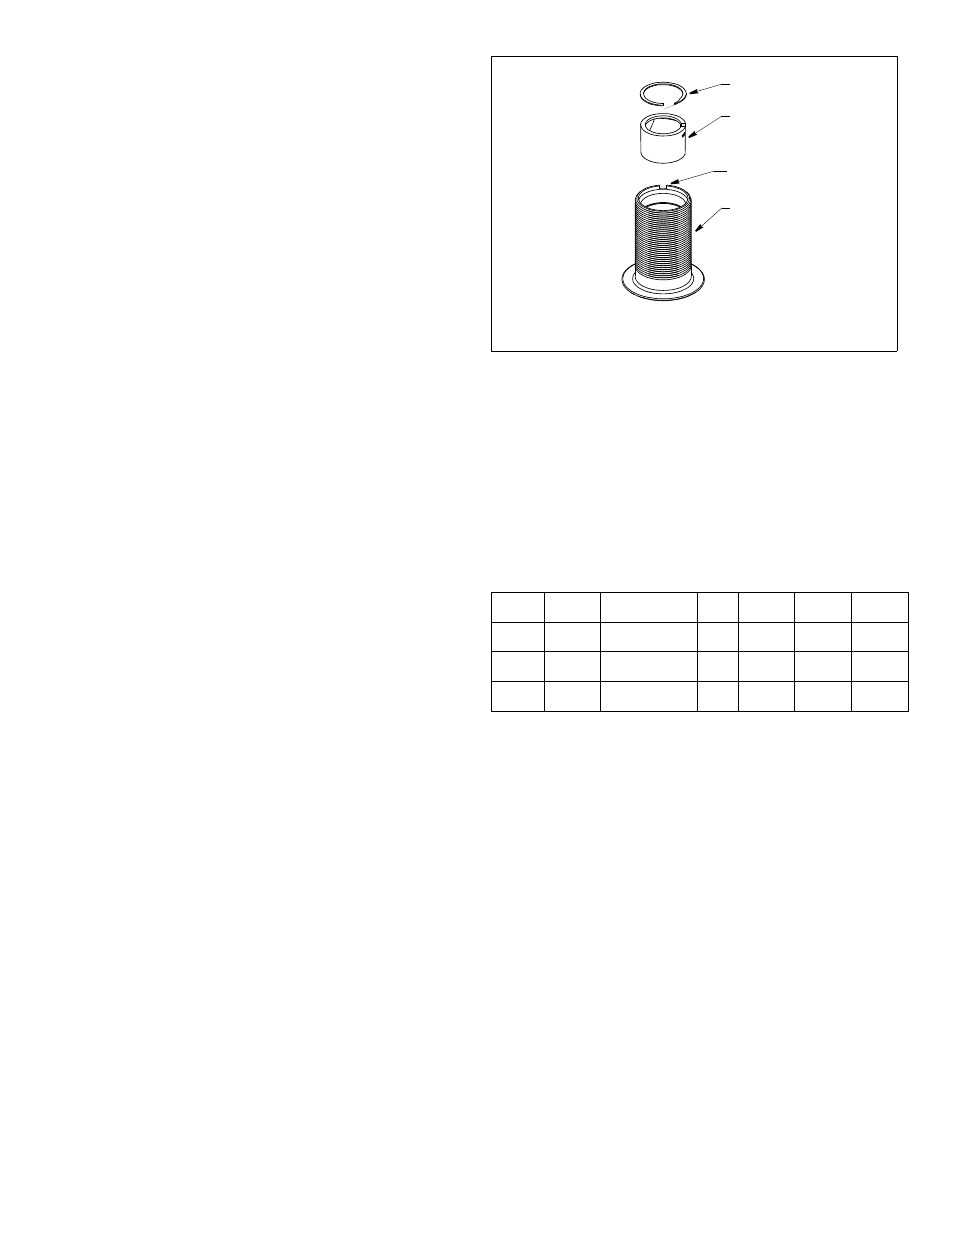
3. Remove the snap ring from the valve assembly using a
screwdriver to pry the end of the ring free. Lift the ring out (see
Figure 15).
4. Slide the valve assembly upward and out of the housing slowly.
The flap valve retainer pin is a loose slip-fit and may slide out
when the assembly is removed.
5. Hold the cap nut on the blanking plug while sliding it into the
housing with the arrow on the top pointing forward toward the
bow. Seat the plug with a twisting motion until the key fits into
the notch. Screw the cap nut in place. Hand tighten only. Do
not over tighten. Reattach the safety wire (see Figure 12 ).
6. Clean, repair, or replace the valve assembly so the flap valve
moves freely and seats against the valve housing.
7. To reinstall the valve assembly, first reassemble the flap valve
in the valve housing with the retainer pin and spring in place
(see Figure 15).
8. Remove the blanking plug. Slide the valve assembly into the
housing with the flap valve pointing downward. Insert the snap
ring being certain that it locks into the groove in the housing
wall.
9. Hold the cap nut on the blanking plug/insert while sliding it into
the housing with the arrow on the top pointing forward toward
the bow. Seat it into place with a twisting motion until the key
fits into the notch. Screw the cap nut in place Hand tighten
only. Do not over tighten.
10.Reattach the safety wire to prevent the insert from backing out
in the unlikely event that the cap nut fails or is screwed on
incorrectly (see Figure 12).
Cleaning
Aquatic growth can accumulate rapidly on the depth transducer
face and impede or freeze the paddlewheel’s rotation reducing
performance within weeks. Clean the insert with a Scotch-Brite®
scour pad and mild household detergent, being careful to avoid
scratching the depth transducer. If there is a paddlewheel and
fouling is severe, remove the paddlewheel and lightly wet sand it
with fine grade wet/dry paper.
Winterizing
After the boat has been hauled for winter storage, remove the
blanking plug to let the water drain away before reinserting it. This
will prevent any water from freezing around the blanking plug and
possibly cracking it.
Replacement Sensor & Parts
The information needed to order a replacement sensor is printed
on the cable tag. Do not remove this tag. When ordering, specify
the part number, date, and frequency in kHz. For convenient
reference, record this information on page one.
Lost, broken, and worn parts should be replaced immediately
Obtain parts from your instrument manufacturer or marine dealer.
Gemeco
Tel: 803.693.0777
(USA)
Fax: 803.693.0477
Email: [email protected]
Airmar EMEA
Tel: +33.(0)2.23.52.06.48
(Europe, Middle East, Africa) Fax: +33.(0)2.23.52.06.49
Email: [email protected]
Model
Fairing
Cap Nut
Hull
Nut
Adaptor
Ring
Blanking
Plug
Pdwl &
O-rings
B122
33-409-01
02-131-01 (bronze)
04-234-1 (plastic) 02-030 33-634-02 33-414 —
DST800L 33-409-01 02-131-01
(bronze)
04-234-1 (plastic)
02-030 33-634-02 33-414
33-398-04
ST700
—
02-131-01 (bronze)
04-234-1 (plastic)
02-030
—
20-306-01 33-250
snap ring
valve assembly:
flap valve
spring
retainer pin
housing
notch
Figure 15. ST700: Servicing the valve
Copyright © 2001 Airmar Technology Corp.