Dual electronic expansion valve module, Aaon, Unit start-up procedures – Orion System Dual Electronic Expansion Valve Module User Manual
Page 5: Technical guide
Technical Guide
Dual Electronic Expansion Valve Module
5
AAON
®
Unit Start-Up Procedures
AAON
®
Unit Start-Up Procedures
NOTE: The following instructions were provided by AAON to set
up the unit. If you have any questions about this start-up
procedure, please contact AAON Technical Support.
Refrigeration Charging Sequence:
1. Determine valve size utilized on equipment part number from the
physical valve. There are currently 4 models used:
•
SER-C (5-Ton Maximum Nominal Capacity)
•
SER-D (13-Ton Maximum Nominal Capacity)
•
SER-G (26-Ton Maximum Nominal Capacity)
•
SER-J (48-Ton Maximum Nominal Capacity)
2. Determine circuit capacity and divide by valve Maximum
Nominal Capacity to determine average full refrigerant mass fl ow
Example: CC-B-045 Condensing unit; (2) 22.5 Ton Circuits,
Evaporator contains (2) SER-G EEV (Electronic Expansion Valve)
22.5/26 = 0.865 = 86.5%, Rounded to 87%
NOTE: Consult with System Specifi cation and Unit Rating, as
lower or higher evaporator temperatures and other factors
play a role in the actual capacity the compressors may
deliver.
3. Ensure system is charged to a reasonable point to enable
compressor start and ensure that all other procedures dictated for
installation and startup have been followed from the unit IOM.
4. Set the EEV Module’s Valve to manual override position of 87%.
5. Ensure the space is fully loaded at design conditions to allow for
maximum capacity operation and lock the compressor to fully-
loaded capacity.
6. Energize the compressor and ensure a solid column of liquid to the
EEV via verifi cation at the sight glass.
7. From the point of a full sight glass, follow standard charging
procedures to maximize effi ciency via sub cooling, and delta T at
the evaporator.
8. Disable the manual override position on the EEV Module and
allow automatic operation at the desired set point.
9. Verify superheat operation and consistent solid column of liquid at
the sight glass. This may take up to 15 minutes.
10. Repeat instruction for Valve 2 starting with Step 3.
Fine-Tuning the EEV Module’s Setpoints for Best
Reaction Time and Effi ciency:
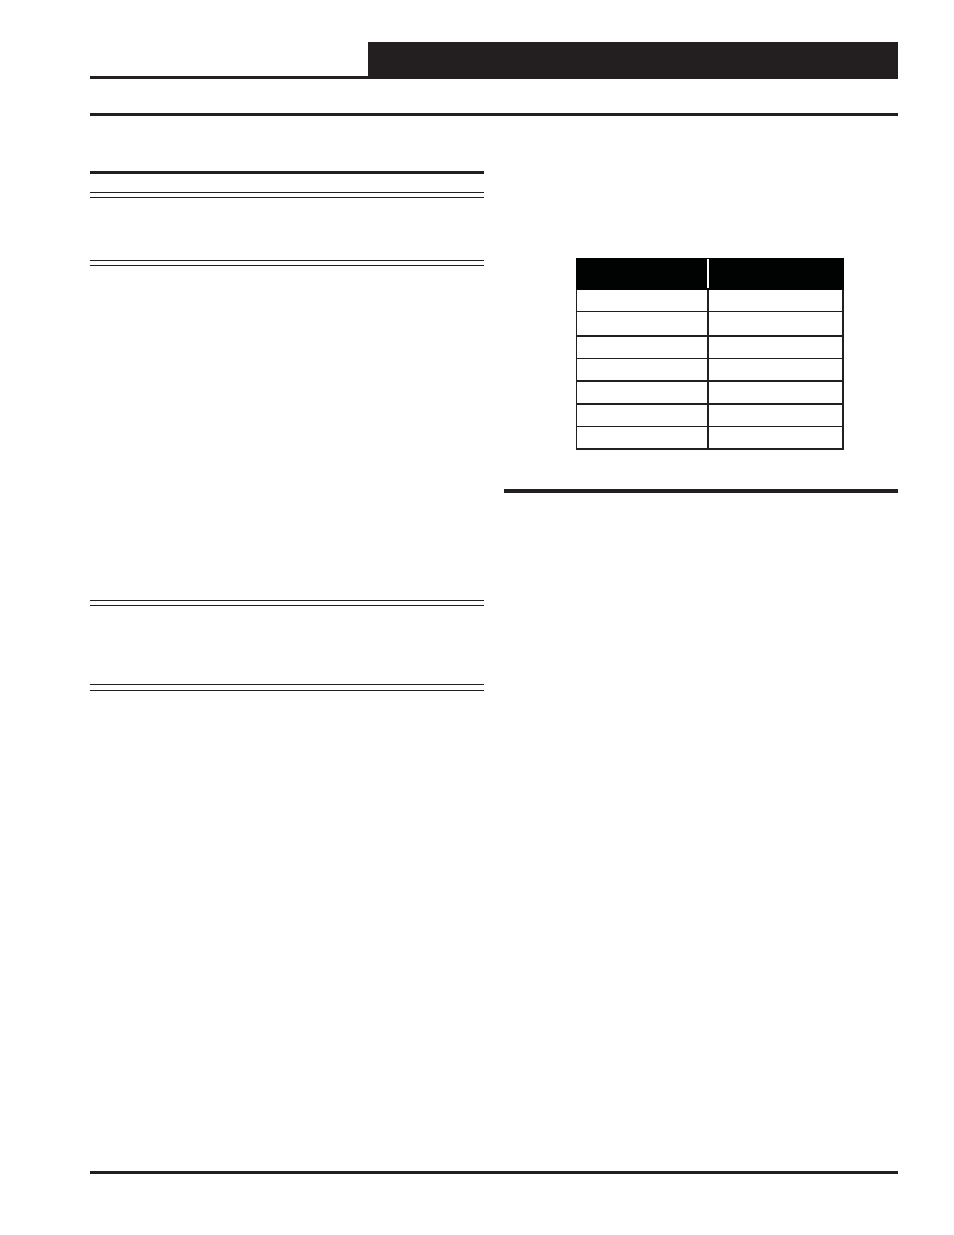
1. Ballpark the modulation rate based on line set length using the
following table as a guide:
Line Set Length
Modulation Rate
15
15
30
20
45
30
60
35
75
40
90
45
120
50
2. Ensure the outside air temperature, return air temperature, and
control setpoints do not change during calibration and fi ne-tuning
procedures.
3. Power off the EEV Module completely to ensure the smart-start
routine does not skew the initial position of future tests.
4. Power on the EEV Module and initialize the unit to enable
compressor operation.
5. Monitor superheat on the EEV Module and mark the time system
started until superheat is maintained at a steady state within an
acceptable dead band for more than 60 seconds.
6. Note the time from startup to stable superheat as well as the
current modulation rate set point (this process should not take lon-
ger than 20 minutes. If it does, then check unit charge or unstable
operating conditions).
7. Adjust the modulation rate set point by 2-3 seconds in either
direction and repeat test from Step 4.
8. Compare and adjust change until the best modulation rate is
obtained for the fi nal setting.
Table 1: Modulation Rate Table