English, 3 surround setup – Marantz SR9600N User Manual
Page 45
41
ENGLISH
3-1 CHANNEL LEVEL
1.
Select “3. SURR SETUP” from MAIN MENU
with or cursor buttons and press the OK/
ENTER button.
2.
Select “CHANNEL LEVEL” with the or
cursor buttons and press the OK/ENTER
button.
3.
Set the SURR. MODE with the or cursor
buttons.
4.
Select the desired menu item with the or
cursor buttons, set the desired level with the
or cursor buttons, and press the OK/ENTER
button.
SURROUND MODE:
The surround mode can be independently set
for 3 modes.
1. Multi Ch STEREO
2. CS
II
3. Others
CHANNEL LEVEL
CENTER LEVEL:
Set the effect level of the center speaker
between –12 and +12 level in 0.5 level interval .
• If “NONE” was selected for the center speaker
setting in the SPEAKER SIZE, then this setting
will not appear.
SURR L or R LEVEL:
Set the effect level of the Surround speaker
between –12 and +12 level in 0.5 level interval .
• If “NONE” was selected for the surround speakers
setting in the SPEAKER SIZE, then this setting
will not appear.
S. B L or R LEVEL:
Set the effect level of the Surround Back
speaker between –12 and +12 level in 0.5 level
interval .
• If “NONE” was selected for the surround back
speakers setting in the SPEAKER SIZE, then this
setting will not appear.
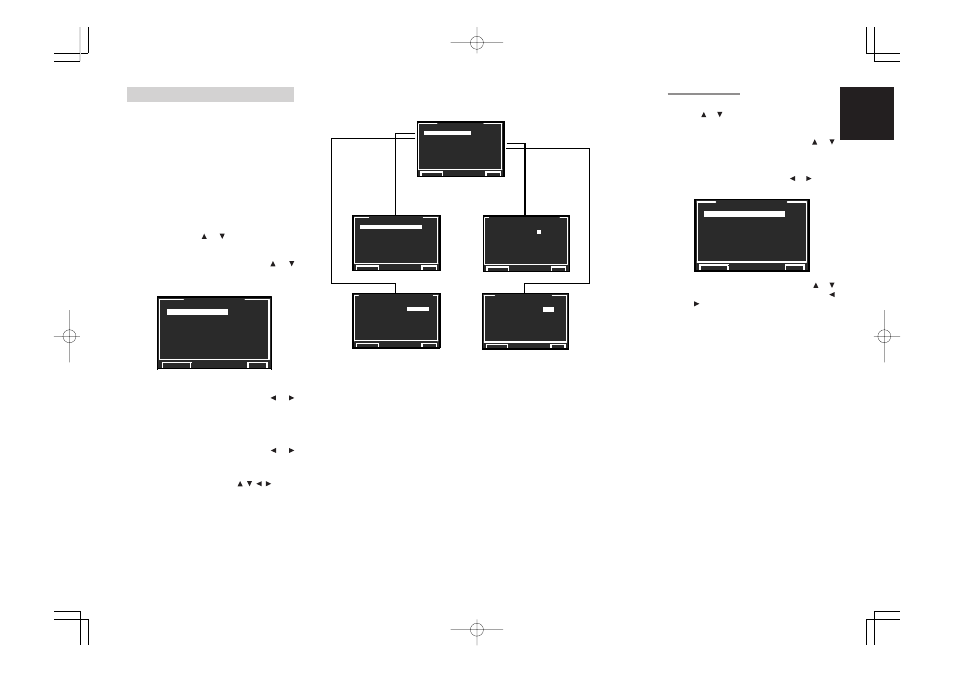
3 SURROUND SETUP
This menu is for setting surround effect parameters
for the various surround input signals so as to bring
out the live audio effect of your speaker system.
• CHANNEL LEVEL:
“3-1 CHANNEL LEVEL” (see page 41)
• PL
II
x MUSIC PARAMETER:
“3-2 PL
II
x MUSIC PARAMETER” (see page 42)
• CS
II
/TS XT PARAMETER:
“3-3 CS
II
/ TS XT PARAMETER” (see page 42)
• NEO:6 PARAMETER:
“3-4 NEO:6 PARAMETER” (see page 42)
1.
Select “3. SURR SETUP” from the MAIN
MENU with the or cursor buttons and
press the OK/ENTER button.
2.
Select the desired menu with the or
cursor buttons and press the OK/ENTER
button.
RE-EQ:
Turns THX Cinema Re-EQ™ on and off.
Select the Cinema Re-EQ™ with the or
cursor button to activate it.
LFE LEVEL:
Select the output level of the LFE signal
included in the Dolby Digital signal or the DTS
signal.
Select “0dB”, “–10 dB” or “OFF” with or
cursor button.
After you complete this portion of the setup, move
the cursor to “RETURN” with the , , , cursor
buttons and press the OK/ENTER button.
3 . S U R R
S E T U P
C H A N N E L
L E V E L
P L
II
II
x
M U S I C
P A R A M E T E R
C S
/ T S
X T
P A R A M E T E R
N E O : 6
P A R A M E T E R
R E - E Q
:
O F F
L F E
L E V E L
:
- 1 0 d B
R E T U R N
E X I T
C H A N N E L
L E V E L
S U R R . M O D E :
T H X
U L T R A
C I N E M A
C E N T E R
L E V E L
:
+ 6 . 0 d B
S U R R . R
L E V E L
:
- 6 . 0 d B
S . B
R
L E V E L
:
- 6 . 0 d B
S . B
L
L E V E L
:
0 . 0 d B
S U R R . L
L E V E L
: + 1 2 . 0 d B
S U B
W
L E V E L
:
- 6 . 0 d B
R E T U R N
E X I T
P L II x
M U S I C
P A R A M E T E R
P A R A M E T E R
:
C U S T O M
P A N O R A M A
: O F F
D I M E N S I O N
: - 3
C E N T E R W I D T H :
3
R E T U R N
E X I T
C S
II / T S
X T
P A R A M E T E R
T R U B A S S
:
0
S R S
D I A L O G
:
0
R E T U R N
E X I T
N E O : 6
P A R A M E T E R
C E N T E R
G A I N
:
0 . 0
R E T U R N
E X I T
☞
p.41
☞
p.42
☞
p.42
☞
p.42
Note:
• After you complete this portion of the setup, press
the OK/ENTER button to move the cursor to
“RETURN” and press the OK/ENTER button
again to go to sub-menu.
3 . S U R R
S E T U P
C H A N N E L
L E V E L
P L
II
II
x
M U S I C
P A R A M E T E R
C S
/ T S
X T
P A R A M E T E R
N E O : 6
P A R A M E T E R
R E - E Q
:
O F F
L F E
L E V E L
:
- 1 0 d B
R E T U R N
E X I T
C H A N N E L
L E V E L
S U R R . M O D E :
T H X
U L T R A
C I N E M A
C E N T E R
L E V E L
:
+ 6 . 0 d B
S U R R . R
L E V E L
:
- 6 . 0 d B
S . B
R
L E V E L
:
- 6 . 0 d B
S . B
L
L E V E L
:
0 . 0 d B
S U R R . L
L E V E L
: + 1 2 . 0 d B
S U B
W
L E V E L
:
- 6 . 0 d B
R E T U R N
E X I T
SR9600N DFU_01_ENG 3_4
05.5.23, 5:48 PM
Page 41
Adobe PageMaker 6.5J/PPC