Installation and operating instructions, Connecting an external amplifier, Fig. 15 connecting an external amplifier – Louroe Electronics DG-12II User Manual
Page 22: External amplifier
PAGE 19 of 28
CONNECTING AN EXTERNAL AMPLIFIER:
An external amplifier can be connected between the DG-MA and DG-25III to boost the
power of its talkback capability. The DG-MA is factory set with a 70V audio output. Before
connecting to an external amplifier, change the audio output to 600 Ohms as follows.
Remove the top lid or cover of the DG-MA is a slide switch located near the large black
capacitor and with the number 230 visible. The switch position is factory set at 70V
output which is towards the center of the PC board. Insert a small screwdriver into the
slot of the switch lever and slide the switch to the left or towards the power transformer. A
115 mark will appear. This will change the audio output to 600 and will serve as a pre-
amp for the external amplifier. Replace the cover of the DG-MA.
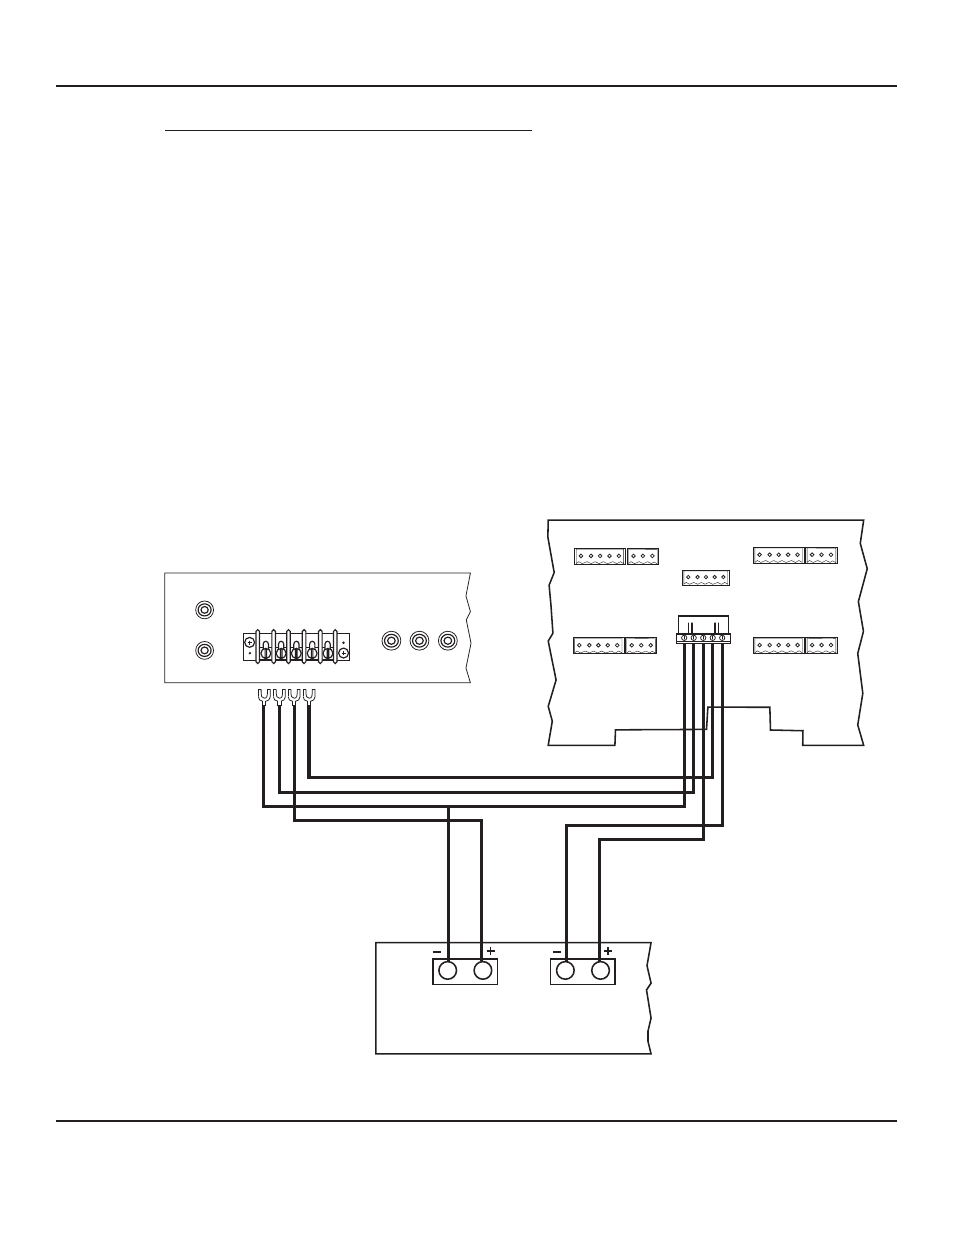
See Fig. 15 for the cable interconnection between units. The “Audio in” and “Audio Out”
Terminal of the external amplifier can be RCA jacks. In such case, the interconnect cable
between the DG-MA Control Terminal Block [40] numbers “1” and “3” and external
amplifier “Audio In” should be two spade lug terminals on one end and on RCA plug on
the other. Also the cable between “Audio Out” of the external amplifier and DG-12II plug-
in connector numbers “3” and “5” should be an RCA plug on one end and two open tinned
wires on the other. Double check the connections before testing. The talkback will not
work properly if the connections are interchanged.
Fig. 15 Connecting an external amplifier
ZONE 9
ZONE 7
ZONE 8
ZONE 10
1 2 3 4 5
TB GND
TB RETURN
TB
AUDIO
ALL
CALL
CTRL
GND
JP51
INPUT
OUTPUT
AUDIO
REAR OF DG-MA
GND
AUDIO IN
SPEAKER
RETURN
AUDIO
OUT
REAR OF DG-12II
EXTERNAL AMPLIFIER
DG_12II_6/11
LOUROE ELECTRONICS 6 9 5 5 VA L J E A N AVENUE, VAN NUYS, CA 91406
TEL (818) 994-6498
FAX
994-6458
website: www.louroe.com e-mail: [email protected]
(818)
®
INSTALLATION AND OPERATING INSTRUCTIONS