Kreg PRS1200 Precision Beaded Face-Frame System User Manual
Page 8
Use
8
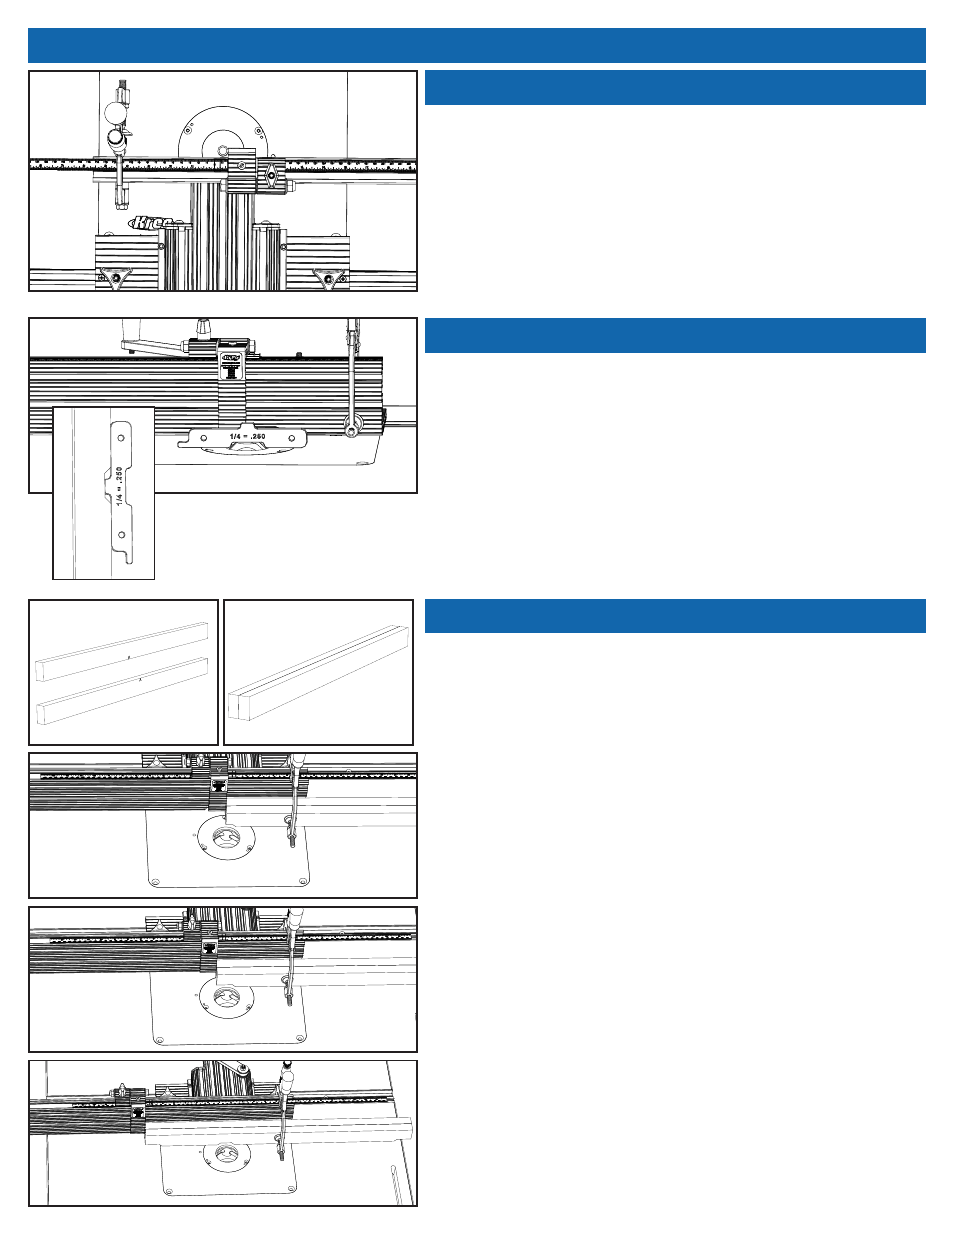
Centering the Fence
Notching Bit Setup
Notching the Stiles
Begin by installing the ½” Dowel Pin in your router. Then, set your
Router Stop to exactly ¼”. With the t-slot knobs still loosened, carefully
slide the entire assembly until the stop approaches the edge of the
dowel pin and just “kisses” the edge. Don’t press too hard. The stop
should still be able to swing freely when in place. Once in position,
apply forward pressure to the assembly with your thumbs to prevent
movement and lock the knobs down firmly. If you’ve done this step
properly, your router bit should be precisely centered with the fence
opening.
Remove the dowel pin and replace it with the included ¼” Notching Bit.
Lock the bit into place in your router, and set the height precisely using
the included ¼” Setup Bar. Be very careful with this step as the height
of the bit must be exact. With the bit set appropriately, use a scrap piece
of stock, secure it to the fence using the Integrated Clamp, and make
a test cut in the middle of the workpiece. Use the top side of the setup
bar to test the depth of the cut once complete. If your cut is too deep,
you’ll need to lower the bit. If the setup bar teeters, you’ll need to raise
the bit slightly. Again, precision is incredibly important here. Do not take
shortcuts and make sure the depth is exact.
For this step, we’ll be following “example 1” in your instruction manual
which features two frame openings and 1-1/2” rails. We’ll also be cutting
both stiles at once to reduce the possibility for tear-out and to ensure
that both stiles are cut exactly the same.
Lay your two stiles in front of you and place a small ‘V’ to signify which
side will be visible when the project is assembled. Sandwich the
“V’s”together, ensure the pieces are aligned correctly, and use masking
tape to secure the two together.
For the first two cuts, we’ll be creating the notches for the top and
bottom rails. This will require two passes through the cutter. First,
position your stop at the 0” marking and lock it into place. Gently press
the workpiece against the stop and secure it with the integrated clamp.
Engage the router and slowly press the handle forward until the cut
has been completed. Disengage the router and wait for it to come to a
complete stop. Then, release the clamp and rotate the workpiece 180°.
Lock the clamp, reengage the router, and repeat the same cut on the
opposite end.
With the second pass complete, set your stop at the ¾” marking and
lock it into place. We’re using ¾” because it represents the center of the
1-1/2” workpiece. Press the workpiece against the stop, secure it with
the clamp and make the second pass on both ends.
To find the center notch location, start with ¾” for the first stile and add
5” for the drawer bank opening. Secure your Router Stop in place at
7-1/4”.