Barbecue operating instructions – Kleenmaid BBQ3BF User Manual
Page 27
Kleenmaid Professional - Outdoor Cooking Centres
27
Barbecue Operating Instructions
Before Lighting
1. Check that all gas hose fittings and connections
are spanner tight. Gas regulators that are fitted
with a hand tightening wheel should be checked to
ensure that the connection is secure.
2. Check that control knobs are in the OFF position.
Note that when in the off position the knob is
locked for safety and can only be operated by
pressing before turning.
3. Open the Roasting Hood fully or remove the
weather cover/lid from the cooking surface before
operating the barbecue.
4. Clean cooking surfaces thoroughly before use.
5. Check gas supply - Turn on gas supply at either the
cylinder (for Propane / LPG) or shut-off valve (for
Natural Gas - mains gas).
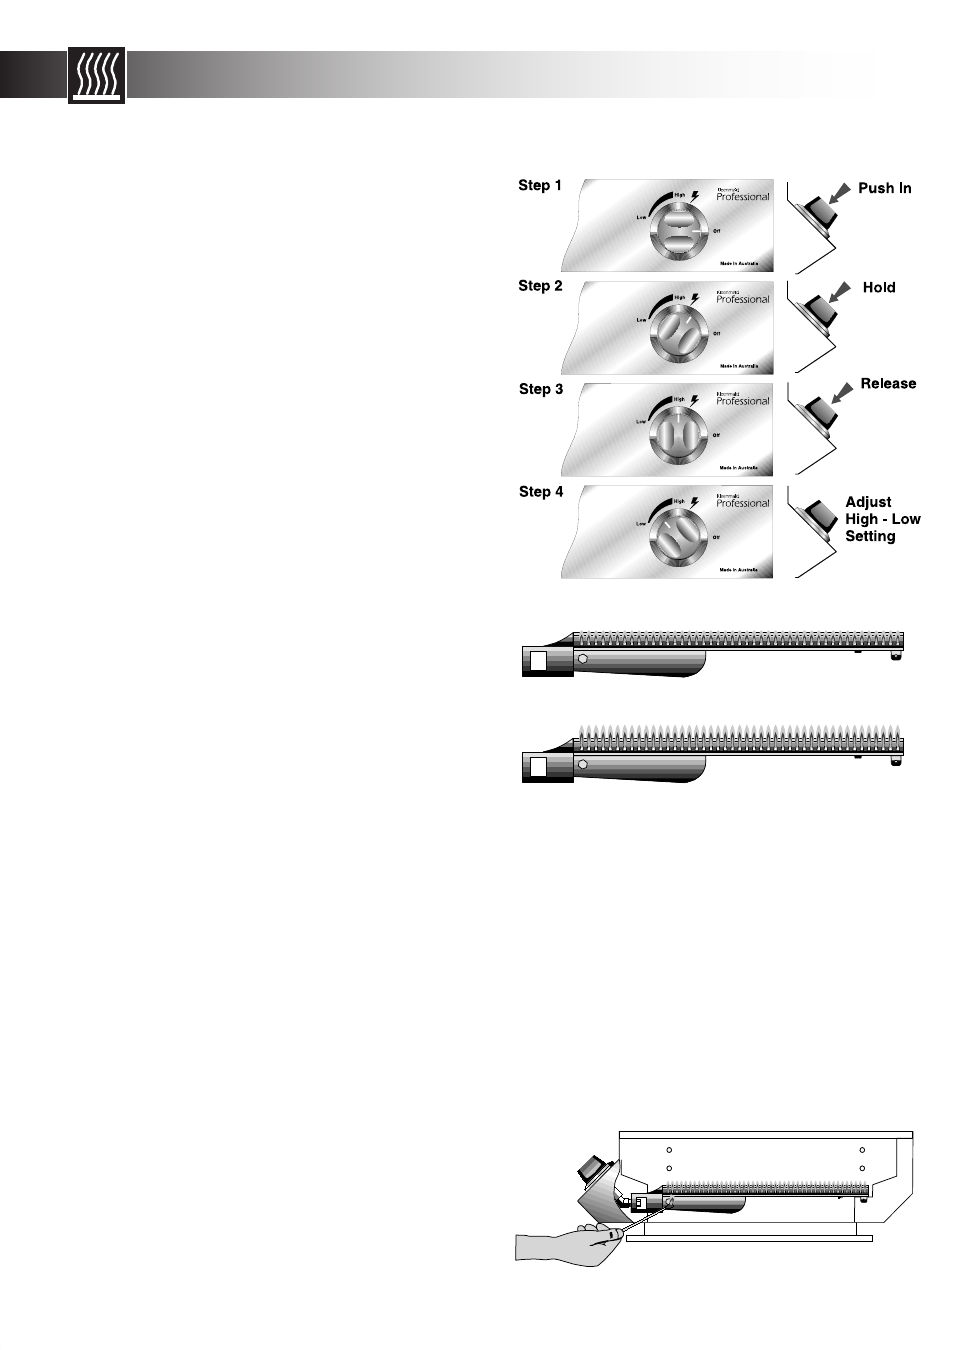
Automatic Lighting Procedure
1. Push in and hold the control knob down while
turning slowly in an anti clockwise direction until
the starter mechanism engages at the two o’clock
position, at this time the gas will start to flow.
Note: There is safety lock that prevents the knob
from being turned on accidentally you must push
the knob in completely to disengage the lock.
2. Hold the control knob in while continuing to turn
the knob to the High or twelve o’clock position.
3. The starter mechanism will click and the main
burner will now light. Continue turning the knob
slowly until it is in the Twelve o’clock position.
4. If the burner is alight, release the knob.
Note: If the burner does not light, keep the control
knob pushed in and turn the control knob in a
clockwise direction to return to the OFF position.
Wait 5 minutes for the gas to disperse and then
repeat steps 1 to 4
5. The control knob can now be turned to the desired
heat setting. (Low, Medium or High)
The control knob does not need to be pushed in
while selecting the heat setting.
To Turn Off The Burner
Push in and hold the control knob while turning in a
clockwise direction until the off position is reached.
After Use
1. Be sure to turn off all control knobs and cylinder
valve (for Propane - LPG) or shut-off valve (for
Natural Gas).
2. Clean drip tray, griddle plates and grills if
necessary.
Allow barbecue to cool before replacing the
weather cover/lid or any polyester BBQ cover.
Manual Lighting (Fig 22)
1. Press and turn the “LEFT Hand” control knob anti-
clockwise to the “HIGH” position, then light the left
hand burner immediately through the gap between
the front of the drip tray and the barbecue body.
Note: If the burner does not light immediately,
keep the control knob pushed in and turn the
control knob to the OFF position. Wait 5 minutes
for the gas to disperse and then repeat the lighting
procedure.
2. The control knob can now be turned to the desired
heat setting. (Low, Medium or High)
The control knob does not need to be pushed in
while selecting the heat setting.
To turn off the burner
Push in and hold the control knob while turning
in a clockwise direction until the off position is
reached.
Fig 20
High Setting
Low Setting
Fig 21
Fig 22