Optional rotisserie assembly instructions, Caution: electrical warning, Do not expose the motor to wet weather at any time – Kleenmaid BBQ3BF User Manual
Page 18: Fig 7
18
Kleenmaid Professional - Outdoor Cooking Centres
Optional Rotisserie Assembly Instructions
CAUTION: ELECTRICAL WARNING
If your barbecue incorporates an electrical
component, such as a rotisserie, then it must be
electrically grounded in accordance with local codes.
The electrical cord is equipped with a three-prong
(grounding) plug for your protection against shock
hazard and should only be plugged directly into a
properly grounded three-prong receptacle. If the
receptacle is not designed for a three wire plug,
you must obtain an adaptor and properly ground it
before using the rotisserie. Do not cut or remove the
grounding prong from this plug. Keep any electrical
supply cord and the fuel supply hose away from any
heated surfaces.
DO NOT EXPOSE THE MOTOR TO WET
WEATHER AT ANY TIME
Specification:
Australia
Model JD - 850A
240 VAC 50/60Hz 2.5w
Electrical appliances must be installed in accordance
with local codes.
Note: Before any assembly or installation is attempted
check for damage or missing parts. Your dealer or
the manufacturer must be notified of any problems
immediately before proceeding.
8. Optional Rotisserie Pack
The roasting hood must be completely assembled
before commencing installation of rotisserie kit.
The roasting hood must be placed in the open
position to allow easy fitting of mounting bracket
hardware.
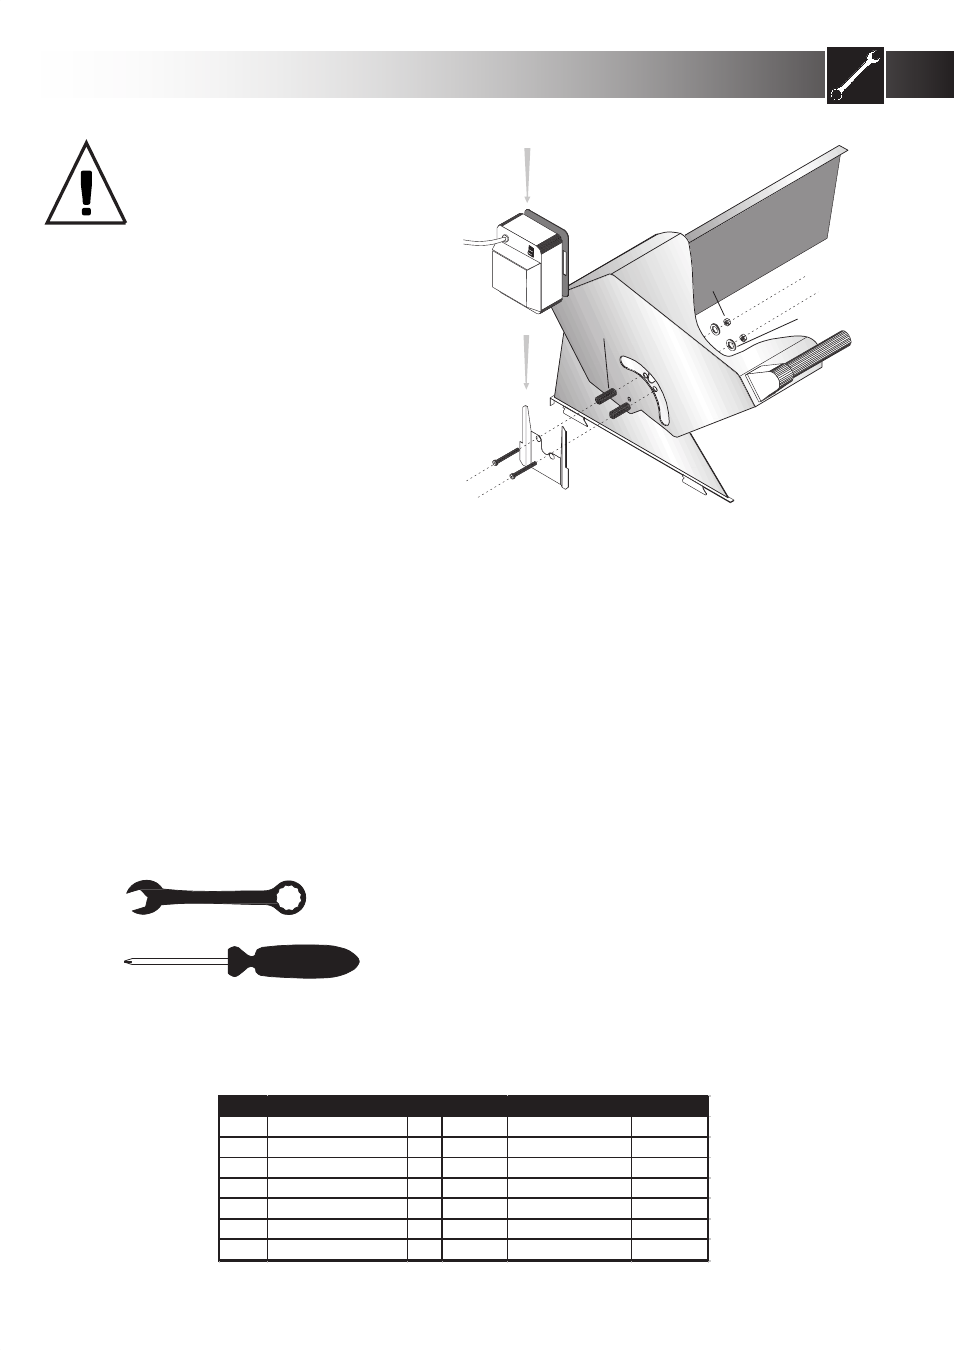
Fit the motor bracket to the left hand side of the
roasting hood using the M6 x 40mm screws, M6
spacers, M6 nuts and M6 washers supplied. The
bracket must be positioned with the locating prongs
facing upwards. The prongs will locate into the
mounting plate that is fixed to the motor assembly.
Locate each screw into the hole in the bracket, then
fit the spacers, align the ends of the screws with the
corresponding holes in the side frame of the Roasting
Hood. Push the screws through the holes, now fit the
washers and finally, the nuts. Tighten the nuts firmly.
Slide the motor onto the bracket with the drive socket
on the motor in the bottom position (with power cord
and on/off switch at top) - See Fig 7.
10mm
Tools Required
You will need the following tools
to assemble your Rotisserie kit.
Phillips Head Screwdriver
10mm Spanner (wrench)
Motor Kit - Type 1
Rotisserie Shaft Kit
Ref # Description
Qty
Ref #
Description
Qty
1
Motor
1
13
Rotisserie shaft
1
2
Mounting Bracket
1
14
Handle
1
3
M6 x 40mm Screw
2
15
Knurled Nut
1
4
M6 Nut
2
16
Counter Balance
1
5
M6 Spacer
2
17
Locating Collar
1
6
M6 Washer
2
18
Meat Prong
2
Motor mounting
bracket (Type 1)
27mm Spacers
6 x 40mm
crews
Motor - Bottom
end up
M6 Nut
M6 Washer
Fig 7