Kuvat 16 - 23 – Kemppi DC 3500W User Manual
Page 13
9901 / 1916110E / 13
English
kuvat 16 - 23
2
1
3
4
4T
2T
4T
2T
/
2
2
4
1
3
2
2
1
2
2
2
2
4
1
3
2
2
5
1
3
4
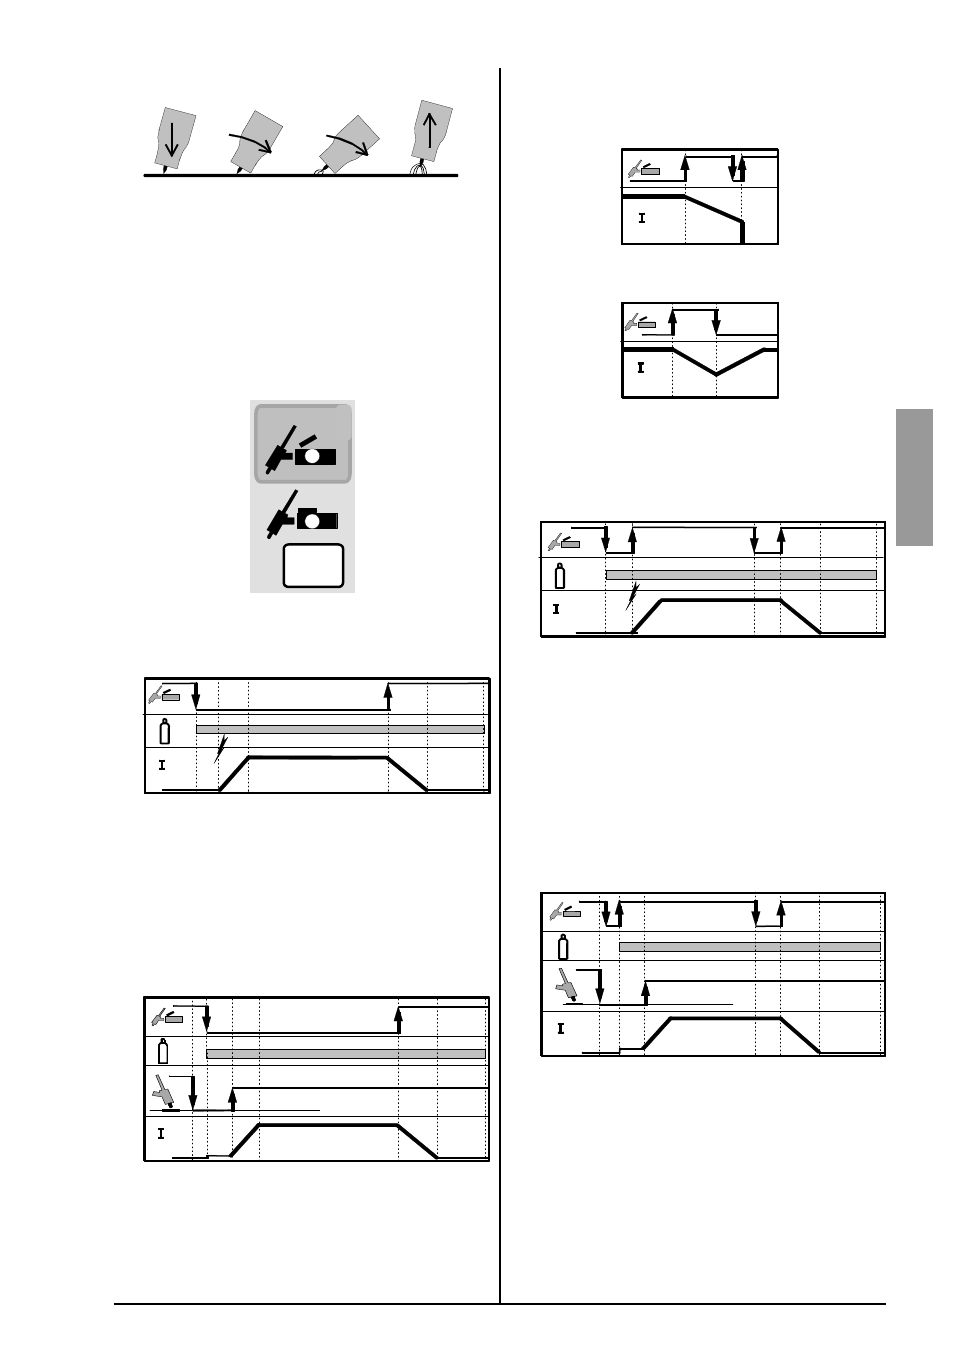
Contact ignition
Press the electrode lightly against the work piece (1).
Press the switch and the shielding gas will start to flow
and a small current will pass through the electrode. Lift
the electrode away from the work piece by turning it so
that gas nozzle rests against the work piece (2 ja 3),
and the arc will ignite and the current will rise to the
welding level within the up-slope time (4).
Use and selection of operation of the torch
switch
The operation of the torch switch is selected by press-
ing the 2T/4T key.
2-function (2T) / spark ignition
1. Press the torch switch. The gas starts to flow and
after the pre-gas time selected, the arc is ignited
and the current rises to the welding level within the
selected up-slope time.
2. Release the torch switch, and the welding current
will drop in accordance with the selected down-
slope time. After the arc is turned off, the gas will
continue to flow for the post-gas time.
2-function (2T) / contact ignition
1. Press the tip of the torch lightly against the work piece.
2. Press down the torch switch.
3. Lift the electrode slowly away from the work piece.
The arc will ignite and the welding current will rise
to the welding level within the selected up-slope
time.
4. Release the torch switch, and the welding current
will drop in accordance with the selected down-
slope time. After the arc is turned off, the shielding
gas will continue to flow for the post-gas time.
The down-slope time of the welding current can be in-
terrupted by quickly pressing the torch switch.
You can go back to the welding current from the down-
slope current by pressing the torch switch down. After
that, the current will rise at a rate corresponding to the
down-slope time.
4-function (4T) / spark ignition
1. Press the torch switch down. The shielding gas
starts to flow.
2. Release the torch switch. The ignition spark ignites
the arc and the current will rise to the welding level
within the up-slope time.
3. Press the torch switch down. The welding contin-
ues.
4. Release the torch switch, and the current starts to
drop and after the selected down-slope time the
arc is broken. After this, the shielding gas will flow
for the time selected.
4-function (4T) / contact ignition
1. Press the electrode lightly against the work piece.
2. Press the torch switch down for a moment.
3. Lift the electrode slowly away from the work piece.
The arc will ignite and the welding current will rise
to the welding level within the up-slope time.
4. Press the torch switch down. The welding contin-
ues.
5. Release the torch switch, and the welding current
will drop and stop after the selected down-slope
time. After the arc is turned off, the shielding gas
will continue to flow for the post-gas time.