Sección de amplificación, Sección de efectos, Sección preset – Johnson Amplification JT50 User Manual
Page 9
About the Mirage
JT50/JT100
The Johnson Mirage JT50 and JT100 are extremely versatile and easy to
use. For ease of operation, the JT50 and JT100 have been divided in to
two sections: the Amp section and the Effects section.
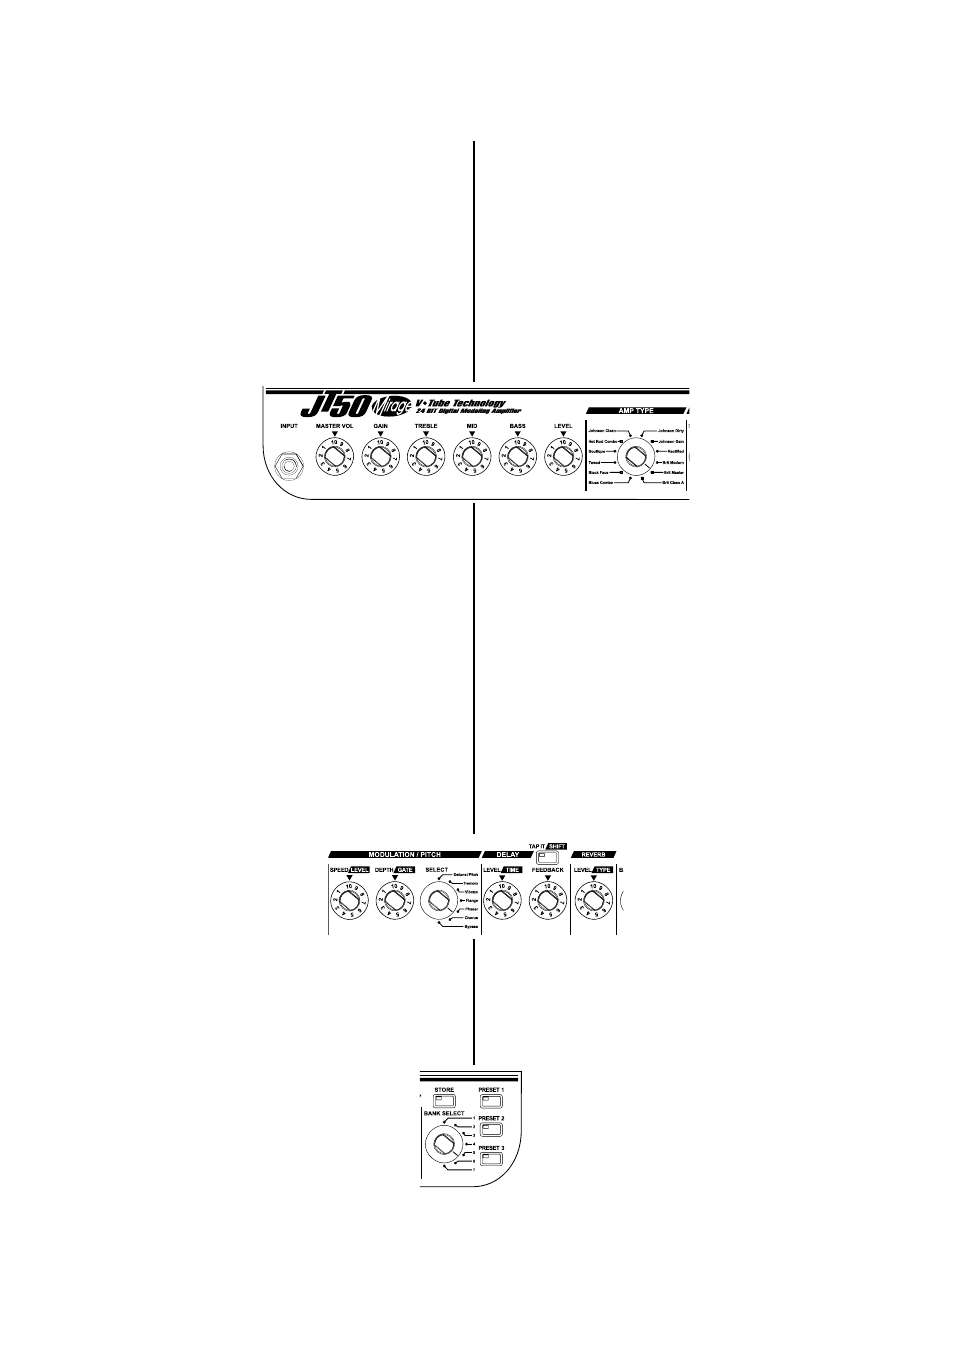
The Amp Section
The Amp Section is located on left half of the control panel. This section
includes the Master Volume, Gain, Tone, and Level control knobs, and the
Amp Type selector switch. The first six knobs control Master Volume
(main amp volume control), Gain (amp drive or distortion), Treble, Mid,
and Bass (tone controls), and Level (preset level). The Amp Type selector
switch selects 1 of the 12 amp models in the JT50/100. Each click of this
switch selects a new model. Together, these knobs provide you the control
to shape your basic tone.
Effects Section
The Effects Section is located on the mid-right half of the control panel.
This section includes the Modulation/Pitch, Delay, and Reverb effects
controls. Each of these sections has knobs dedicated to adjust various
aspects of their effects. The Modulation/Pitch section also uses a selector
switch to select one of 6 different effects per preset. These effects are
Chorus, Phaser, Flanger, Vibrato, Tremolo, Pitch/Detune, or Bypass for no
effect. The Speed/Level and Depth/Gate knobs control Speed and Depth in
all effects except Pitch/Detune where Speed controls Pitch Shift amount
and Depth controls Detune amount. A third control is the Level control for
each effect. See page 9 for more information on accessing the Level
function on the JT50.
The Delay section includes the Level/Time and Feedback knobs and a Tap-
It/Shift button. The Level knob controls the output level of the delay. The
Feedback knob controls the number of delay repeats. The Tap-It/Shift
button sets the delay time by tapping in the tempo. This is great for
synchronizing your delay time with the beat of the music by tapping this
button in tempo with the song. To bypass the delay, turn the Delay Level
knob to 1. See page 9 for more information on accessing the Delay Time
Parameter.
The Reverb section has a single Level/Type knob to control the output level
of the reverb. To bypass the reverb, turn the Reverb Level knob to 1. See
page 10 for more information on accessing the Reverb Type Parameter.
Preset Section
The Preset Section located on the far right side of the control panel. This
section includes the Bank Select switch, Preset buttons, and Store button.
The Bank Select switch selects 1 of the 7 banks available. The Preset 1-3
buttons select 1 of the 3 presets available in the selected Bank. Recalling
a Preset is done by selecting a Bank and/or pressing one of the 3 flashing
Preset buttons. The Amp and Effect knobs will not necessarily represent
the sound you hear when selecting a new preset. Turning a knob at least
one whole value will update the parameter to the knobs current position.
Any changes made to Presets must be stored to a Bank and Preset
location using the Store Button if you want to recall them later.
See page 10 for more information on saving or copying presets.
Acerca del Mirage
JT50/JT100
Los Johnson Mirage JT50 y JT100 son extremadamente versátiles y fáciles
de usar. Para facilitar su manejo, los JT50 y JT100 han sido divididos en
dos secciones: la sección de Amplificación y la sección de Efectos.
Sección de Amplificación
La Sección de Amplificación está en la mitad izquierda del panel de control.
Incluye los mandos de control de Volumen General, Ganancia, Tono y Nivel
y el selector de Tipo de Amplificación. Los seis primeros mandos controlan
el volumen master (control principal de volumen del amplificador), la
ganancia (drive o distorsión del amp), agudos, medios y graves (controles
de tono) y nivel(nivel de preset). El selector de Tipo de Amp elige 1 de los
12 modelos de amplificación del JT50/JT100. Con cada clic elige un nuevo
modelo. Juntos, estos mandos dan control para modelar su tono básico.
Sección de Efectos
La Sección de Efectos se encuentra en la parte central derecha del panel
de control. Incluye los controles de efectos Modulation/Pitch, Delay y
Reverb. Cada una de estas secciones tiene mandos giratorios específicos
para el ajuste de los distintos aspectos de sus efectos. La sección
Modulación/Tono también usa un interruptor selector para elegir entre 6
aspectos distintos por preset. Estos efectos son Chorus, Modulador de
Fase, Flanger, Vibrato, Trémolo, Tono/Desafinación o Anulación para no
tener efecto. Los mandos Speed/Level y Depth/Gate controlan la Velocidad
y Profundidad en todos los efectos excepto en el de Tono/Desafinación,
donde Speed controla la cantidad de Cambio de Tono y Depth controla la
cantidad de Desafinación. Un tercer control es el de Nivel para cada efecto.
Vea la página 9 para más información acerca de cómo acceder a la
función Nivel en el JT50.
La sección de Retardo incluye los mandos Level/Time y Feedback y un
botón Tap-It/Shift. El mando Level controla el nivel de salida del retardo. El
mando Feedback controla el número de repeticiones del retardo. El botón
Tap-It/Shift ajusta el tiempo de retardo al marcar el tempo pulsando el
botón. Esto es bueno para sincronizar su tiempo de retardo al ritmo de la
música pulsando este botón en el tempo con la canción. Para anular el
retardo, gire el mando Level hasta 1. Vea la página 9 para más información
acerca de cómo acceder al Parámetro Tiempo de Retardo.
La sección Reverberación tiene un solo mando giratorio Level/Type que
controla el nivel de salida de la reverberación. Para anular la
reverberación, gire el mando Level hasta 1. Vea
la página 10 para más información acerca de
cómo acceder al Parámetro Tipo de
Reverberación.
Sección Preset
La Sección Preset está en la parte derecha del panel de control. Incluye el
interruptor Bank Select, los botones Preset y el botón Store. El interruptor
Bank Select elige 1 de los 7 bancos disponibles. Los botones Preset 1-3
seleccionan 1 de los 3 presets disponibles en el Banco seleccionado. Para
cargar un Preset, elija un Banco y/o pulse uno de los 3 botones Preset
parpadeantes. Los mandos Amp y Effect no representarán necesariamente
el sonido que escuche cuando seleccione un nuevo preset. Si gira un
mando al menos un valor completo actualizará el parámetro a la
posición actual de los mandos. Cualquier cambio en los Presets
puede ser guardado en una posición de Banco y Preset usando el
botón Store si quiere cargarlos más tarde. Vea la página 10 para
más información sobre guardar o copiar presets.
5
Johnson Mirage User’s Guide Section One - Introduction
Manual del Johnson Mirage Sección Uno - Introducción