Highgear Axis User Manual
Page 10
ALTIWARE SERIES
TABLE OF CONTENTS
17
english
axis
TABLE OF CONTENTS
18
english
COMPASS
COMPASS
COMPASS SCREEN
There is only one screen display available in the COMPASS mode.
The display shows the CURRENT HEADING IN DEGREES in the
center line and the bearing in half cardinal points in the top line.
Opposite to one another on the display you will see a single segment
and three segments activated. The single segment indicates NORTH
and the center of the three segments indicates SOUTH.
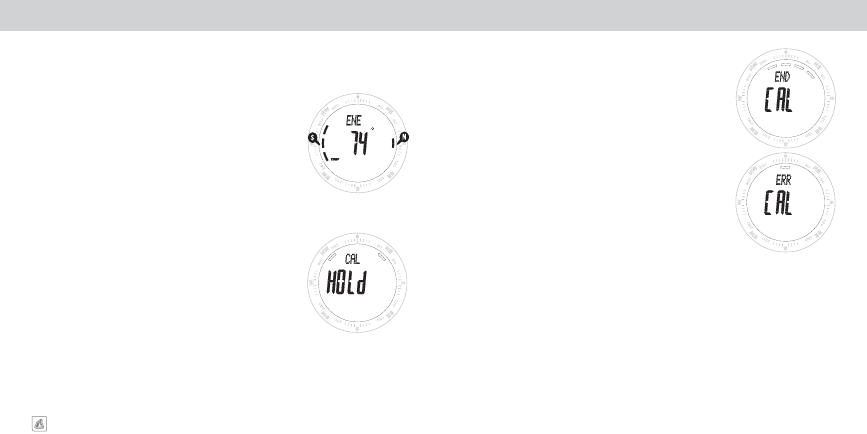
CALIBRATING THE COMPASS
The compass of the Axis must be calibrated on a regular basis. The
compass should be calibrated any time it does not seem to be working
properly. We recommend calibrating the compass prior to any activity
where optimal accuracy is desired, such as a long back country trip.
The watch must also be calibrated to your local altitude prior to your
initial use.
1. Start in COMPASS mode.
2.
PRESS & HOLD
the
S4
key to enter the calibration sequence.
3. CAL will appear in the center line of the display.
4. Rotate the unit clockwise for 3 complete rotations of
approximately 10-seconds per rotation.
5. To exit the calibration sequence at this point using the
S1
key. Or
advance to setting the magnetic declination using the
S4
key.
NOTE:
For the optimum accuracy, the compass must be held
completely level during the calibration process. We recommend
placing the unit on top of a drinking glass while performing
the calibration as this will make it easier to keep the compass
level.
The Axis are equipped with a highly accurate digital magnetic compass with a resolution of one degree.
The compass can be adjusted to compensate for the magnetic declination corresponding to the area
where the compass is being used.
CALIBRATING THE COMPASS
(continued)
6. If the calibration is successful the display will show CAL in the
center line and END in the upper line and automatically advance
to the compass display.
7. If the calibration was unsuccessful an ERR message will appear
in the upper line of the display and you will need to repeat the
calibration sequence.
8. If you have chosen to set a magnetic declination, adjust the
degrees and direction using the
S1
and
S2
keys. Set and advance
from variable to variable using a the
S3
key.
9. If you do not know the magnetic declination for your area, leave
this setting at ZERO.
10. When you have completely entered the magnetic declination you
desire, exit the calibration sequence using the
S4
key.
MAGNETIC DECLINATION
A magnetic compass points to the earth’s magnetic north pole. Depending on your location, this may
be different from True North. Adjusting the magnetic declination allows you to compensate for this
variation. Magnetic declination for an area can be found on topographical maps. Declination can change
over time and distance. Make sure the source for your declination settings is up to date. The following
websites are good sources for finding local magnetic declination.
http://www.gsc.nrcan.gc.ca/geomag/field/mdcalc_e.php
http://www.ngdc.noaa.gov/seg/geomag/jsp/Declination.jsp
REACTIVATING COMPASS
To save power, the compass feature of the Axis only remains active for a period of 10-seconds. To
reactivate the compass display,
QUICK
PRESS
the
S1
key.