Blade pitch adjustment for belt and direct drive, V-belt drives – Greenheck Vane Axial Fans (452954) User Manual
Page 8
Blade Pitch Adjustment for Belt
and Direct Drive
Blade Pitch Adjustment Procedure
1. Disconnect all electrical power to the fan and lock
in the “off” position. See warning on front cover of
this manual.
2. Remove the aluminum nose cone on the impeller
assembly. Record the location of all balancing
weights located under the nose cone bolts.
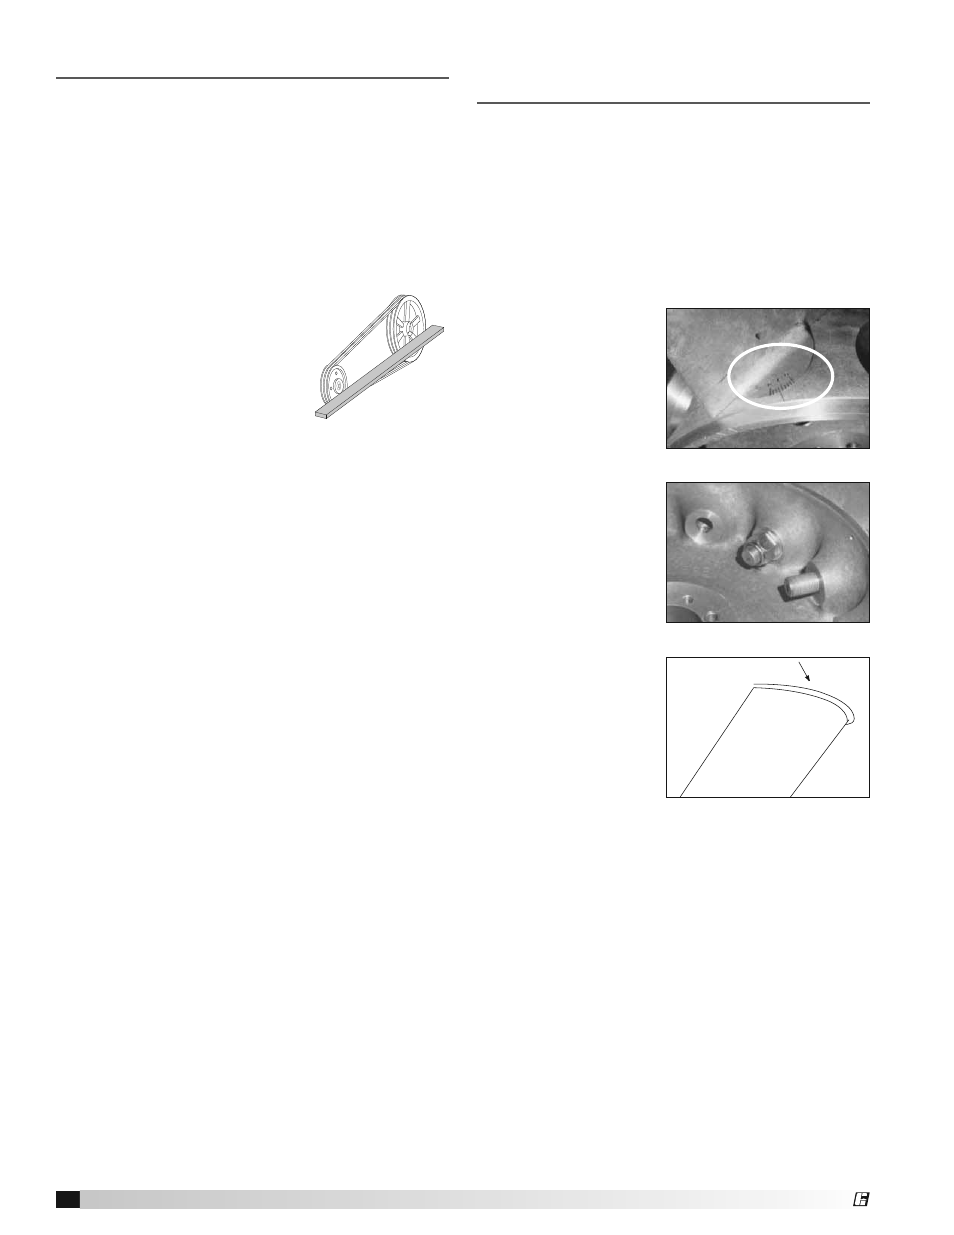
3. Locate the blade with blade pitch graduations
stamped into the blade base and index line on the
impeller (Fig. 4). This
is the master blade.
4. Loosen the self-
locking nut (Fig. 5)
attaching the master
blade until the blade
can be rotated by
hand.
5. Set the new blade
pitch on the master
blade by aligning the
desired blade pitch
number with the
index mark. Tighten
the self-locking nut
slightly to prevent the
master blade from
moving.
6. At the tip of the
master blade, use
a thin marker pen
to scribe the blade
profile on the interior
of the fan housing
from the leading to
the trailing edge of
the blade tip (Fig. 6).
7. Loosen the self-locking nuts on the remainder of
the blades and set each blade to align with the
blade profile scribed on the fan housing. Tighten
the self-locking nut slightly to prevent blade from
moving.
8. After all blades are adjusted to the proper setting,
tighten the self-locking nuts to 125 ft. Ibs. of torque.
Verify that all the blades tips follow the profile on
the fan housing.
9. Replace the nose cone and any balancing weights
removed earlier. All fasteners and washers must be
reinstalled in the exact spot they were removed.
10. IMPORTANT: Motor load amperes must be
checked and compared to the nameplate rating
before returning the fan to service. Increasing blade
pitch beyond the capacity of the motor will result in
motor burn-out and void the warranty.
Fig. 5
Fig. 6
Fig. 4
V-Belt Replacement
The V-belt drive components, when supplied by
Greenheck Fan Corporation, have been carefully
selected for this unit’s specific operating condition.
Changing V-belt drive components could result in
unsafe operating conditions which may cause personal
injury or failure of fan components.
1. Remove the protective coating from the end of the
fan shaft using mineral spirits or another similar
solvent. Check to ensure that the shaft is free of
nicks and burrs.
2. Slide sheaves on shafts. Do not
drive sheaves on as this may
result in bearing damage.
3. Align fan and motor sheaves
with a straight-edge or string
and tighten.
4. Place belts over sheaves. Do
not pry or force belts, as this
could result in damage to the cords in the belts.
5. Adjust the tension until the belts appear snug. Run
the unit for a few minutes (refer to unit start-up
section) and allow the belts to “set” properly.
6. With the fan off, adjust the belt tension by moving
the motor pivot plate. (Belts are adjusted by
raising or lowering the motor pivot plate). When in
operation, the tight side of the belts should be in a
straight line from sheave to sheave with a slight bow
on the slack side.
Aligning sheaves
with a straight edge
V-Belt Drives -
continued
8
Vane Axial Fans
®