V-belt drives, Belt tension, Shaft bearings – Greenheck Vane Axial Fans (452954) User Manual
Page 7: Standard grease
V-Belt Drives
V-belt drives should be checked for wear, tension,
alignment and dirt accumulation on a regular basis.
Premature belt failure is frequently caused by improper
belt tension (excessively tight or loose) or misaligned
sheaves. Excessive belt tension creates high bearing
loads which reduce bearing life. Belts which are too
loose may cause squealing on start-up, belt flutter,
slippage and overheating of the sheaves. Belts which
are overly tight or loose may cause vibration and noise.
When replacing V-belts on multiple groove drives,
all belts should be changed to provide uniform drive
loading. Do not pry belts on or off the sheave. Loosen
belt tension until belts can be removed by simply lifting
the belts off the sheaves. After replacing belts, ensure
that slack in each belt is on the same side of the drive.
Belt dressing should never be used. Do not install new
belts on worn sheaves. If the sheaves have grooves
worn in them, they must be replaced before new belts
are installed.
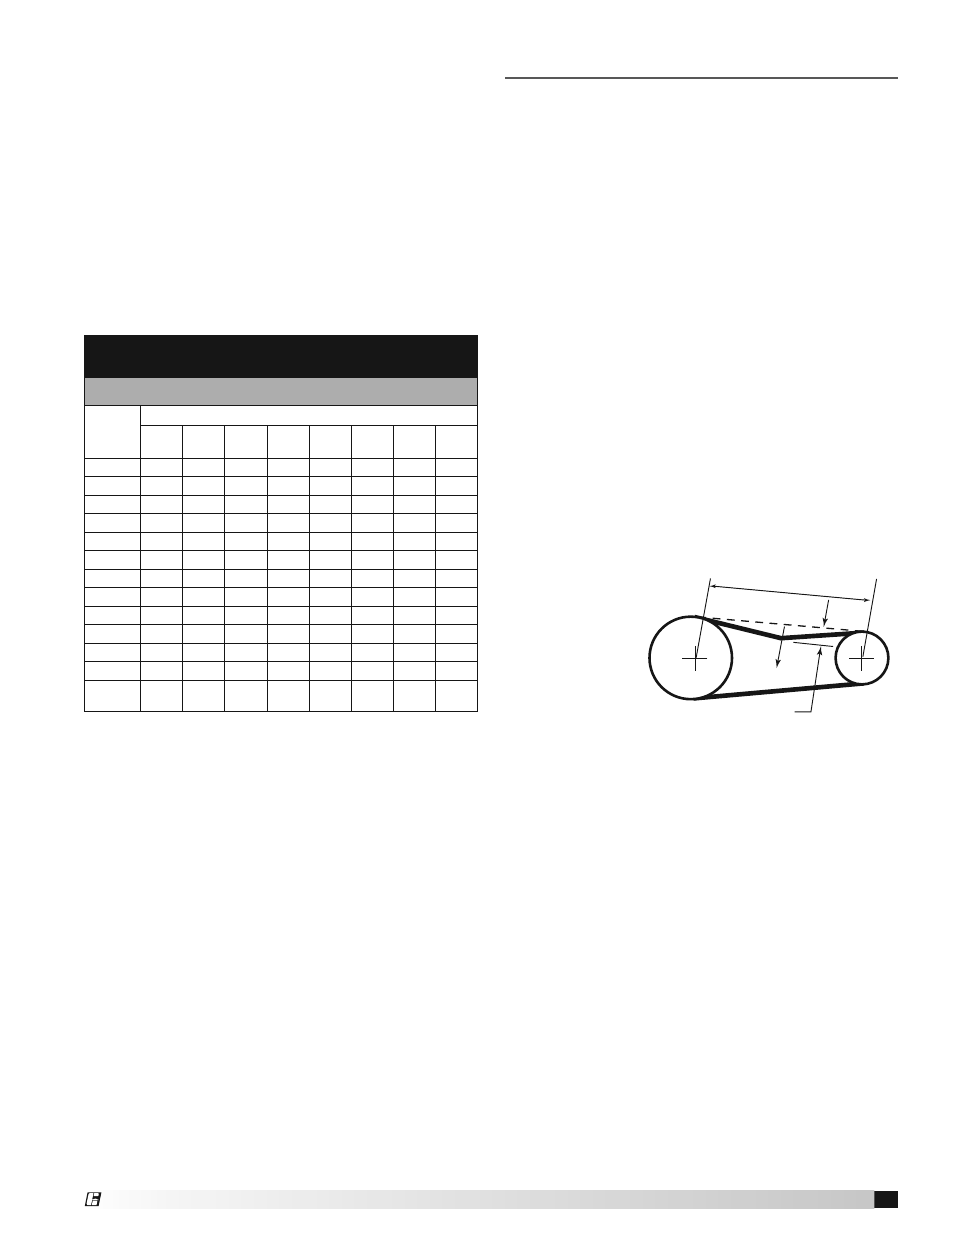
Belt Tension
The proper tension for V-belts is the lowest tension at
which the belts will not slip at peak load conditions. For
initial tensioning, the belt should deflect 1/64 inch for
each 1 inch of belt span. For example, a belt span of
32 inches should
deflect 1/2 inch
with moderate
thumb pressure
at midpoint of the
drive. Check belt
tension after 24
hours of operation
and periodically
thereafter.
Shaft Bearings
The bearings for Greenheck fans are carefully selected
to match the maximum load and operating conditions
of the specific class, arrangement, and fan size. The
instructions provided in this manual and those provided
by the bearing manufacturer, will minimize any bearing
problems. Bearings are the most critical moving part
of the fan, therefore special care is required when
mounting them on the unit and maintaining them.
Refer to the table and the manufacturer’s instructions
for grease types and intervals for various operating
conditions. Never mix greases made with different
bases. This will cause a breakdown of the grease and
possible failure of the bearing.
Recommended Bearing Lubrication Schedule
Relubrication Schedule in Months*
Standard Grease
Fan
RPM
Bearing Bore (inches)
1
⁄
2
-
1
1
1
⁄
8
-
1
1
⁄
2
1
5
⁄
8
-
1
7
⁄
8
1
15
⁄
16
-
2
3
⁄
16
2
7
⁄
16
- 3
3
3
⁄
16
-
3
1
⁄
2
3
15
⁄
16
-
4
1
⁄
2
4
15
⁄
16
-
5
7
⁄
16
To 250
12
12
12
12
12
12
10
8
500
12
12
11
10
8
7
5
4
750
12
9
8
7
6
4
3
2
1000
12
7
6
5
4
3
2
1
1250
12
6
5
4
3
2
1
.5
1500
12
5
4
3
2
1
.75
-
2000
12
3
3
2
1
.5
.25
-
2500
12
2
2
1
.5
.25
-
-
3000
12
2
1
.5
.25
-
-
-
3500
12
1
.5
.25
-
-
-
-
4000
12
.5
.25
-
-
-
-
-
5000
12
.25
-
-
-
-
-
-
Number
of shots**
4
8
8
10
16
25
41
57
* Lubrication interval is based on 12 hour per day operation
and maximum 160˚F housing temperature.
For 24 hour per day operation, the interval should be cut in
half.
** Lubricant should be added with the shaft rotating and
until clean grease is seen purging from the bearing. The
lubrication interval may be modified based on the condition
of the purged grease. If bearing is not visible to observe
purged grease, lubricate with number of shots indicated for
bore size.
• For conditions including high temperatures, moisture, dirt
or excessive vibration, consult the factory for a specific
lubrication interval for your application.
• Lubricant should be a high quality lithium complex grease
conforming to NLGI Grade 2. Factory recommends Mobilux
EP-2.
• The use of synthetic lubricants will increase lubrication
intervals by approximately three times.
• Storage periods of three months or longer require monthly
rotation of the shaft and purging grease prior to start-up.
Span Length
Deflection Force
Deflection
7
Vane Axial Fans
®