Operation – Greenheck EQB (479049) User Manual
Page 5
Mixed Flow Inline Fan
5
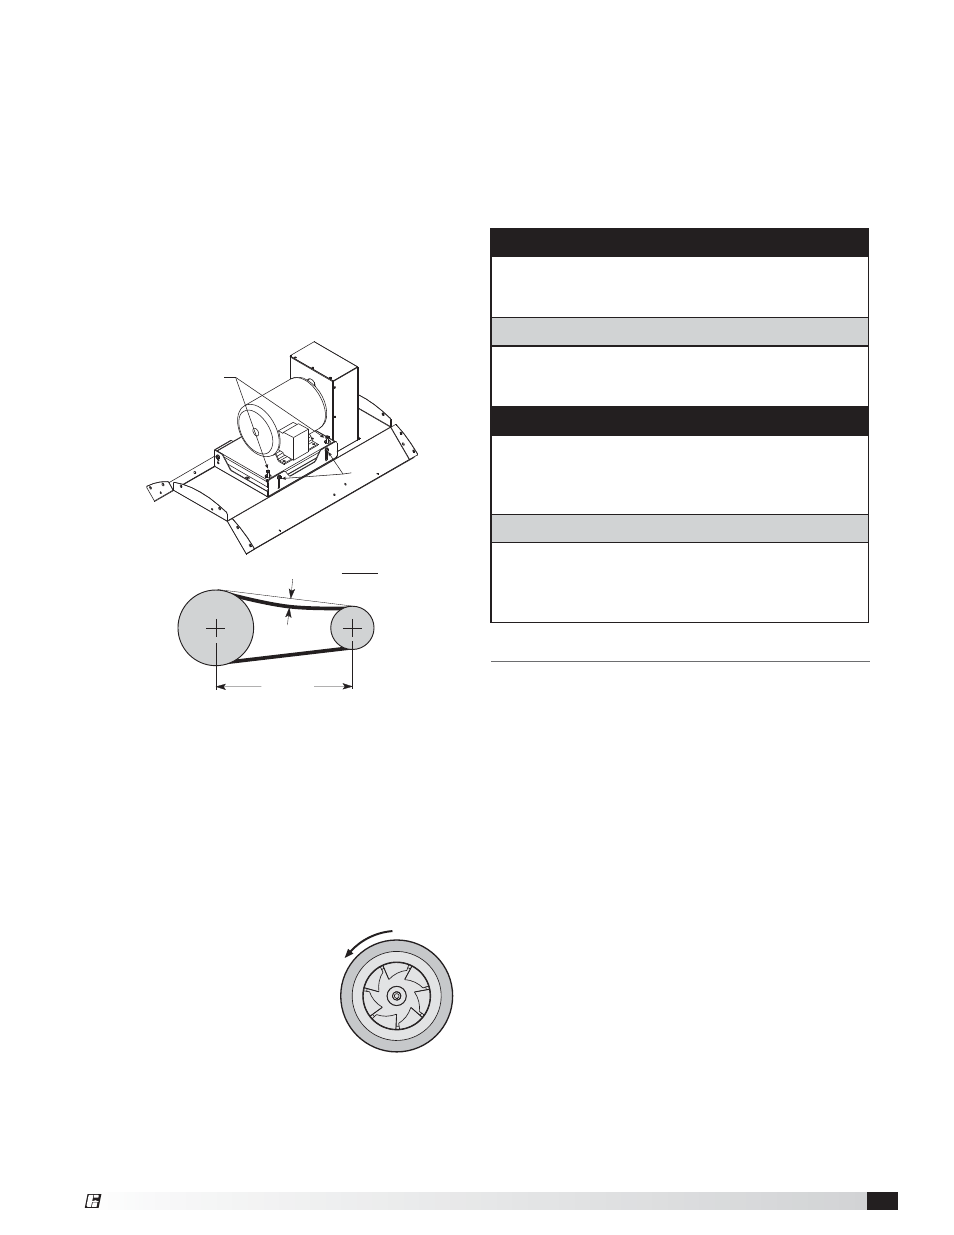
7. Check belt tension. Belt tension can be adjusted
by loosening two fasteners marked “A” in Fig. 12
below. The motor plate can then be adjusted up
or down using the two adjustment bolts marked
“B” in Fig. 12. Ensure that both adjustment bolts
are altered by the same number of turns. Belt
tension should be adjusted to allow 1/64 inch
of deflection per inch of belt span. For example,
a 15 inch belt span should have 15/64 inch (or
about 1/4 inch) of deflection with moderate
thumb pressure at the mid-point between pulleys
(see Fig. 13). Over-tightening will cause excessive
bearing wear and noise. Too little tension will
cause slippage at start-up and uneven wear.
Retighten “A” once tension is correct.
8. Check all guarding (if supplied) to ensure it’s
securely attached and not interfering with rotating
parts.
9. Check all electrical connections for proper
attachment.
10. Check housing and ductwork, if accessible,
for obstructions and foreign material that may
damage the fan wheel.
11. Wheel Rotation: Direction of wheel rotation
is critical. Reversed rotation will result in poor
air performance, motor
overloading and possible
burnout. Check wheel rotation
by momentarily energizing
the unit. Rotation should
be counterclockwise when
viewed from the fan inlet and
correspond to the rotation
decal on the unit.
NOTE: One of the most frequently encountered
problems with mixed flow fans is motors wired to
run in the wrong direction. This is especially true with
3-phase installations where the motor will run in either
direction, depending on how it has been wired. To
reverse rotation of a 3-phase motor, interchange any
two of the three electrical leads. Single phase motors
can be reversed by changing internal connections as
described on the motor label or wiring diagram.
DANGER
High voltage electrical input is needed for this
equipment. This work should be performed by a
qualified electrician.
DANGER
Cet appareil nécessite une alimentation électrique
sous haute tension. Confier ce travail à un
électricien qualifié.
DANGER
Disconnect and secure to the ‘OFF’ position all
electrical power to the fan prior to inspection
or servicing. Failure to comply with this safety
precaution could result in serious injury or death.
DANGER
Pour écarter les risques de blessure grave ou
de mort, débrancher et verrouiller l’alimentation
électrique en position « Arrêt » avant tout contrôle
ou entretien.
Operation
1. Before starting up or operating fan, check all
fasteners for tightness. In particular, check the
setscrews in wheel hub (and pulleys, if applicable).
2. While in the ‘OFF’ position or before connecting
the fan to power, turn the fan wheel by hand to be
sure it is not striking the venturi or any obstacle.
3. Start the fan and shut it off immediately to check
rotation of the wheel with directional arrow in the
motor compartment, see Fig. 14.
4. Fans with multi-speed motors should be checked
on low speed during initial start-up.
5. When the fan is started, observe the operation
and check for any unusual noise, vibration
or overheating of bearings. Refer to the
Troubleshooting section of this manual if a
problem develops.
6. Grease may be forced out of the bearing seals
during initial start-up. This is a normal self-purging
feature of the bearing.
7. With the system in full operation and all ductwork
attached, measure current input to the motor and
compare with the nameplate rating to determine if
the motor is operating under safe load conditions.
8. Keep inlets and approaches to fan clean and free
from obstruction.
Belt Span
Deflection =
Belt Span
64
Fig. 13
B
A
Fig. 12
Mixed Flow
Fig. 14
®