Setup and programming 7, Scteci software flow chart – Drake SCTeci Ethernet Controller Interface User Manual
Page 7
Setup and Programming 7
CONNECTIONS & POWER UP
Connect the RS232 connector to the RS232 IN connector
of the Drake power supply used to power the Transcoders
to be controlled. If more than one power supply is in use
in your system, their RS232 connectors should be "daisy
chained" together.
Connect the ETHERNET connector to the router, hub, or
switch which provides access to the Internet or to the LAN
you intend to use.
Connect the 12 VDC connector to an appropriate source of
12 VDC with at least 250 mA DC capacity. The SCTeci will
activate as soon as power is supplied.
PROGRAMMING
Programming and viewing of the various setup and
operating parameters is accomplished using the front
panel back lit, two line, sixteen character wide LCD along
with the 4 arrow buttons and the ENTER button. The name
of the parameter is on the top line of the display and the
setting value is on the bottom line.
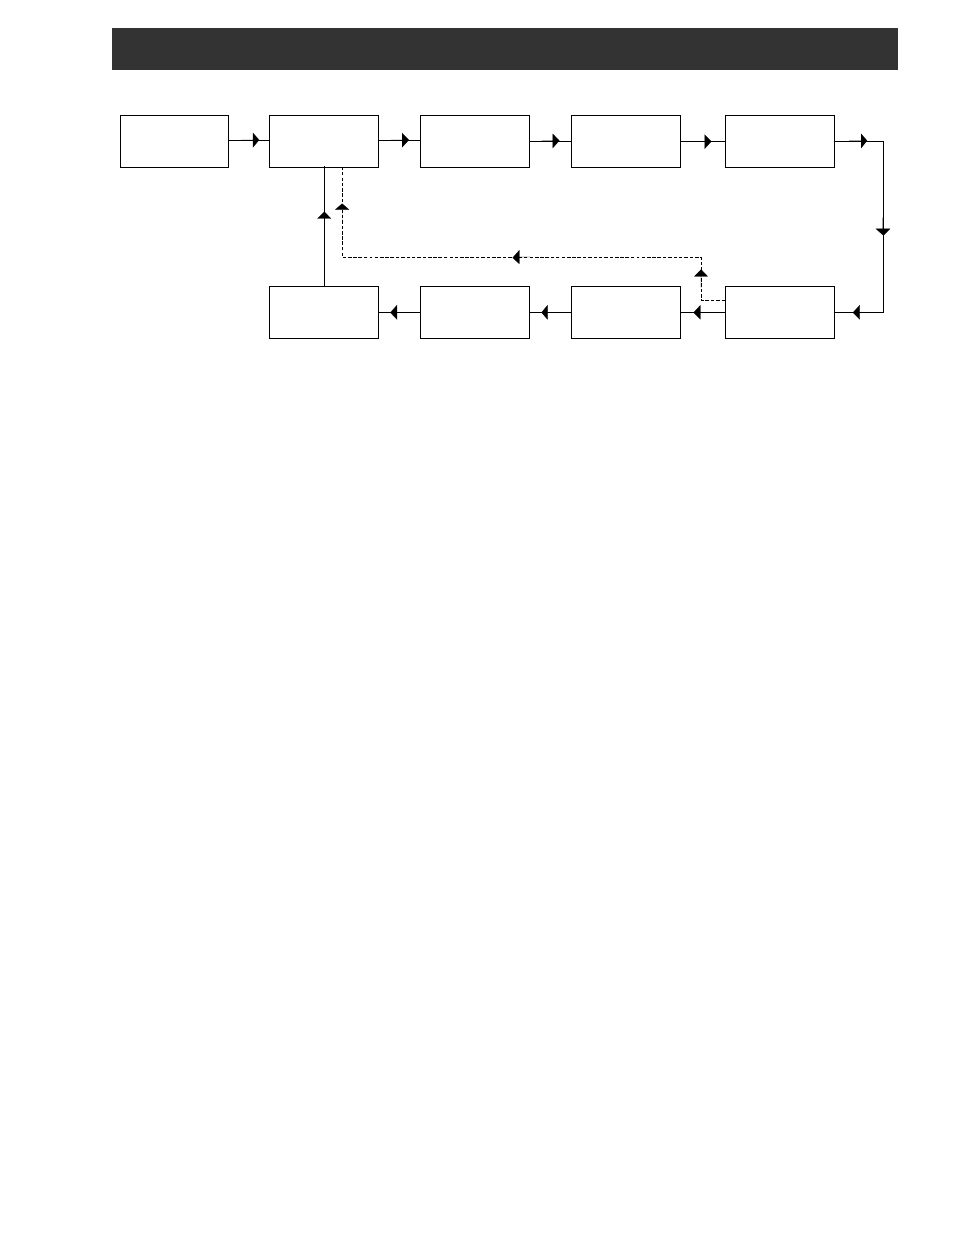
To observe a certain parameter setting without intending to
change its value, just use the left and right arrow buttons
to navigate through the menus shown in the above flow
chart. The current setting for each parameter is shown on
the bottom line of the display. Note that, depending upon
the DHCP enable setting, some screens are not needed
and will be skipped.
To make a change in the displayed parameter and its
setting, and if this is the initial setup, you will want to enter
the ‘adjust’ mode. To do this, press the ENTER button that
is located in the center of the four arrow buttons and hold
in for several seconds until a flashing caret (
^
) is
observed in the upper right hand corner of the display.
After you are in the adjust mode press the right arrow key.
This will cause an asterisk ( * ) to appear over one digit of
the parameter to be changed. Use the up and down arrow
keys to change each individual digit to the desired value
and use the left and right arrow keys to move the asterisk
to the next digit to be changed. Note that repeatedly
pressing the right arrow key when in the 'adjust' mode will
scroll through each changeable parameter one digit at a
time. Repeatedly pressing the left arrow button when in
the adjust mode will scroll left one digit at a time until the
first digit of a given parameter is reached. It will then
scroll through each of the changeable parameters without
producing an asterisk. Also note that you cannot enter the
'adjust' mode when on a screen that does not have a
changeable parameter. i.e.: 'Board Setup' and 'SCTeci /IP
number' screens.
When ENTER is pressed, the new settings will be loaded
and stored and the unit will exit the ‘adjust’ mode. You may
wish to not press ENTER until you have gone through all
screens and settings and then press ENTER to save and
load all changes in one step OR you can store just one or
several parameters at a time and reenter adjust mode to
set the next. Either method is acceptable.
SPECIAL CONSIDERATIONS
IP addr, GATEWAY addr, and SUBNET mask parameters
will not allow entries greater than 255. Therefore if you
wanted to change a number such as 165 to 225 and first
attempted to change the 1 to a 2, you would not be
permitted to do so. You would first have to change the 6 to
a 2 before changing the 1 to a 2.
SYSTEM can be any number between 11111 and 99999
excluding zeros. Each digit scrolls from 1 to 9, no 0.
PASWRD can be any eight alphanumeric characters,
including upper and lower case letters, numbers, and
punctuation - the SCTeci password. This is not to be
confused with the transcoder password, if used.
RS232 Baudrate: Make sure that the RS232 baud rate
that you select agrees with the RS232 baud rate of all
Drake power supplies to which the SCTeci is connected.
SCTeci Software Flow Chart
SCTeci 1.0
xxx.xxx.xxx.xxx
Board Setup
MAC xxxxxxxxxxx
SYSTEM
xxxxx
PASWRD
xxxxxxxx
2400
4800
19200
xxxxx
DHCP enable
9600
ON
OFF
RS232 Baudrate
IP addr
xxx.xxx.xxx.xxx
xxx.xxx.xxx.xxx
SUBNET mask
xxx.xxx.xxx.xxx
GATEWAY addr
DHCP ON
system identifier.
Enter 5 digit numeric
Enter 8 digit
alphanumeric password.
Enter appropriate
12 digit address.
12 digit address.
Enter appropriate
12 digit address.
Enter appropriate
DHCP OFF
Shows current
IP address
Unique
address
SCTeci