Removing and replacing the drive chain – DR Power 30 Snow Thrower User Manual
Page 31
CALL
TOLL
FREE
1-800-DR-OWNER 27
Removing and Replacing the Drive Chain
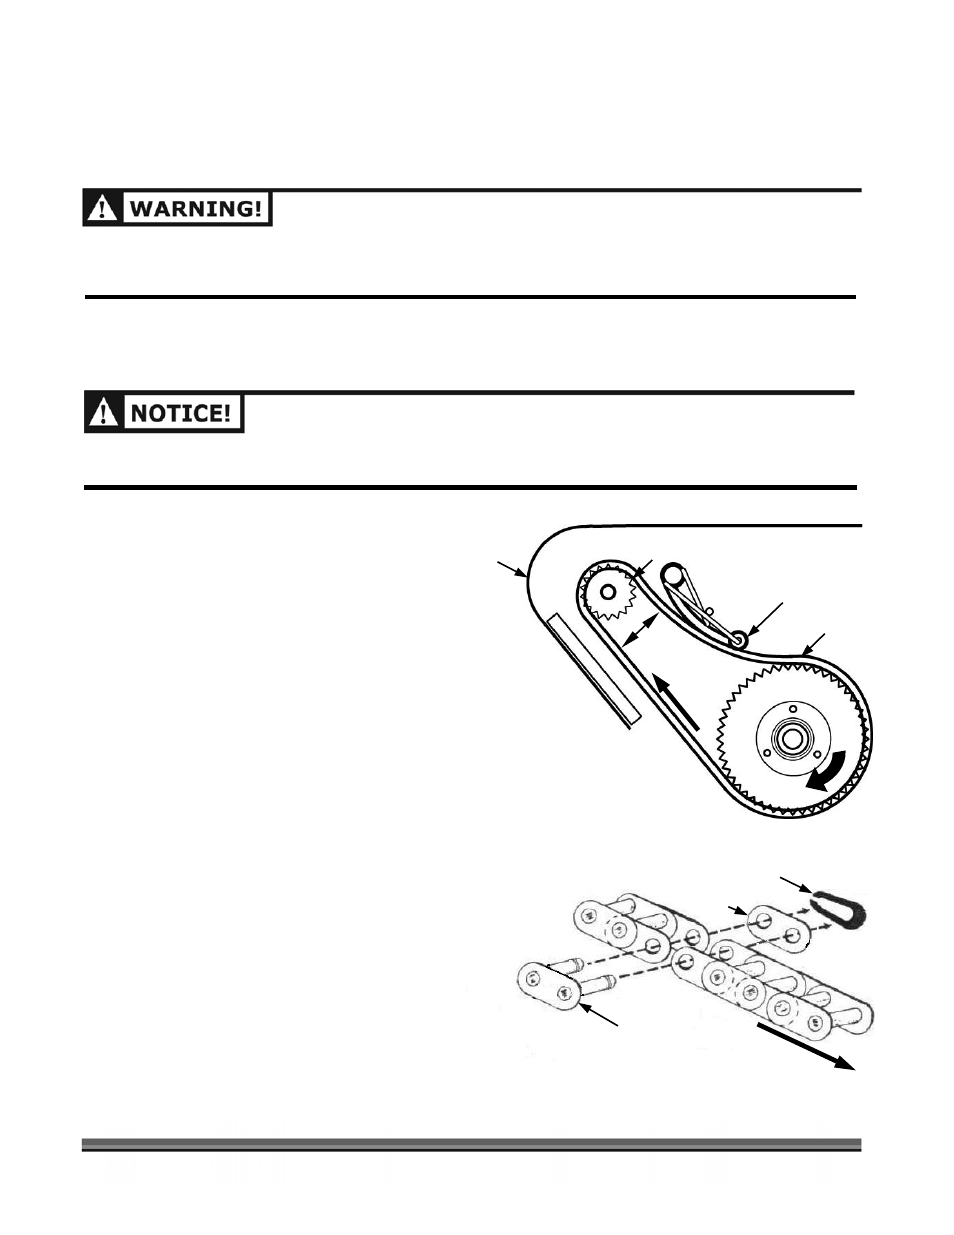
Replace the Drive Chain when the distance between the sections of the Chain is less than 2" (Figure 15).
BEFORE PERFORMING ANY MAINTENANCE PROCEDURE OR INSPECTION: STOP THE ENGINE, SET THE
PARKING BRAKE, WAIT FOR ALL MOVING PARTS TO COME TO A COMPLETE STOP AND DISCONNECT THE
SPARK PLUG WIRE(S), KEEPING IT AWAY FROM THE SPARK PLUG(S).
NOTE: A spring-loaded Tensioner maintains the chain tension on your DR SNOW THROWER ATTACHMENT.
With this system, no tensioning adjustment is required.
USE ONLY A DR CHAIN ON YOUR MACHINE. THE CHAIN HAS BEEN THOROUGHLY TESTED AND
PROVEN FOR MANY HOURS OF USE.
Tools and Supplies Needed:
•
1/2" Wrench
•
Blade Screwdriver
•
Pliers
•
Chain Saw Bar and Chain Oil
1. Using a 1/2" Wrench, unbolt the Chain Cover
(Figure 15) and remove it.
2. Locate and remove the Master Connecting Link in
the chain by first removing the Lock Clip with a
Blade Screwdriver and Pliers (Figure 16). You will
need to lift one side and rotate the Clip to get it
off the Master Link. Next, remove the Side Plate.
Then remove the Master Chain Link and remove
the Chain.
3. Check the Chain Tensioner for wear (Figure 15)
and replace it if necessary.
4. Install the new chain around the Drive Sprocket
and the Auger Sprocket (Figure 15).
5. Pull the Chain Tensioner (Figure 15) up and away
from the Chain to release tension on the Chain
and reinstall the Master Chain Link, as shown in
Figure 16, in the new Chain.
Tip: It is easier to install the Master Link on the
Auger Sprocket to hold the chain ends in place.
6. Release the Chain Tensioner onto the new Chain
and lubricate the Chain with Chain Saw Lubricant.
7. Reinstall the Chain Cover.
Figure 16
Figure 15
Drive Sprocket
Chain Cover
Tensioner
Auger Sprocket
Drive Chain
2" Min
Chain Travel
Lock Clip
Side Plate
Master Chain Link
Direction of
Chain Travel