48 prl instruction 6, C14f collar, Struts – DH Satellite 3M 1 PC Ant 48 Polar or Fixed Series User Manual
Page 6: Fine tuning the antenna, Preparing the feed assembly
FINE TUNING THE ANTENNA
Plan to take an extra hour of your time to get the most from your antenna. We recommend using a Spectrum
Analyzer to do this.
With each adjustment you make you will be able to see your increase/decrease in gain. To begin you must
string the antenna. This is done by simply taking a string, tying it to one brace and running the string across the
front of the antenna to the other brace at 180 degrees and tying it so it is taut. Now tie another string to a brace
90 degrees from the first brace and running it to the corresponding brace 180 degrees away. Be sure you put the
string on top or under the other string so as to not touch each other. When done you should have two strings at
90 degrees and they should meet in the center of the antenna. (Ideally you should use four strings at
approximately 45 deg. apart.) If the strings don't touch at the center, then you will have to do some adjusting
with the braces. Be sure your strings are taut. Stand back about 30 ' and sight the antenna again and see where
you must apply pressure with the braces or relieve the pressure from an area. Now go ahead and make small
adjustments with the braces, each time checking with the Spectrum analyzer to see that you are increasing the
gain of the antenna.
PREPARING THE FEED ASSEMBLY
You will find below the focal lengths and focal length/diameter ratios for our commercial 3M antennas. This
information is necessary to set the antenna and feed up properly.
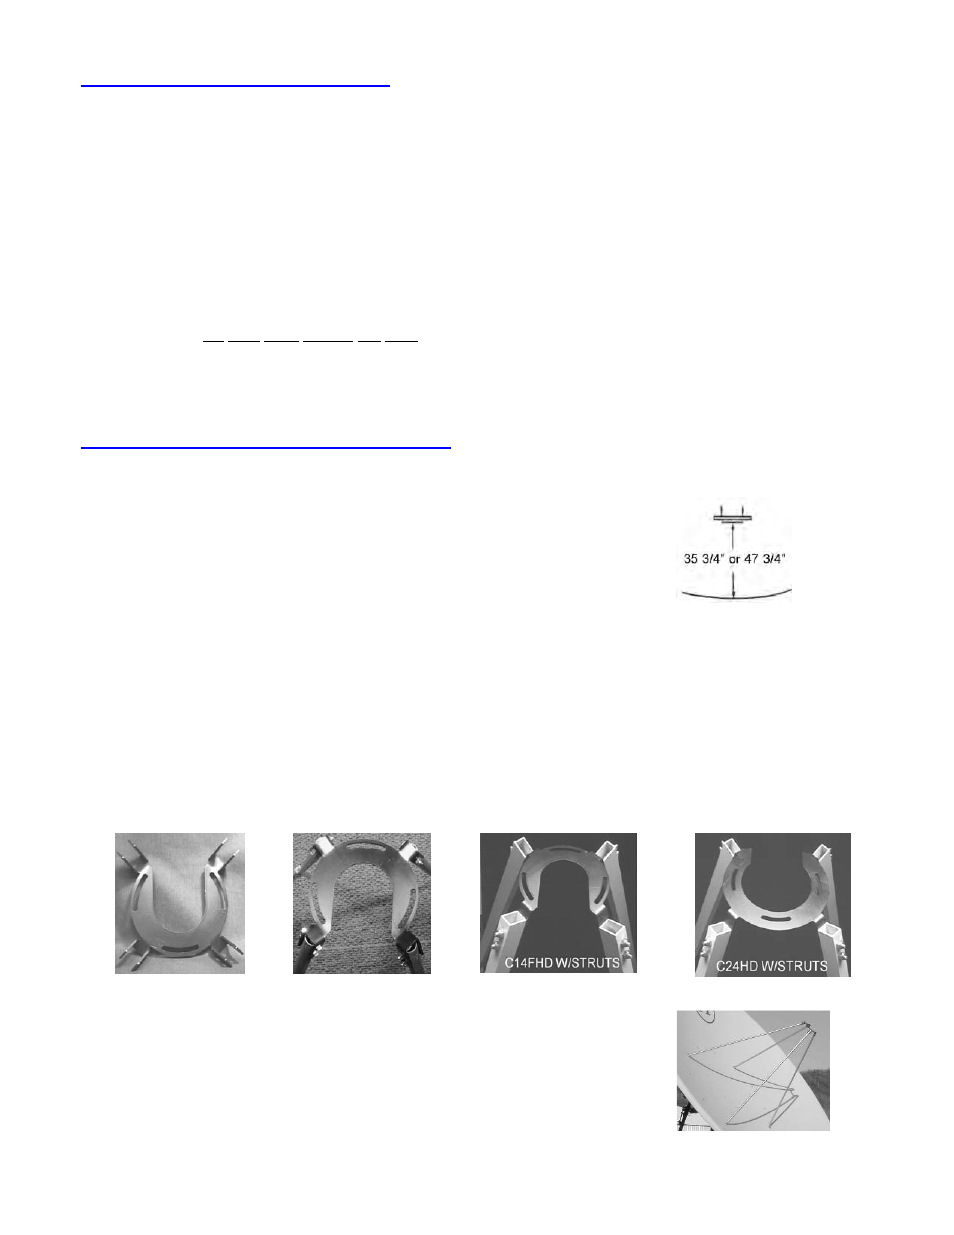
10' (3m) 36"f/l .3 f/d 10’ (3m) 48”f/l .4 f/d
Your DH representative has provided you with the correct feed collar to mate to the feed horn that you have
ordered for this installation. Take the collar and set it on the back of the scaler ring of the feed horn. Turn it
until all three holes line up between the two and insert the 1/4 "x 3/4" bolts thru the scaler ring and then thru the
collar. Fasten with the 1/4" nuts. Most C-band and dual feeds have a 3-bolt pattern on the scaler just for this
(See Fig #1 - #4). Now, slide the end of the strut thru the feed bracket as shown in drawing #2 and attach each
leg w/ 2-1/4” x 1 1/2” bolt & nut. Do this on all four struts. Place the flattened end of the struts onto the
antenna and use the 1/2 "x 1 1/2" bolts to fasten to the dish. Use every other hole. Check to see the feed is at
the focal length, and then tighten all bolts. The actual focal length should be 1/4" inside the waveguide for C-
band
SPECIAL NOTE: Fig.#1, #2, & #3 are used primarily with
Chaparral and ADL C band and C/Ku band feed horns. Fig#3 is a
special order Heavy Duty feed strut system and may be purchased
at an additional cost.
Figure#4: Our C24HD is a special order Heavy Duty system set up
for Seavey manufactured C & C/Ku band feeds. This may be
purchased at an additional cost.
C14F COLLAR
C14F COLLAR
& STRUTS
C14FHD COLLAR
& STRUTS
C24HD COLLAR
& STRUTS
Page 6
Fig#1
Fig.#3
Fig.#2
Fig.#4
Measuring f/l