Valera – BDI 9721 VALERA User Manual
Page 4
Swivel-Lock Pins
VALERA
9721 9723 9724
ASSEMBLY INSTRUCTIONS
4
BDIUSA.COM [email protected]
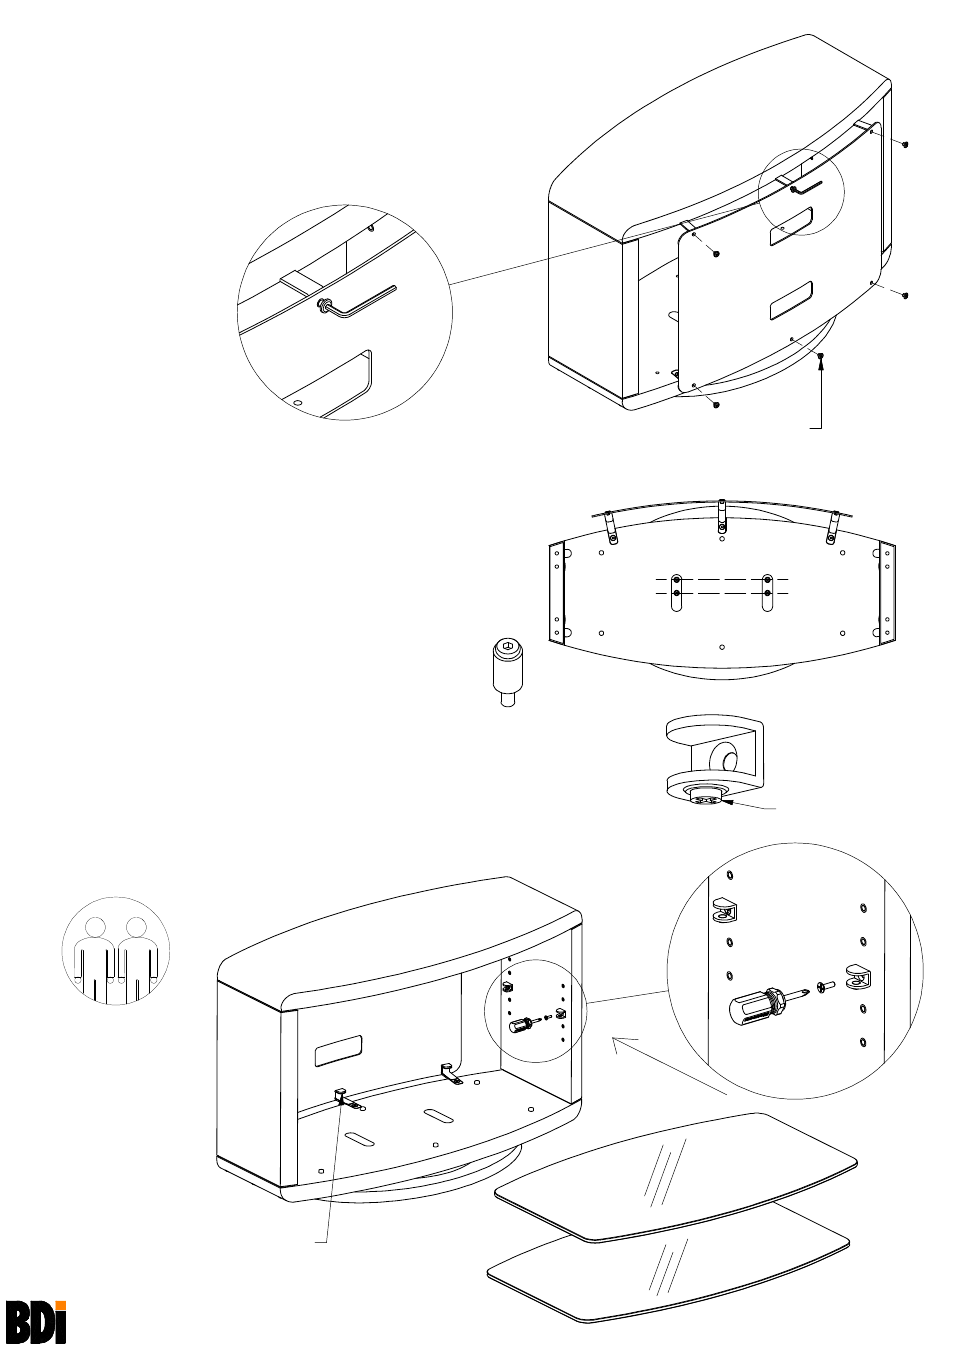
Step 7
Install Back Panel
Install
Back Panel (Q) onto Upper Brackets (I) and Lower Brackets
(J) with Machine Screws (H) using 4mm Hex L-Wrench (B).
Fasten the
Machine Screws (H) in the middle of the Back Panel (Q)
and then fasten the outside
Machine Screws (H).
After
Back Panel (Q) is installed, then tighten Upper Brackets (I) and
Lower Brackets (J).
Step 9
Install Glass Shelves
Note:
Glass Shelves (R) are identical.
Install
Rubber Stem Bumpers (M) into Base Assembly (P).
Install Lower
Glass Shelf (R) onto Base Assembly (P). Slowly slide Glass Shelf (R)
into place under
Lower Brackets (J).
Install
Shelf Clips (K) into Side Panels (O) at desired height and tighten with
Phillips Screwdriver (A). Make certain set screw on Shelf Clips (K) faces down.
Install Middle
Glass Shelf (R) into Shelf Clips (K) and tighten set screws on Shelf
Clips (K) with Phillips Screwdriver (A).
Shelf Clip (K)
Set screw faces down.
Recommended
2-person Step
for easy
installation
H
H
H
H
H
B
H
Fasten the screws in the middle
of the panel and then
fasten the outside screws.
Carefully slide
Glass Shelf (R)
under
Lower Brackets (J).
Step 8
Set Swivel Position
Valera 9721, 9723 and 9724 feature a swiveling base. Note
that
Swivel-Lock Pins are factory-installed at Position 1
enabling the stand to swivel 15-degrees to left and
15-degrees to right.
To lock the stand in a fixed position, use
Hex Driver (B) to
remove both
Swivel-Lock Pins from Position 1 (factory
position) and re-install them at Position 2.
To unlock the swivel for 360 degree rotation, remove
Swivel-Lock Pins.
Position 1
Position 2
Fixed
Swivel
A
L
K
R
R