Knox Video DIGI-88 User Manual
Page 10
~ 8 ~
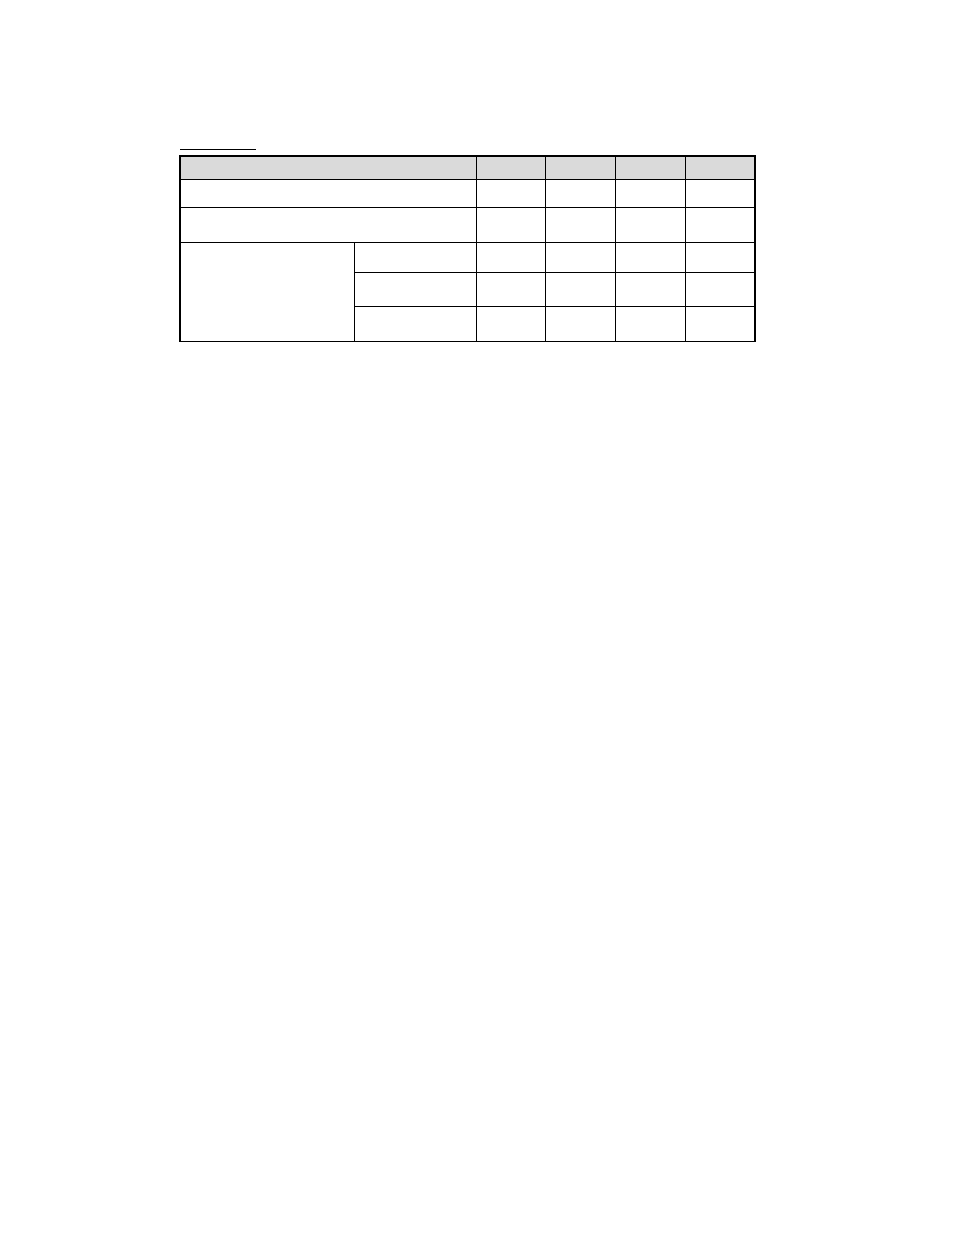
SW Main for firmware update (for technical support only)
DIP Switch Position
Pin 1
Pin 2
Pin 3
Pin 4
Normal Operation Mode [via RS-232 port]
6
OFF[!]
OFF[!]
OFF[!]
OFF[!]
Normal Operation Mode [via USB port]
7
OFF[!]
OFF[!]
OFF[!]
ON["]
Firmware Update Mode
8
Block A [main]
ON["]
OFF[!]
OFF[!]
OFF[!]
Block B [remote] ON["]
OFF[!]
ON["]
OFF[!]
Block C [HDMI]
ON["]
ON["]
OFF[!]
OFF[!]
Note
6
Factory default for SW Main is pin 1-OFF[!], pin 2-OFF[!], pin 3-OFF[!], & pin 4-OFF[!].
PLEASE MAINTAIN THIS SETTING AT ANYTIME FOR REGULAR USE VIA RS-232 CONTROL!
7
Factory default for SW Main is pin1-OFF[!], pin2- OFF[!], pin 3-OFF[!], & pin 4-ON["].
PLEASE MAINTAIN THIS SETTING AT ANYTIME FOR REGULAR USE VIA USB CONTROL!
8
Sequence for firmware update
WARNING!
[Firmware update only can be done via RS-232 port and connection to PC set at COM1)
1. Power off the ASP-88. Execute the firmware update program on your PC via COM1 port
connection to the RS-232 port of the ASP-88 using a straight through (pin-pin) cable.
2. Set the pin 1 of [SW Main] at ON[
"
] for Firmware Update Mode.
3. Set pin 2 and pin 3 at respective positions to assign which Block to be updated.
4. Power on the ASP-88. The firmware update program should begin this update sequence
automatically. If not, please check the RS-232 connection status between PC and ASP-88.
5. After the OK message shows up to indicate the firmware update sequence for designated
Block is complete, please turn off the ASP-88.
6. Repeat step 3 ~ step6 if you want to update the firmware of the remaining Blocks.
7. Set the [SW Main] switch position to Normal Operation Mode.
8. Power on the ASP-88.
Note
6
Factory default for SW Main is pin 1-OFF[], pin 2-OFF[], pin 3-OFF[], & pin 4-OFF[].
PLEASE MAINTAIN THIS SETTING AT ANYTIME FOR REGULAR USE VIA RS-232 CONTROL!
7
Factory default for SW Main is pin1-OFF[], pin2- OFF[], pin 3-OFF[], & pin 4-ON[].
PLEASE MAINTAIN THIS SETTING AT ANYTIME FOR REGULAR USE VIA USB CONTROL!
8
Sequence for firmware update
WARNING! [Firmware update only can be done via RS-232 port and connection to PC set at COM1)
1. Power off the DIGI-88. Execute the firmware update program on your PC via COM1
port connection to the RS-232 port of the DIGI-88 using a straight through (pin-pin)
cable.
2. Set the pin 1 of [SW Main] at ON[
] for Firmware Update Mode.
3. Set pin 2 and pin 3 at respective positions to assign which Block to be updated.
4. Power on the DIGI-88. The firmware update program should begin this update
sequence automatically. If not, please check the RS-232 connection status between PC
and DIGI-88.
5. After the OK message shows up to indicate the firmware update sequence for
designated Block is complete, please turn off the DIGI-88.
6. Repeat step 3 ~ step6 if you want to update the firmware of the remaining Blocks.
7. Set the [SW Main] switch position to Normal Operation Mode.
8. Power on the DIGI-88.