Digital sub-channels, Adjusting the volume, Displaying additional information – Dynex DX-L24-10A User Manual
Page 18: Adjusting the picture, Adjusting the tv picture, Adjusting the computer image, Adjusting the picture dx-l24-10a
14
Adjusting the picture
DX-L24-10A
Note: Button presses must be within three seconds of each other.
• Press RECALL to go to the last channel viewed.
Digital sub-channels
A digital TV signal transmits more data than an analog signal. This
increase in data provides a better picture and sound with less static and
interference. The increased data capacity also lets broadcasters fit
several channels into the same bandwidth as an analog signal.
Broadcasters may use these sub-channels to transmit a variety of
information, such as weather forecasts, foreign languages, and
commercials. A digital sub-channel is indicated by the main channel
number, followed by a dot, then the sub-channel number. For example,
5.1 indicates sub-channel 1 of main channel 5.
Adjusting the volume
To adjust the volume:
• Press VOL+ or VOL– to increase or decrease the volume.
• Press MUTE to temporarily turn off all sound. Press MUTE again
to restore the sound.
Displaying additional information
To display additional information:
• Press INFO to show an information banner. The information
banner shows current program information such as channel
number, video input source, and resolution.
• Digital mode information—Displays program name, time,
signal type, channel number, channel label, TV rating,
resolution, and current signal strength.
• Analog mode information—Displays signal type, channel
number, audio information, and TV rating.
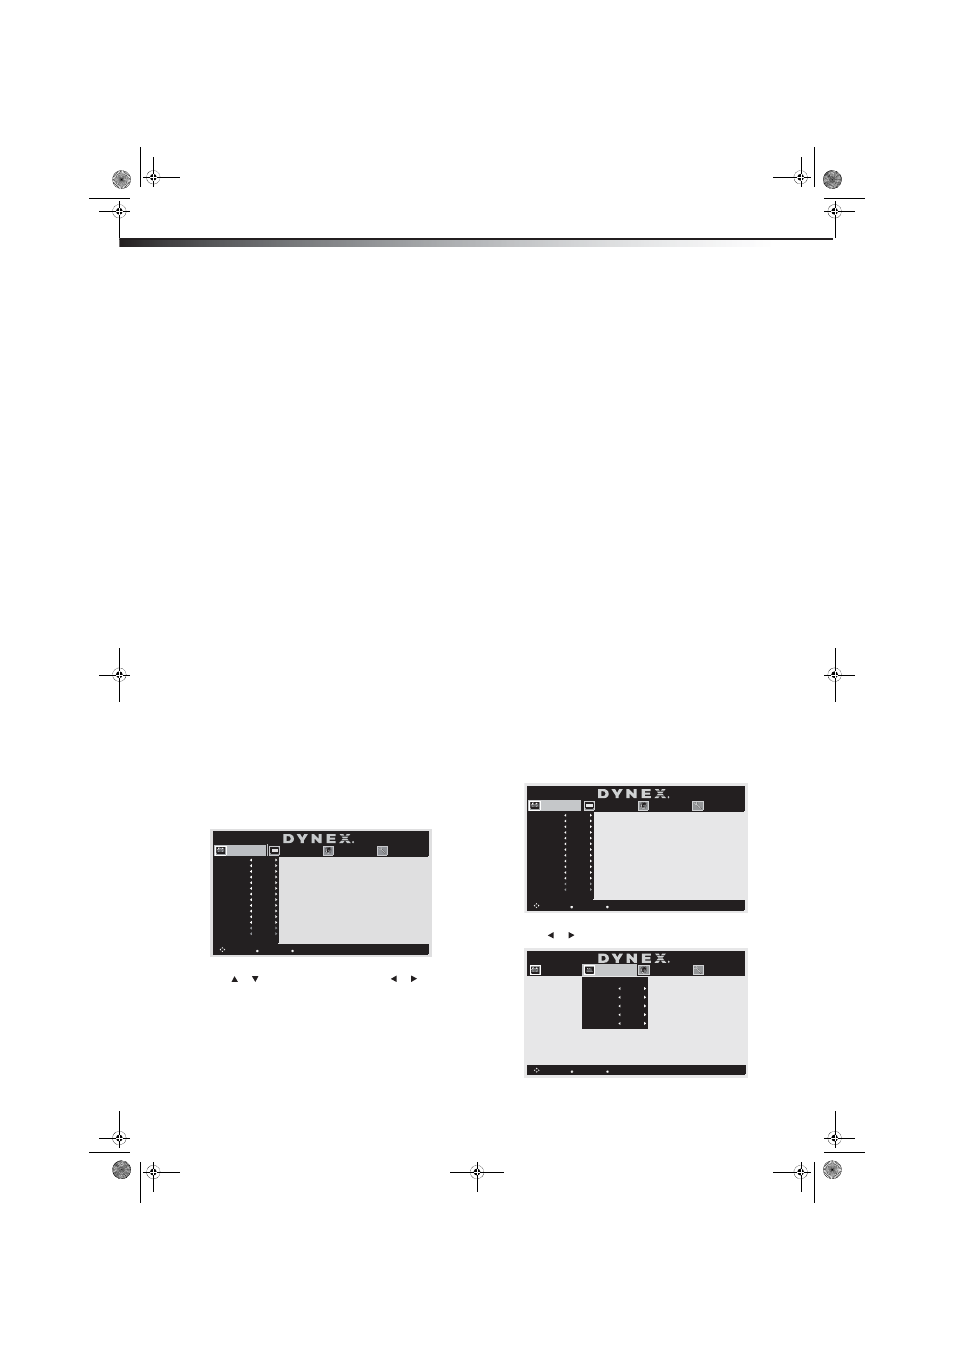
Adjusting the picture
Adjusting the TV picture
To adjust the TV picture:
1 Press MENU. The on-screen menu opens with the Picture menu
displayed.
2 Press or to highlight an option, then press or to adjust
the option. You can select:
• Aspect—Selects the aspect ratio of the picture. You can
select Auto (selects the correct aspect ratio automatically, for
TV source only), Normal (selects the correct aspect ratio to
match the source image), Wide (shows a full-screen picture),
Zoom (enlarges the picture but may crop the top and
bottom), or Cinema (stretches the picture at the edges, but
maintains a good aspect ratio at the center of the screen).
• Video Status—Selects the picture mode. You can select
Vivid (a bright and vivid picture), Standard (a standard
picture), Sport (a dynamic picture), Theater (a finely detailed
picture), or User (customized picture).
• Tint—Adjusts the image tint.
• Color—Adjusts the color saturation.
• Contrast—Adjusts the contrast.
• Brightness—Adjusts the brightness.
• Sharpness—Adjusts the sharpness.
• Backlight—Adjusts the backlight level of the screen.
• Color Temp—Selects the color temperature. You can select
Warm (to enhance the reds), Cool (to enhance the blues), or
Normal.
• Color Enhance—Automatically optimizes the skin tone
(not available for the VGA source).
• Adaptive Contrast—Automatically optimizes the picture
contrast between bright and dark portions (not available for
the VGA source).
• Noise Reduction—Selects the noise reduction mode to
reduce picture noise (snow). You can select Low, High, or
Off. (Not available for the VGA source.)
• MPEG NR—Reduces block noises and improves picture
quality (only available for the DTV and HDMI sources).
• Cinema Mode—Turns on or off the 3:2 pull-down feature
which realizes smoother picture movement for cinema video
(not available for the VGA source).
• Video Reset—Resets all settings in the Picture menu to
their default values.
3 Press EXIT to return to the previous menu, or press MENU to
close the menu.
Adjusting the computer image
Note: Make sure that your TV is in VGA mode. For more information, see
“Selecting the video input source“ on page 12.
To adjust the computer image:
1 Press MENU. The on-screen menu opens with the Picture menu
displayed.
2 Press or
to
highlight
VGA. The VGA menu opens.
Picture
TV
Sound
Setting
Aspect
Wide
Video Reset
Video Status
Vivid
Tint
50
Color
48
Contrast
50
Brightness
74
Sharpness
40
Backlight
10
Color Temp
Cool
Color Enhance
Off
Adaptive Contrast
On
Noise Reduction
Low
MPEG NR
Off
Cinema Mode
Off
: Select
: Back
EXIT
: Exit
MENU
0-
-100
0-
-10
0-
-100
0-
-100
0-
-100
0-
-100
Picture
VGA
Sound
Setting
Aspect
Wide
Video Reset
Video Status
Vivid
Tint
50
Color
48
Contrast
50
Brightness
74
Sharpness
40
Backlight
10
Color Temp
Cool
Color Management
Off
Dynamic Gamma
On
Noise Reduction
Low
MPEG NR
Off
Cinema Mode
Off
: Select
: Back
EXIT
: Exit
MENU
0-
-100
0-
-100
0-
-100
0-
-100
0-
-100
0-
-100
Picture
VGA
Sound
Setting
Auto Adjustment
Clock Adjustment
0
: Select
: Back
EXIT
: Exit
MENU
Phase Adjustment
42
H-Position
0
V-Position
0
Reset
DX-L24-10A_10-0348.book Page 14 Monday, March 22, 2010 4:26 PM