Nexen BD 933507 User Manual
Page 9
9
FORM NO. L-20063-AD-0314
SPRING ACTUATED
Note
Friction facing adjustment on spring actuated units is
accomplished while the brake is not actuated. Apply hold-
off air pressure of 5.17-6.90 bar [75-100 psi] to release the
spring Actuator.
1. Apply hold-off air pressure to release the spring Actuator
(See Figure 6).
Note
Before performing step two, determine the actuator type
and select either step 2a or 2b. Step four returns to general
instructions used for both models.
o
BSolete
t
hree
-P
ort
a
ctuator
o
nly
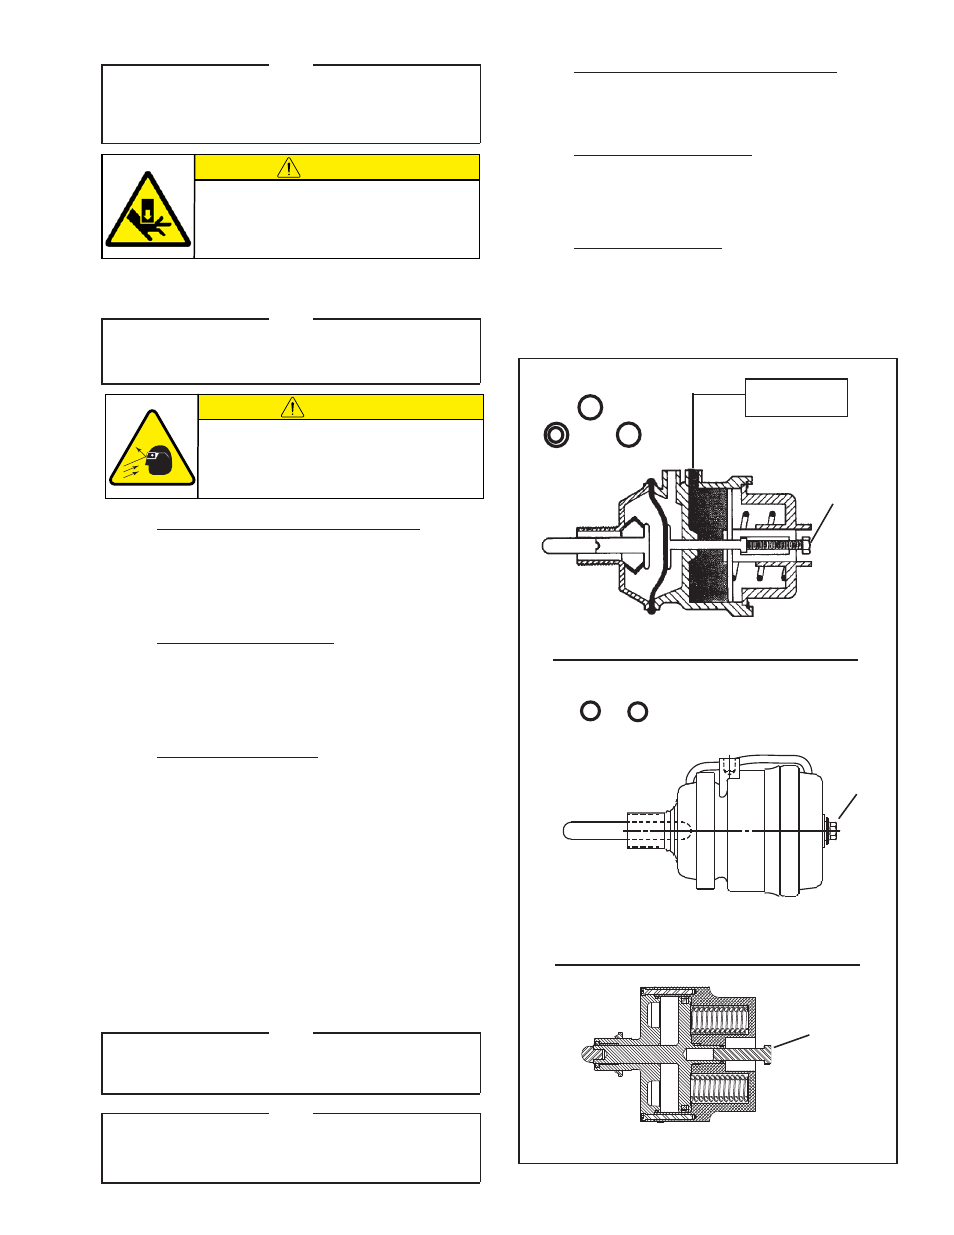
2a. Using a 9/16 inch socket wrench, turn the tap
bolt counterclockwise until the brake is released
(approximately 40 turns). Hold-off air pressure can be
removed at this time and service performed. (Refer to
Figure 6a).
t
wo
-P
ort
a
ctuator
o
nly
2b. Using a 3/4 inch socket, turn the tap bolt
counterclockwise to fully cage (compress) the spring.
The spring is fully compressed when the bolt is backed
out of the unit 21 mm [0.83 inches]. (Refer to Figure
6b).
60 PSi a
ctuator
o
nly
2c. Using a 15/16 inch socket, turn the manual release
bolt clockwise until snug to fully cage (compress) the
spring. (Refer to Figure 6c)
3. Loosen the adjustment screw Spanner Nut (Item 12)
(See Figure 5).
4. Turn the Adjustment Screw (Item 8) until a 1/32 inch
spacer can be slid between each of the Friction Facings
(Item 4) and the Friction Disc (See Figure 5).
5. Turn the Adjustment Screw in until the spacer can just
be pulled out.
6. Tighten the Spanner Nut (Item 12) to 13.6-20.3 Nm
[10-15 ft-lb] torque.
Note
Ensure proper hold-off pressure has been maintained.
(This will remove any tension on the tap bolt for
easier release.)
Note
Before performing step seven, determine the actuator
type and select either step 7a or 7b. Step eight returns
to general instructions used for both models.
o
BSolete
t
hree
-P
ort
a
ctuator
o
nly
7a. Using a 9/16 inch socket, turn the tap bolt clockwise
until it bottoms out (approximately 40 turns), then torque
the Tap Bolt to 13.5-20.2 Nm [10-15 ft-lb].
t
wo
-P
ort
a
ctuator
o
nly
7b. Using a 3/4 inch socket, turn the tap bolt clockwise
to fully uncage (decompress) the spring. The spring
is fully decompressed when the hex bolt head is flush
against the actuator.
60 PSI Actuator Only
7c. Using a 15/16 inch socket, turn the manual release bolt
12 turns counterclockwise to fully uncage (decompress)
the spring.
8. Remove hold-off air pressure to engage the spring
Actuator.
Figure 6a
Obsolete Three-Port Actuator
SPRING BRAKE
SERVICE
SERVICE
Apply Hold-Off
Air Pressure
Figure 6b
Two-Port Actuator
Spring Brake
Service
9/16"
Hex Bolt
3/4" Hex
Bolt
Figure 6c
60 PSI Actuator
15/16" Hex
Head
CAUTION
This product has possible pinch
points. Care should be taken when
interacting with this product.
CAUTION
Working with spring loaded or tension
loaded fasteners and devices can cause
injury. Wear safety glasses and take the
appropriate safety precautions.