Baffle adjustment – Star Headlight & Lantern ULB18 Lineum Dual-Color Half-Phanto Interior LED Lightbar User Manual
Page 4
-3-
CAUTION: Take extreme caution not to over tighten the screws!!! Over tightening
of the screws can strip the holes.
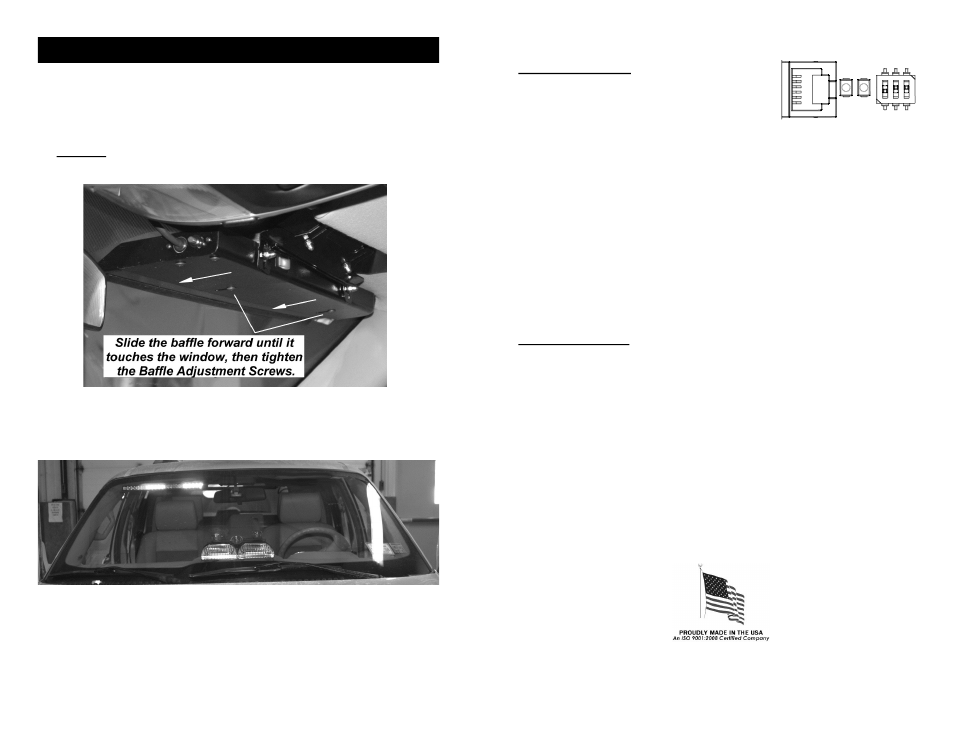
1. After the light has been mounted (see separate mounting instructions), if adjustments
permit, slide the light forward until the top of it is touching the windshield.
2. Loosen the baffle screws and carefully slide the baffle forward until the gasket is forced
slightly downward by the pressure of the windshield.
3. Tighten the Baffle Adjusting Screws to secure the baffle in place .
Baffle Adjustment
4.
Once all of the brackets are securely tightened, check your mount to ensure the
desired angle is achieved. Stand in front of the vehicle and inspect the light through
the front windshield. The screws may be loosened slightly to allow for any final
adjustments necessary.
-8-
Program Mode (Cloning)
If you are installing multiple lights and have a number of
options to set, you may find it easier to set up one light,
then “clone” its settings onto the other lights. To do so,
proceed as follows:
1. Program the first light as previously described.
2. Connect the second light to the programmed unit using
a special telephone-type cable (P/N SWH-140 available
from the manufacture upon request) between the two
communications ports.
3. Flip the Program Mode switches from both lights onto the ON position (DOWN in the
diagram above). Both lights should start flashing the Pursuit lights.
4. Press the Phase button on the light you would like to reprogram and hold it until the
Pursuit lights go off and the colored lights start flashing. Release the button and the new
programming information will begin uploading to the second unit. Once it has
successfully completed uploading all of the programming, the entire light will illuminate
into a steady burn mode. Repeat programming if not.
5. Flip the Program Mode DIP switches from both lights into the OFF position and remove
the cable connecting the lights. Programming should be completed.
Programming (CONT'D)
Factory Default Settings
To reset the light to all of the factory default settings, proceed as follows:
1. Flip the Program Mode switch ON position (DOWN in the diagram above). All Pursuit
lights should start flashing.
2. Press and hold the Head Enable button until the Pursuit lights go off and all of the heads
light up sequentially from left to right.
3. Once all of the heads are illuminated, release the Head Enable button and the light will
be restored to the factory default settings.
4. Flip the Program Mode DIP switch into the OFF position. Reprogramming should be
completed.
ON
CTS
1
2
3
Ph
as
e
Pr
o
g
ra
m
m
in
g
H
ea
d
En
ab
le
Pr
o
g
ra
m
m
in
g
Communication
Port
Pr
o
g
ra
m
M
o
d
e
H
ig
h
-L
o
w
/Pa
tte
rn
T
ra
ff
ic
D
ir
ec
to
r/
T
ak
ed
o
w
n