Installation instructions, Final assembly and test (cont.), Lp cylinder installation - some models – Dacor OB52 User Manual
Page 18: Leak testing, Power connection - cart models
16
Installation Instructions
Final Assembly and Test (cont.)
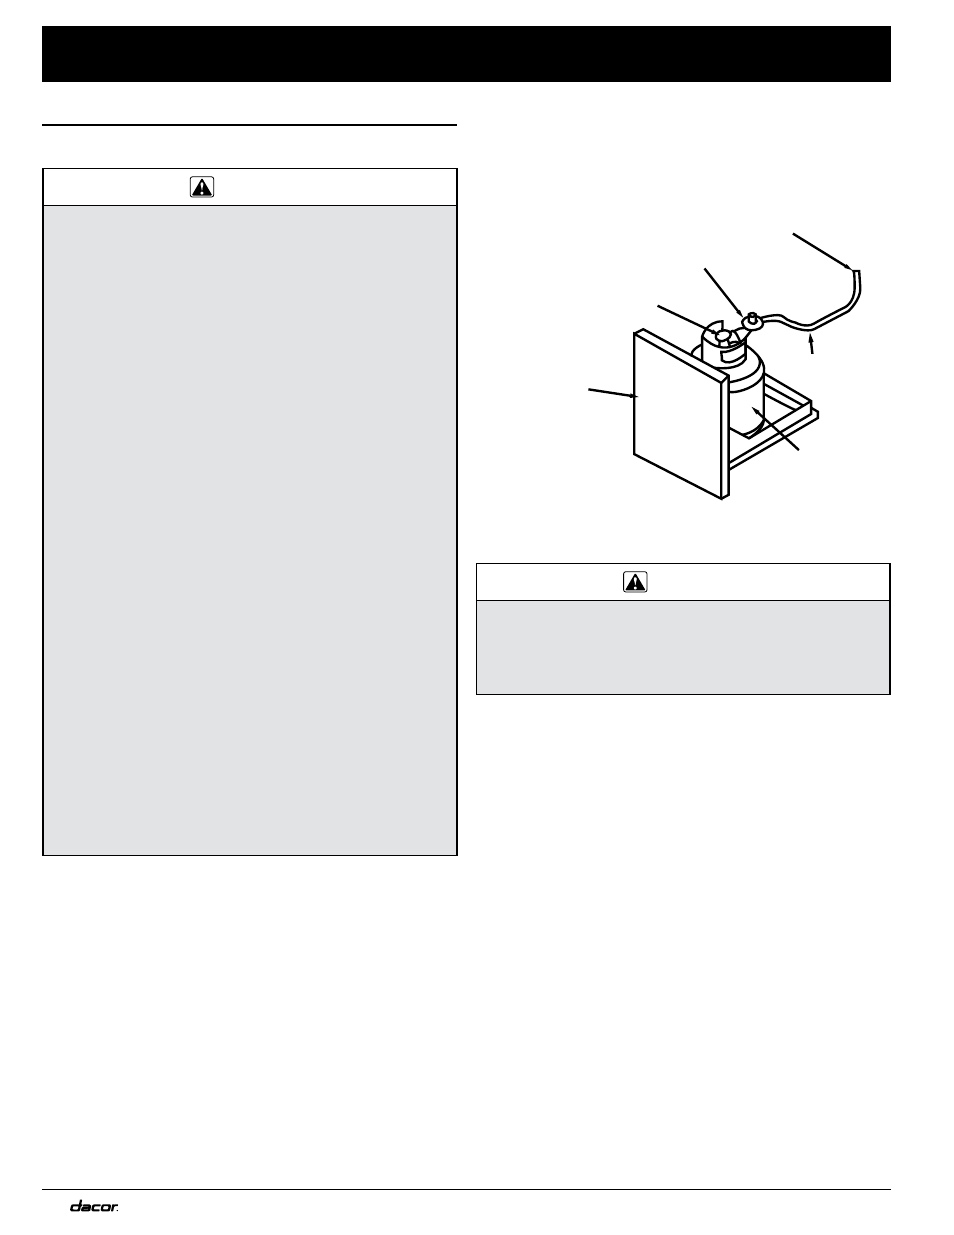
LP Cylinder Installation - Some Models
warning
The largest recommended LP cylinder size for the
•
rollout tank shelf on the cart is five gallons. A five
gallon portable liquid propane cylinder should be
approximately 12 inches (305mm) in diameter and
18 inches (457mm) high,. It must be constructed and
marked in accordance with the specification for liquid
propane (LP) gas cylinders of the U.S. Department
of Transportation (DOT) and designed for use with a
5LP-A quick disconnect systems only.
Cylinders must be stored outdoors in a well vented
•
area out of the reach of children.
On installations with a LP cylinder, when storing the
•
appliance indoors, you must disconnect and store
the LP cylinder outdoors.
On models OB52 and OBS52, use only a two stage
•
regulator on the gas supply line.
For LP cylinder installations, the LP gas cylinder
•
must have its own certified high-pressure regulator
(Either Type I or No. 600 Connection).
A dented or rusty LP tank may be hazardous and
•
should be checked by your LP supplier.
Never use a cylinder with a damaged valve.
•
Do not change the regulator/hose assembly with a
•
standard 510 POL tank/valve assembly.
The cylinder must be provided with a shut-off valve
•
terminating in a Liquid Propane (LP) gas supply
cylinder valve outlet specified, as applicable, for con-
nection No. 5LP-A.
The cylinder supply system must be arranged for
•
vapor withdrawal and provided with a listed overfill-
ing prevention device.
For units that will use a LP cylinder, start by making
1.
sure the main valve is completely closed.
Place the tank into the final position within the cabinet
2.
or cart.
Leak Testing
warning
Do not use a flame to check leaks.
•
The grill or cooktop and shut-off valve must be dis-
•
connected from the gas supply piping during any
pressure testing exceeding 1/2 psi (3.5kPA).
Turn all burner control valves on the front of the appli-
1.
ance to the “OFF” position.
With the power to the appliance DISCONNECTED, turn
2.
on the main gas supply valve.
Check all gas connections for leaks using an electronic
3.
gas leak detector. You may also apply a water and
soap solution to the connections. Bubbles around the
connections indicate a leak. If you observe leakage do
not attempt to operate the appliance until all leaks have
been eliminated.
Power Connection - Cart Models
If the appliance is installed on a cart, connect a three-
1.
prong extension cord (minimum 5 Amp. capacity) to the
power input on the back of the cart. Connect the exten-
sion cord to a grounded, three-prong, electrical outlet.
LP Tank Valve
Tank Gas
Regulator (included)
LP Tank
(not included)
5 Gal Max.
Shelf Capacity
Gas Connection at
Right Rear Corner
Under Outdoor Grill
Slideout LP Tank
Storage Shelf on
Optional Cart
Flexible Gas
Line (included)