Wing assembly and installation – ParkZone PKZ6680 User Manual
Page 7
EN
IMPORTANT: Bind the aircraft to your transmitter before wing installation for
easier spoiler adjustment.
Before fl ying, bind the aircraft to your transmitter again to correctly set failsafe.
Assembly
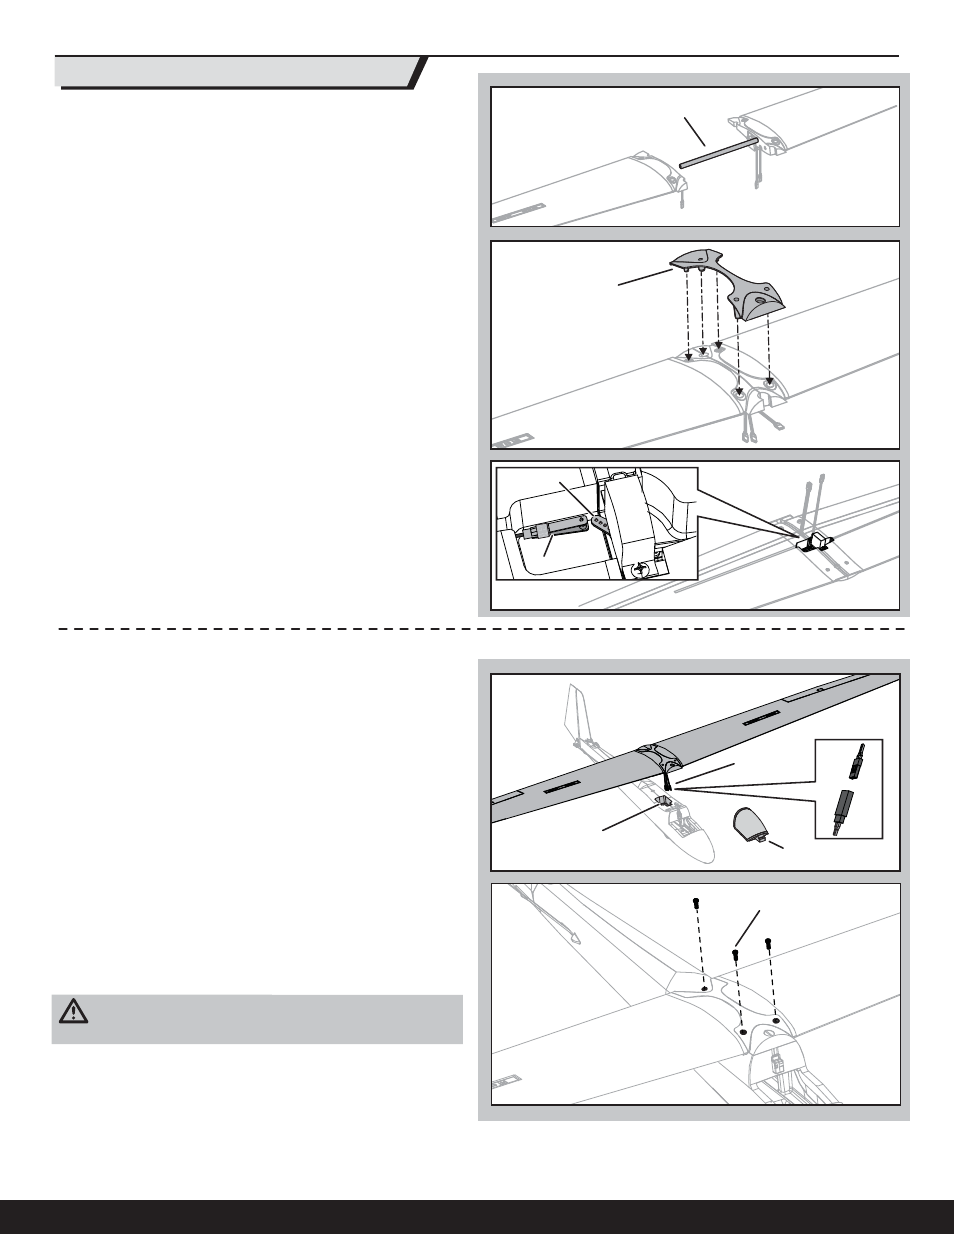
1. Slide the wing tube (A) in the hole in the left wing.
2. Slide the other end of the wing tube into the hole in the right wing until
both wings meet. Ensure the aileron servo wires exit the wing through the
forward slot in the bottom of the wing as shown.
3. Install the wing cover (B) on the top of the wing, aligning the 5 holes as
shown.
4. Flip the wing assembly over and attach the right spoiler clevis (C) to the
outermost hole in the servo arm (D). For more information about attaching
the clevis, refer to the “Clevis Installation” section. Hemostats or needle
nose pliers may be needed to connect the clevis.
Installation
1. Remove the canopy hatch (F) from the fuselage.
2. Insert the servo connectors (G) through the hole in the fuselage (H) to the
receiver.
3. Connect the aileron servos to the aileron Y-harness. The left and right
servos can be connected to either side of the Y-harness. Insert the spoiler
connector in the throttle port of the receiver.
Tip: When using a transmitter capable of controlling separate ailerons, the
aileron Y-harness is not required. If desired, connect the aileron servos to the
AIL and AUX1 ports of the receiver. Set up aileron control accordingly in your
transmitter.
4. Use the transmitter throttle to extend and retract the spoilers. Turn the wing
as needed to adjust the spoilers. Disconnect and adjust the right spoiler
clevis on the linkage so the spoilers extend equally and fully retract in
response to the throttle.
5. Apply tape over the spoiler linkage channels on the underside of the wings.
CAUTION: DO NOT crush or otherwise damage the wiring when
attaching the wing to the fuselage.
6. Install the wing assembly to the fuselage using 3 screws (I).
7. Install the canopy hatch on the fuselage. When needed, disassemble in
reverse order.
Tip: We recommend removing the wing from the fuselage for storage or
transport.
A
Wing Assembly and Installation
B
C
D
H
I
F
G
7