Hanna Instruments HI 83216 User Manual
Page 8
14
15
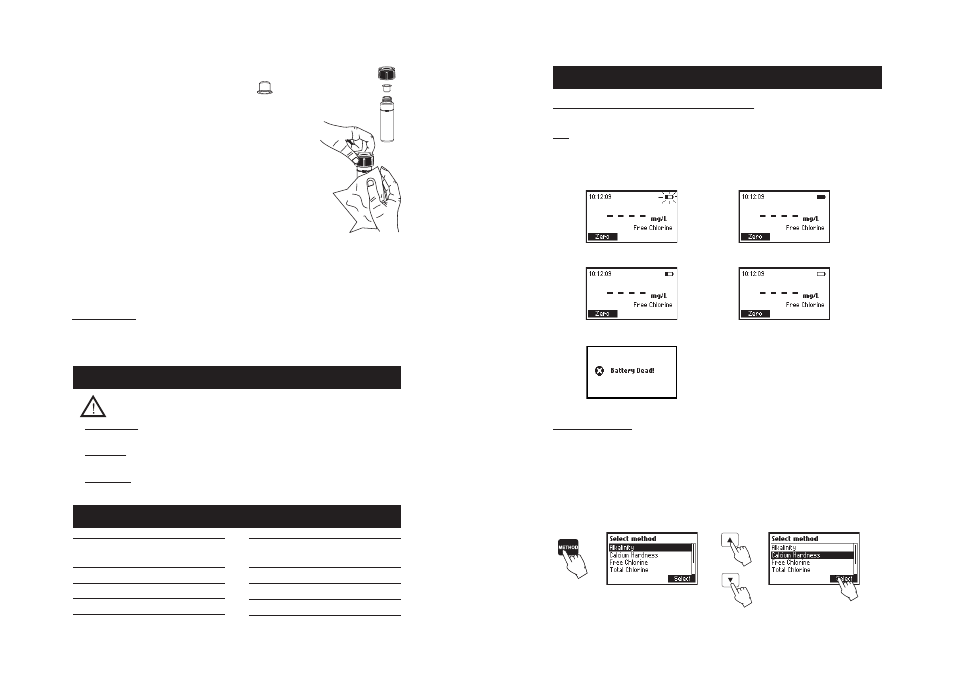
POWER CONNECTION AND BATTERY MANAGEMENT
The meter can be powered from an AC/DC adapter (included) or from the built-in rechargeable battery.
Note: Always turn the meter off before unplugging it to ensure no data is lost.
When the meter switches ON, it verifies if the power supply adapter is connected. The battery icon on the
LCD will indicate the battery status:
- battery is charging from external adapter
- battery fully charged (meter connected to AC/DC adapter)
- battery capacity (no external adapter)
- battery Low (no external adapter)
- battery Dead (no external adapter)
OPERATIONAL GUIDE
• Turn the instrument ON via the ON/OFF power switch.
• The meter will perform an autodiagnostic test. During this test, the Hanna Instrument logo will appear
on the LCD. After 5 seconds, if the test was successful, the last method used will appear on the display.
• In order to select the desired method press the METHOD key and a screen with the available methods will
appear.
• Press the ▲ ▼ keys to highlight the desired method. Press Select.
METHOD SELECTION
METHOD REFERENCE TABLE
Method
Method
Page
description
1
Alkalinity
20
2
Calcium Hardness
22
3
Free Chlorine
25
HEALTH & SAFETY
• The chemicals contained in the reagent kits may be hazardous if improperly handled.
• Read the Material Safety Data Sheet (MSDS) before performing tests.
• Safety equipment: Wear suitable eye protection and clothing when required, and follow instructions
carefully.
• Reagent spills: If a reagent spill occurs, wipe up immediately and rinse with plenty of water.
If reagent contacts skin, rinse the affected area thoroughly with water. Avoid breathing released vapors.
• Waste disposal: for proper disposal of reagent kits and reacted samples, refer to the Material Safety
Data Sheet (MSDS).
Method
Method
Page
description
4
Total Chlorine
27
5
Cyanuric Acid
29
6
pH
31
• In order to avoid reagent leaking and to obtain more accurate measurements, close
the cuvette first with the supplied HDPE plastic stopper
and then the black cap.
• Each time the cuvette is used, the cap must be tightened to the same degree.
• Whenever the cuvette is placed into the measurement cell, it must be dry
outside, and free of fingerprints, oil or dirt. Wipe it thoroughly with
HI 731318 or a lint-free cloth prior to insertion.
• Shaking the cuvette can generate bubbles in the sample, causing higher
readings. To obtain accurate measurements, remove such bubbles by
swirling or by gently tapping the cuvette.
• Do not let the reacted sample stand too long after reagent is added. For
best accuracy, respect the timings described in each specific method.
• It is possible to take multiple readings in a row, but it is recommended to take
a new zero reading for each sample and to use the same cuvette for zeroing
and measurement when possible (for most precise results follow the measurement procedures carefully).
• Discard the sample immediately after the reading is taken, or the glass might become permanently stained.
• All the reaction times reported in this manual are at 25 °C (77 °F). In general, the reaction time
should be increased for temperatures lower than 20 °C (68 °F), and decreased for temperatures higher
than 25 °C (77 °F).
INTERFERENCES
• In the method measurement section the most common interferences that may be present in an average
wastewater matrix have been reported. It may be that for a particular treatment process other
compounds do interfere with the method of analysis.