Hanna Instruments HI 83749 User Manual
Page 12
12
It is recommended to calibrate the meter only with Hanna ready-to-use calibration standard solutions.
Alternatively, formazin standards can be used. The prepared formazin solutions should be close
to the default calibration points. The first point must be near 0 NTU, the second point between
10 and 20 NTU, the third point between 50 and 150 NTU and the fourth point between 400
and 600 NTU.
CALIBRATION
Calibration can be performed in two, three or four points. It is possible to interrupt calibration procedure
at any time by pressing ON/OFF.
CALIBRATION PROCEDURE
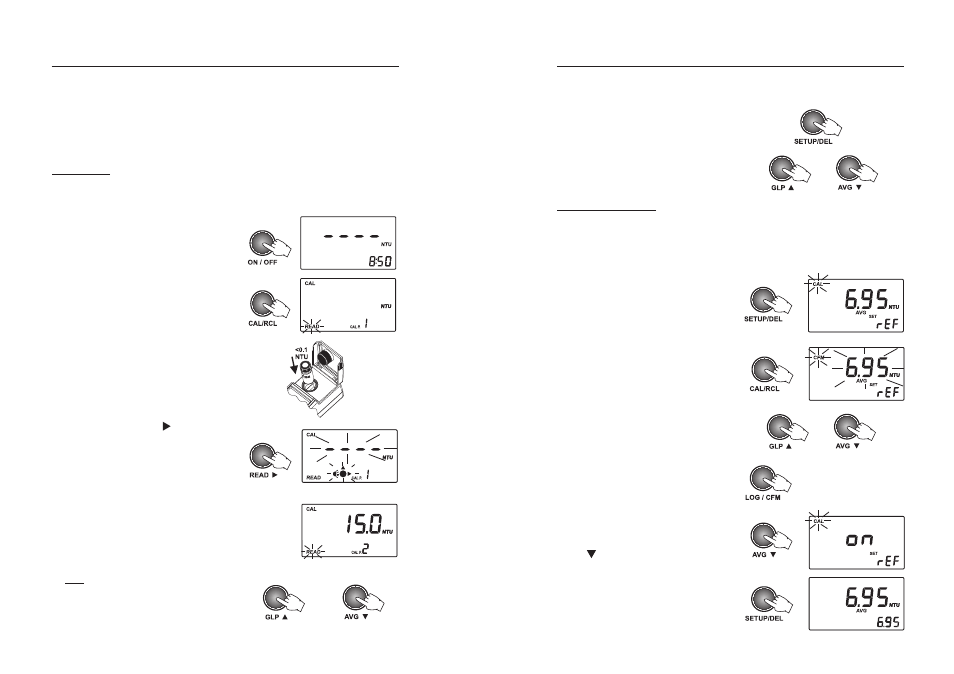
• Turn the instrument on by pressing ON/OFF.
When the LCD displays “----”, the instrument
is ready.
• Enter calibration mode by pressing CAL/RCL.
The display will show “CAL P.1”.
• Place the <0.10 NTU standard cuvet into the
holder.
• Close the lid and press READ . “----” and the
“Lamp and Read Status” indicator will blink
on the display.
Alternatively, press LOG/CFM to skip the first
calibration point.
• Then the LCD will show the second calibration
point (15.0 NTU) and “CAL P.2”, while “READ”
is blinking.
Note: If you’re using different calibration
standards, change the displayed value by
pressing UP or DOWN keys until the display
shows the desired value.
or
29
The Setup mode allows the user to view and modify the instrument parameters.
The blinking “CAL” tag appears during setup mode suggesting to press CAL for editing parameters.
SETUP
SET REFERENCE VALUE
During determination of bentonite requirement for
stabilization of the wine, it can be useful to set a
reference value and let the instrument automatically
compare turbidity values.
• When the display shows the first reading (T1),
you can store the result as Reference Value. Press
SETUP/DEL to enter the “Set Reference Value”
panel. “CAL” will blink and “SET rEF” will be
displayed.
• To set the reference value, press CAL/RCL. Then
the value and “CFM” tag will start blinking.
• At this point the displayed reference value can
be modified using the UP and DOWN arrow keys.
• Press LOG/CFM to store the value.
Note: To exit without saving the reference value,
press SETUP/DEL and the meter will return to
the measurement panel.
• To activate the Comparative mode, press the
AVG key and set on the Comparative mode
(see page 30).
• Press SETUP/DEL to return to Measurement
mode. The display will show the reference value.
or
or
• To enter/exit SETUP, press SETUP/DEL.
• To select the parameter to be edit, press UP or
DOWN keys until the desired panel is displayed.