Orp calibration (hi 8615 family), Ph calibration with fixed temperature – Hanna Instruments HI 8614N User Manual
Page 7
12
13
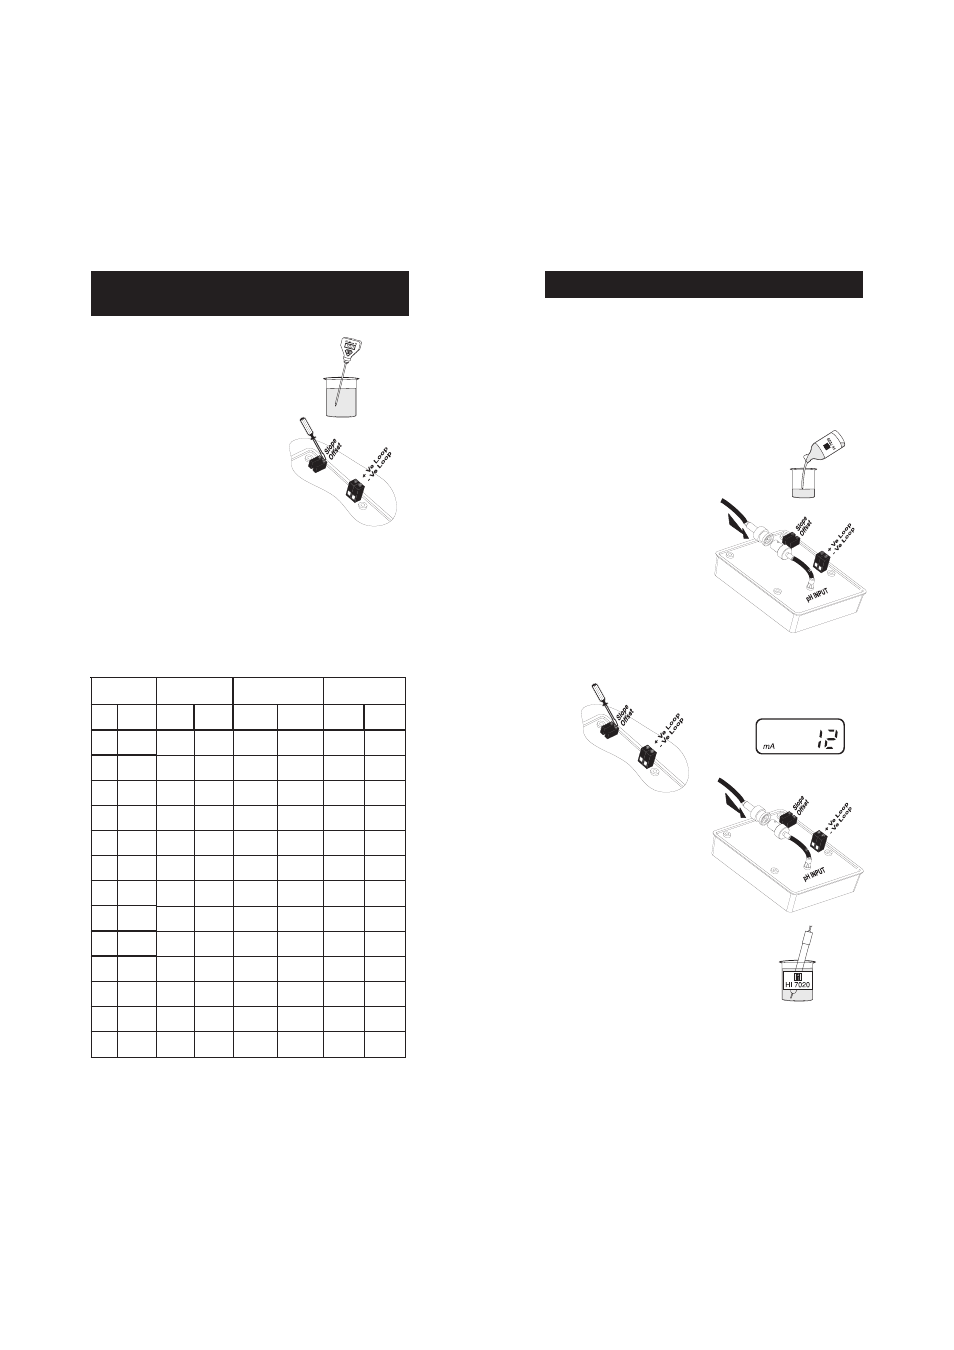
ORP CALIBRATION (HI 8615 family)
ORP CALIBRATION (HI 8615 family)
ORP CALIBRATION (HI 8615 family)
ORP CALIBRATION (HI 8615 family)
ORP CALIBRATION (HI 8615 family)
INITIAL PREPARATION
Disconnect the +ve supply cable from the "+VE LOOP" terminal
and connect a 20 mA f.s. ammeter between the +ve cable and the
"+VE LOOP" terminal. With
HI 8615L the instrument display can
be used during calibration without the need to connect the ammeter.
In this case the values are directly expressed in mV units.
Pour a small quantity of
HI 7020 ORP solution
into a beaker.
PROCEDURE
• Connect the shorting BNC connector
to the ORP transmitter.
• Adjust the OFFSET ADJUSTMENT
trimmer on the module for
a display of 12 mA on the
ammeter or 0 mV on the
instrument display (
HI 8615L
only). This sets the zero point for the transmitter.
• Connect the ORP electrode to
the transmitter and immerse
the tip of the electrode into
a beaker of
HI 7020 ORP
calibration solution, and check
that the ammeter reading lies
between 13.6 and 14.2 mA
for
HI 8615 or the instrument
reading is between 200 and
275 mV at 25°C (
HI 8615L).
HI 8614, HI 8614L
pH CALIBRATION WITH FIXED TEMPERATURE
pH CALIBRATION WITH FIXED TEMPERATURE
pH CALIBRATION WITH FIXED TEMPERATURE
pH CALIBRATION WITH FIXED TEMPERATURE
pH CALIBRATION WITH FIXED TEMPERATURE
COMPENSATION (HI 8614 family)
COMPENSATION (HI 8614 family)
COMPENSATION (HI 8614 family)
COMPENSATION (HI 8614 family)
COMPENSATION (HI 8614 family)
• Take the temperature of the buffer
solutions using a Checktemp or a
thermometer with a resolution of at
least 1°.
• Connect the appropriate resistor
to the "TEMP. PROBE" terminals
(see page 8) depending on the
temperature of the calibration solution.
• Follow the procedure as outlined in the calibration with automatic
temperature compensation and use the thermometer reading to
adjust the trimmer until the ammeter reads the value according
to the following table.
e
r
u
t
a
r
e
p
m
e
T
r
e
f
f
u
B
1
0
.
4
H
p
r
e
f
f
u
B
1
0
.
7
H
p
r
e
f
f
u
B
1
0
.
0
1
H
p
C
º
F
º
H
p
A
m
H
p
A
m
H
p
A
m
0
2
3
1
0
.
4
4
3
.
9
3
1
.
7
2
1
.
2
1
2
3
.
0
1
5
9
.
4
1
5
1
4
0
0
.
4
3
3
.
9
0
1
.
7
9
0
.
2
1
4
2
.
0
1
8
8
.
4
1
0
1
0
5
0
0
.
4
3
3
.
9
7
0
.
7
6
0
.
2
1
8
1
.
0
1
3
8
.
4
1
5
1
9
5
0
0
.
4
3
3
.
9
4
0
.
7
4
0
.
2
1
2
1
.
0
1
7
7
.
4
1
0
2
8
6
0
0
.
4
3
3
.
9
3
0
.
7
3
0
.
2
1
6
0
.
0
1
2
7
.
4
1
5
2
7
7
1
0
.
4
4
3
.
9
1
0
.
7
1
0
.
2
1
1
0
.
0
1
8
6
.
4
1
0
3
6
8
2
0
.
4
5
3
.
9
0
0
.
7
0
0
.
2
1
6
9
.
9
3
6
.
4
1
5
3
5
9
3
0
.
4
6
3
.
9
9
9
.
6
9
9
.
1
1
2
9
.
9
0
6
.
4
1
0
4
4
0
1
4
0
.
4
7
3
.
9
8
9
.
6
8
9
.
1
1
8
8
.
9
6
5
.
4
1
5
4
3
1
1
5
0
.
4
8
3
.
9
8
9
.
6
8
9
.
1
1
5
8
.
9
3
5
.
4
1
0
5
2
2
1
6
0
.
4
9
3
.
9
8
9
.
6
8
9
.
1
1
2
8
.
9
1
5
.
4
1
5
5
1
3
1
7
0
.
4
0
4
.
9
8
9
.
6
8
9
.
1
1
9
7
.
9
8
4
.
4
1
0
6
0
4
1
9
0
.
4
1
4
.
9
8
9
.
6
8
9
.
1
1
7
7
.
9
6
4
.
4
1