Hanna Instruments HI 98713 User Manual
Page 5
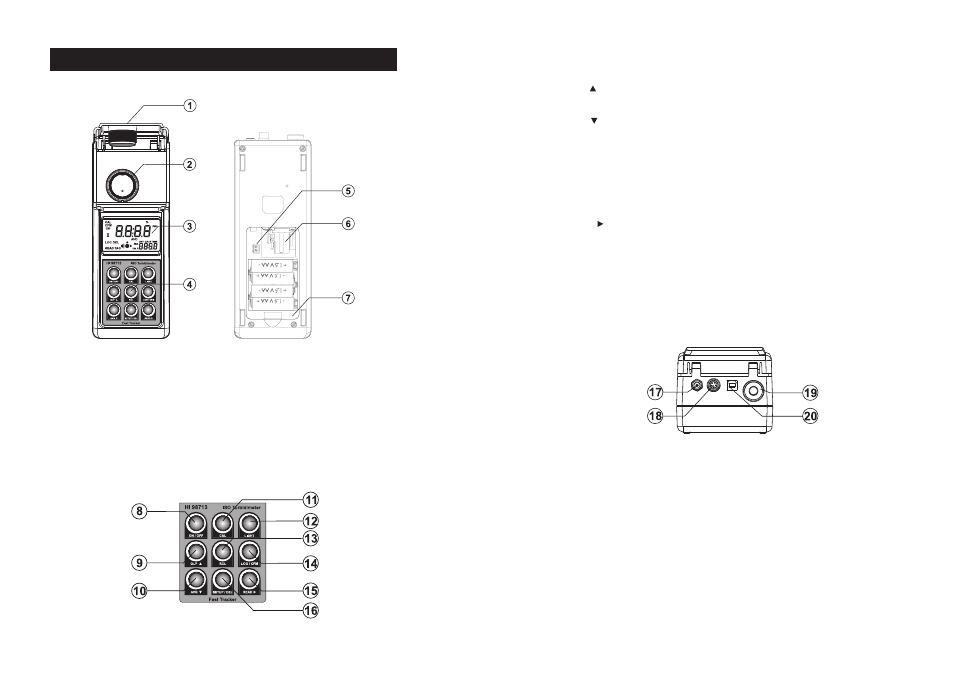
8
9
8) ON/OFF, press to turn the instrument ON/OFF. If no key is pressed for more than 15
minutes, the instrument automatically shuts off.
9) GLP , press to enter/exit GLP feature. In SETUP it is used to increase the set values. In Log
Recall it is used to select a newer record (scroll up).
10) AVG , press to set the average reading mode ON/OFF. In SETUP it is used to decrease the
set values. In Log Recall it is used to select an older record (scroll down).
11) CAL, press to enter/exit calibration. During setup it is used to start/stop editing a parameter.
12) LIGHT, press to turn ON/OFF the backlight.
13) RCL, press to enter/exit viewing log content.
14) LOG/CFM, press to save the log records or to confirm the selected option.
15) READ , press to start a measurement. Press and hold READ to make a continuous
measurement. In Log Recall it is used to see the content of a record. In GLP it is used to
see all available informations. In SETUP, during date or time editing, it is used to move the
focus on the next setting item.
16) SETUP/DEL, press to enter/exit setup. The DEL function is available in Log Recall to delete
one or all records. In GLP it is used to delete the user calibration.
CONNECTORS DESCRIPTION
17) AC adapter connector, used to connect an external AC Adapter.
18) RS232 connector, used to transfer data through the RS232 connection. Use
HI 920011
serial cable to connect to the PC.
19) Tag reader connector. Touch the tag with the connector to read the location identification
number during logging.
20) USB connector, used to transfer data to the PC.
F U N C T I O N A L D E S C R I P T I O N
F U N C T I O N A L D E S C R I P T I O N
F U N C T I O N A L D E S C R I P T I O N
F U N C T I O N A L D E S C R I P T I O N
F U N C T I O N A L D E S C R I P T I O N
INSTRUMENT DESCRIPTION
1) Cuvet Lid. Close the cuvet lid prior to start a measurement.
2) Cuvet Holder. Insert the cuvet into the holder with the cuvet mark matching the case mark.
3) Liquid Crystal Display (LCD). The LCD has backlight for better visibility in dark environments.
4) Keypad. Splash proof resistant.
5) LED connector. Connect the new LED using a screwdriver during LED changing procedure.
6) LED. Replaceable infrared LED.
7) Battery Lid. Remove the battery lid in order to change batteries or replace the LED.
KEYPAD DESCRIPTION