Т³гж 11, Chapter 5: dvr setup - 5.5 recording frame rate, Chapter 5: dvr setup - 5.6 recording quality – Q-See DVR User Manual
Page 11: Chapter 7: playback
Q-See Q25DVR4ES User's Manual
Q-See Q25DVR4ES User's Manual
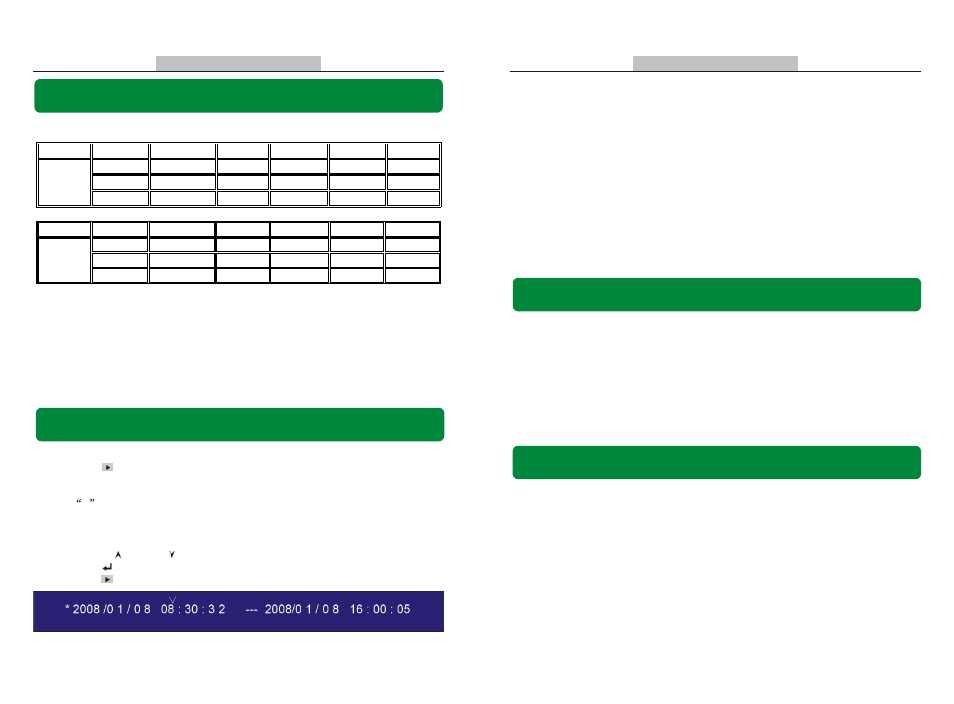
Chapter 6: Recording -6.3 Recording Time on Hard Drive
Estimated record time based on a 120GB Hard Drive (Quad Mode) Unit: Hour
Quality
Frame Rate
30
15
7
1
HIGH
NORMAL
LOW
20
15
12
58
78
97
117
155
194
251
332
416
1748
2330
2913
System
System
Quality
Frame Rate
1
HIGH
NORMAL
LOW
20
15
12
12
117
194
1748
2330
2913
NTSC
25
70
93
146
243
291
388
485
6
Estimated record time based on a 120GB Hard Drive (Quad Mode) in hours:
120 (G Byte) x 1024 (M Byte) x 1024 (K Byte)
Divided by:
15 (K Byte/frame) x 7 (frame/sec.) x 60 (sec.) x 60 (min.)
Estimated time would be 332 Hours
Page 10
Page 17
[QUAD] button and hold for three (3) seconds to make each video
channel enlarge to full screen.
The full screen will be displayed for three (3) seconds, including Quad view.
The Loop Function will continue until any button is pushed.
For example, [Stop] will stop the Loop function and may stop the recording
depending on Record Schedule Settings.
2. Quad Mode: The DVR will compress and record all 4 video channels
into one file, therefore user cannot enlarge a single channel to full screen in
play back mode.
User can not use the video Loop Function in this mode.
Chapter 5: DVR Setup - 5.5 Recording Frame Rate
Chapter 5: DVR Setup - 5.6 Recording Quality
There are three levels of recording quality, High, Normal, and Low.
Higher quality uses more hard drive space.
Record frame rate, record quality and available hard drive space will affect
the total recording time of the DVR system.
Chapter 7: Playback
Press [ Play] to play the last recording.
Note: The DVR will play the last recording which has not been previously played
until all recordings have been played.
*
Marks un-played video recording.
During playback, press the [Menu] button to initiate the Time Search feature then
the system will list all recorded video clips from the hard drive.
Newest video will at the top of the list, press [FF] to change the select mode and
then press [ Up] and [ Down] to select start time or date to change.
Press [ Select] to edit time value.
Press [ Play] again to continue playing the video.
Recording frame rate will affect the movement of objects in recorded video. More frames
per second gives smoother movement and uses more hard disk space.
System default value is 30fps (frames per second) for NTSC (PAL is 25fps), which means
the system will record 30 frames per second shared by all cameras. User can set frame rate
for NTSC to 30,15,10,7,5,4,3,2,1 frames per second (PAL is 25,12,8,6,4,3,2,1)
PAL