Initial installation, Re-installation, Connections setup – Daewoo DRV-6815 User Manual
Page 20
19
CONNECTIONS
SETUP
After successfully connecting your DVD Recorder + VCR to your TV and other devices,
this chapter will show you how to complete the initial installation.
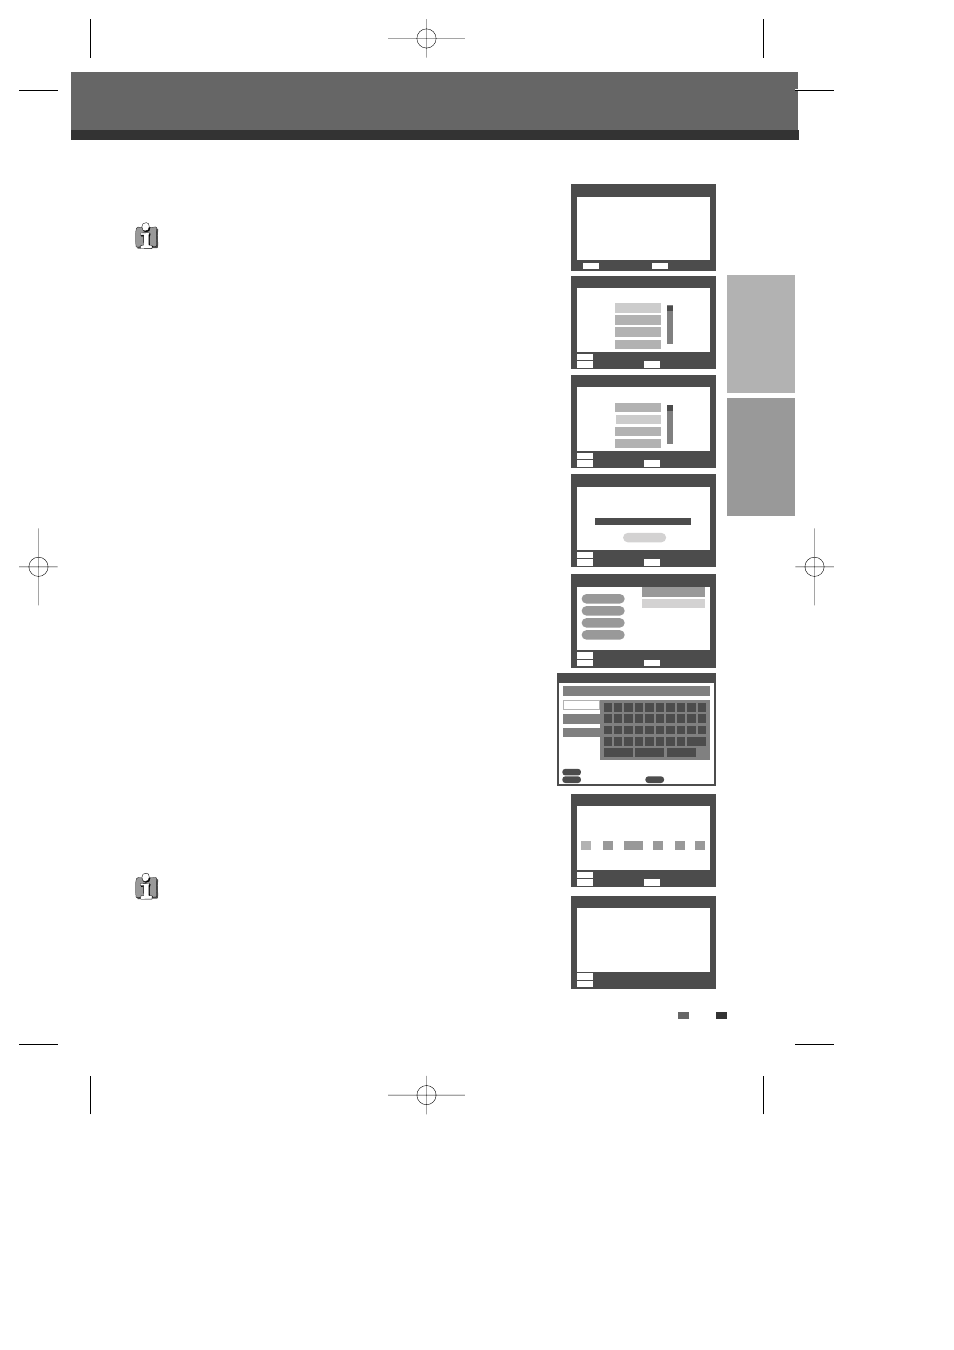
1
A ‘Welcome’ message is displayed on the screen. Make sure the RF cable from
your antenna or cable TV jack is connected. Press [ENTER] to begin initial
installation.
2
Select the desired language for the on-screen menu using [… †]. Press [ENTER]
to confirm.
3
Select the desired country using [… †]. Press [ENTER] to confirm.
4
The DVD Recorder + VCR detects channels automatically and stores them in
memory.
5
After finishing Auto Channel Search, adjust channels. You can move up, move
down, delete and edit channels.
Press [œ] to select ‘Move Up’, ‘Move Down’, ‘Delete’ or ‘Edit’ while a channel is
selected.
If you press [ENTER] while ‘Move Up’ or ‘Move Down’ is selected, the channel’s
order will move up or down.
If you want to delete the channel, press [ENTER] while ‘Delete’ is selected.
When you want to edit the channel, press [ENTER] while ‘Edit’ is selected.
Keyboard screen will appear. To enter characters, see page 31~32.
6
Set the clock after adjusting channels.
Use [œ √] to move left/right and use [… †] to change the settings.
7
After setting the clock, press [ENTER] to confirm. If you cancel the process during
Initial Installation, you should repeat this procedure.
You must follow the initial installation process to set the time, date, channels, and
language preferences for the DVD Recorder + VCR.
Initial Installation
Initial Installation
Re-Installation
This set is equipped with the multi-tuner for receiving many countries' broadcasting.
In order to receive broadcasting of different countries, follow as below.
1
Press [SETUP] and select the 'Restore Defaults' using [œ √]. Then, RESET the
set. (see page 29)
2
Power On, then you see the 'Initial Installation'.
3
Select the country which you want to (see step 3), then repeat the steps 4~7.
Welcome
1/7
Before using the recorder,
please finish the Initial Wizard.
Next
Exit
ENTER
SETUP
Finish
7/7
Finished the Initial Wizard!
Please enjoy using the recorder.
OSD Language
2/7
Select an OSD language.
Prev
Next
Exit
ENTER
MENU
SETUP
French
Spanish
Portuguese
…
†
†
English
Country Setting
3/7
Select your current country.
Denmark
Finland
…
†
†
†
Australia
Belgium
Auto Scan
4/7
Auto scan the channels.
Channels found :1
1%
Adjust Channels
5/7
Move Up
Move Down
Delete
Edit
†
†
No
Name
1
BBC1
2
RTP1
3
- - - -
†
Cancel
Clock Setting
6/7
Set the system time.
Date : Time:
31 /
08
/
2010
01
:
50
:
42
…
†
Rename
0
1
2
3
4
5
6
7
8
9
a
b
c
d
e
f
g
h
i
_
j
k
l
m
n
o
p
q
r
.
s
Backspace
Save
Cancel
t
u
v
w
x
y
z
Space
BBC1
a Page
A Page
Symbol
Prev
Next
Exit
ENTER
MENU
SETUP
Prev
Next
Exit
ENTER
MENU
SETUP
Prev
Next
Exit
ENTER
MENU
SETUP
Prev
Next
Exit
ENTER
MENU
SETUP
Prev
Next
ENTER
MENU
Confirm
Back
Clear
CLEAR
ENTER
MENU
DF-H7DD3D-FB-I(GB) 2007.7.25 2:53 PM ˘
` 19 mac001 1200DPI 100LPI